Sig Engineering - Part 1 - Solana's Gossip Protocol

This post is Part 1 of a multi-part blog post series we'll be releasing periodically to outline Sig Validator's engineering updates/milestones.
This blog post from the Syndica team marks a major milestone completion in Sig's journey: The initial implementation of the gossip protocol. This post will contain the details of the implementation.
A gossip protocol propagates data to nodes across a network efficiently. It is a core component of a distributed system and acts as a node’s entry point to the network, allowing it to identify other nodes in the network and to receive and sync metadata about the state of the blockchain.
In essence, gossip is written to do two things: store data and send/receive requests. Doing these efficiently, is the goal of a well-implemented gossip protocol.
In line with our dedication to transparency, we've detailed below the Sig implementation of the Solana gossip protocol.
Storing Data
What is the GossipTable?
Solana’s gossip data is stored in the GossipTable structure (also known as a Cluster Replicated Data Store in the Agave client).
There are two main data types we store in the table:
The GossipData enum covers various gossip data types including, ContactInfo for node details like public keys and addresses, Vote for block validity signatures (being phased out for lower bandwidth), and more.
The SignedGossipData structure holds a GossipData instance and a signature over its data. When processing incoming SignedGossipData from the network, we verify the signature of the SignedGossipData and then store it in the GossipTable.
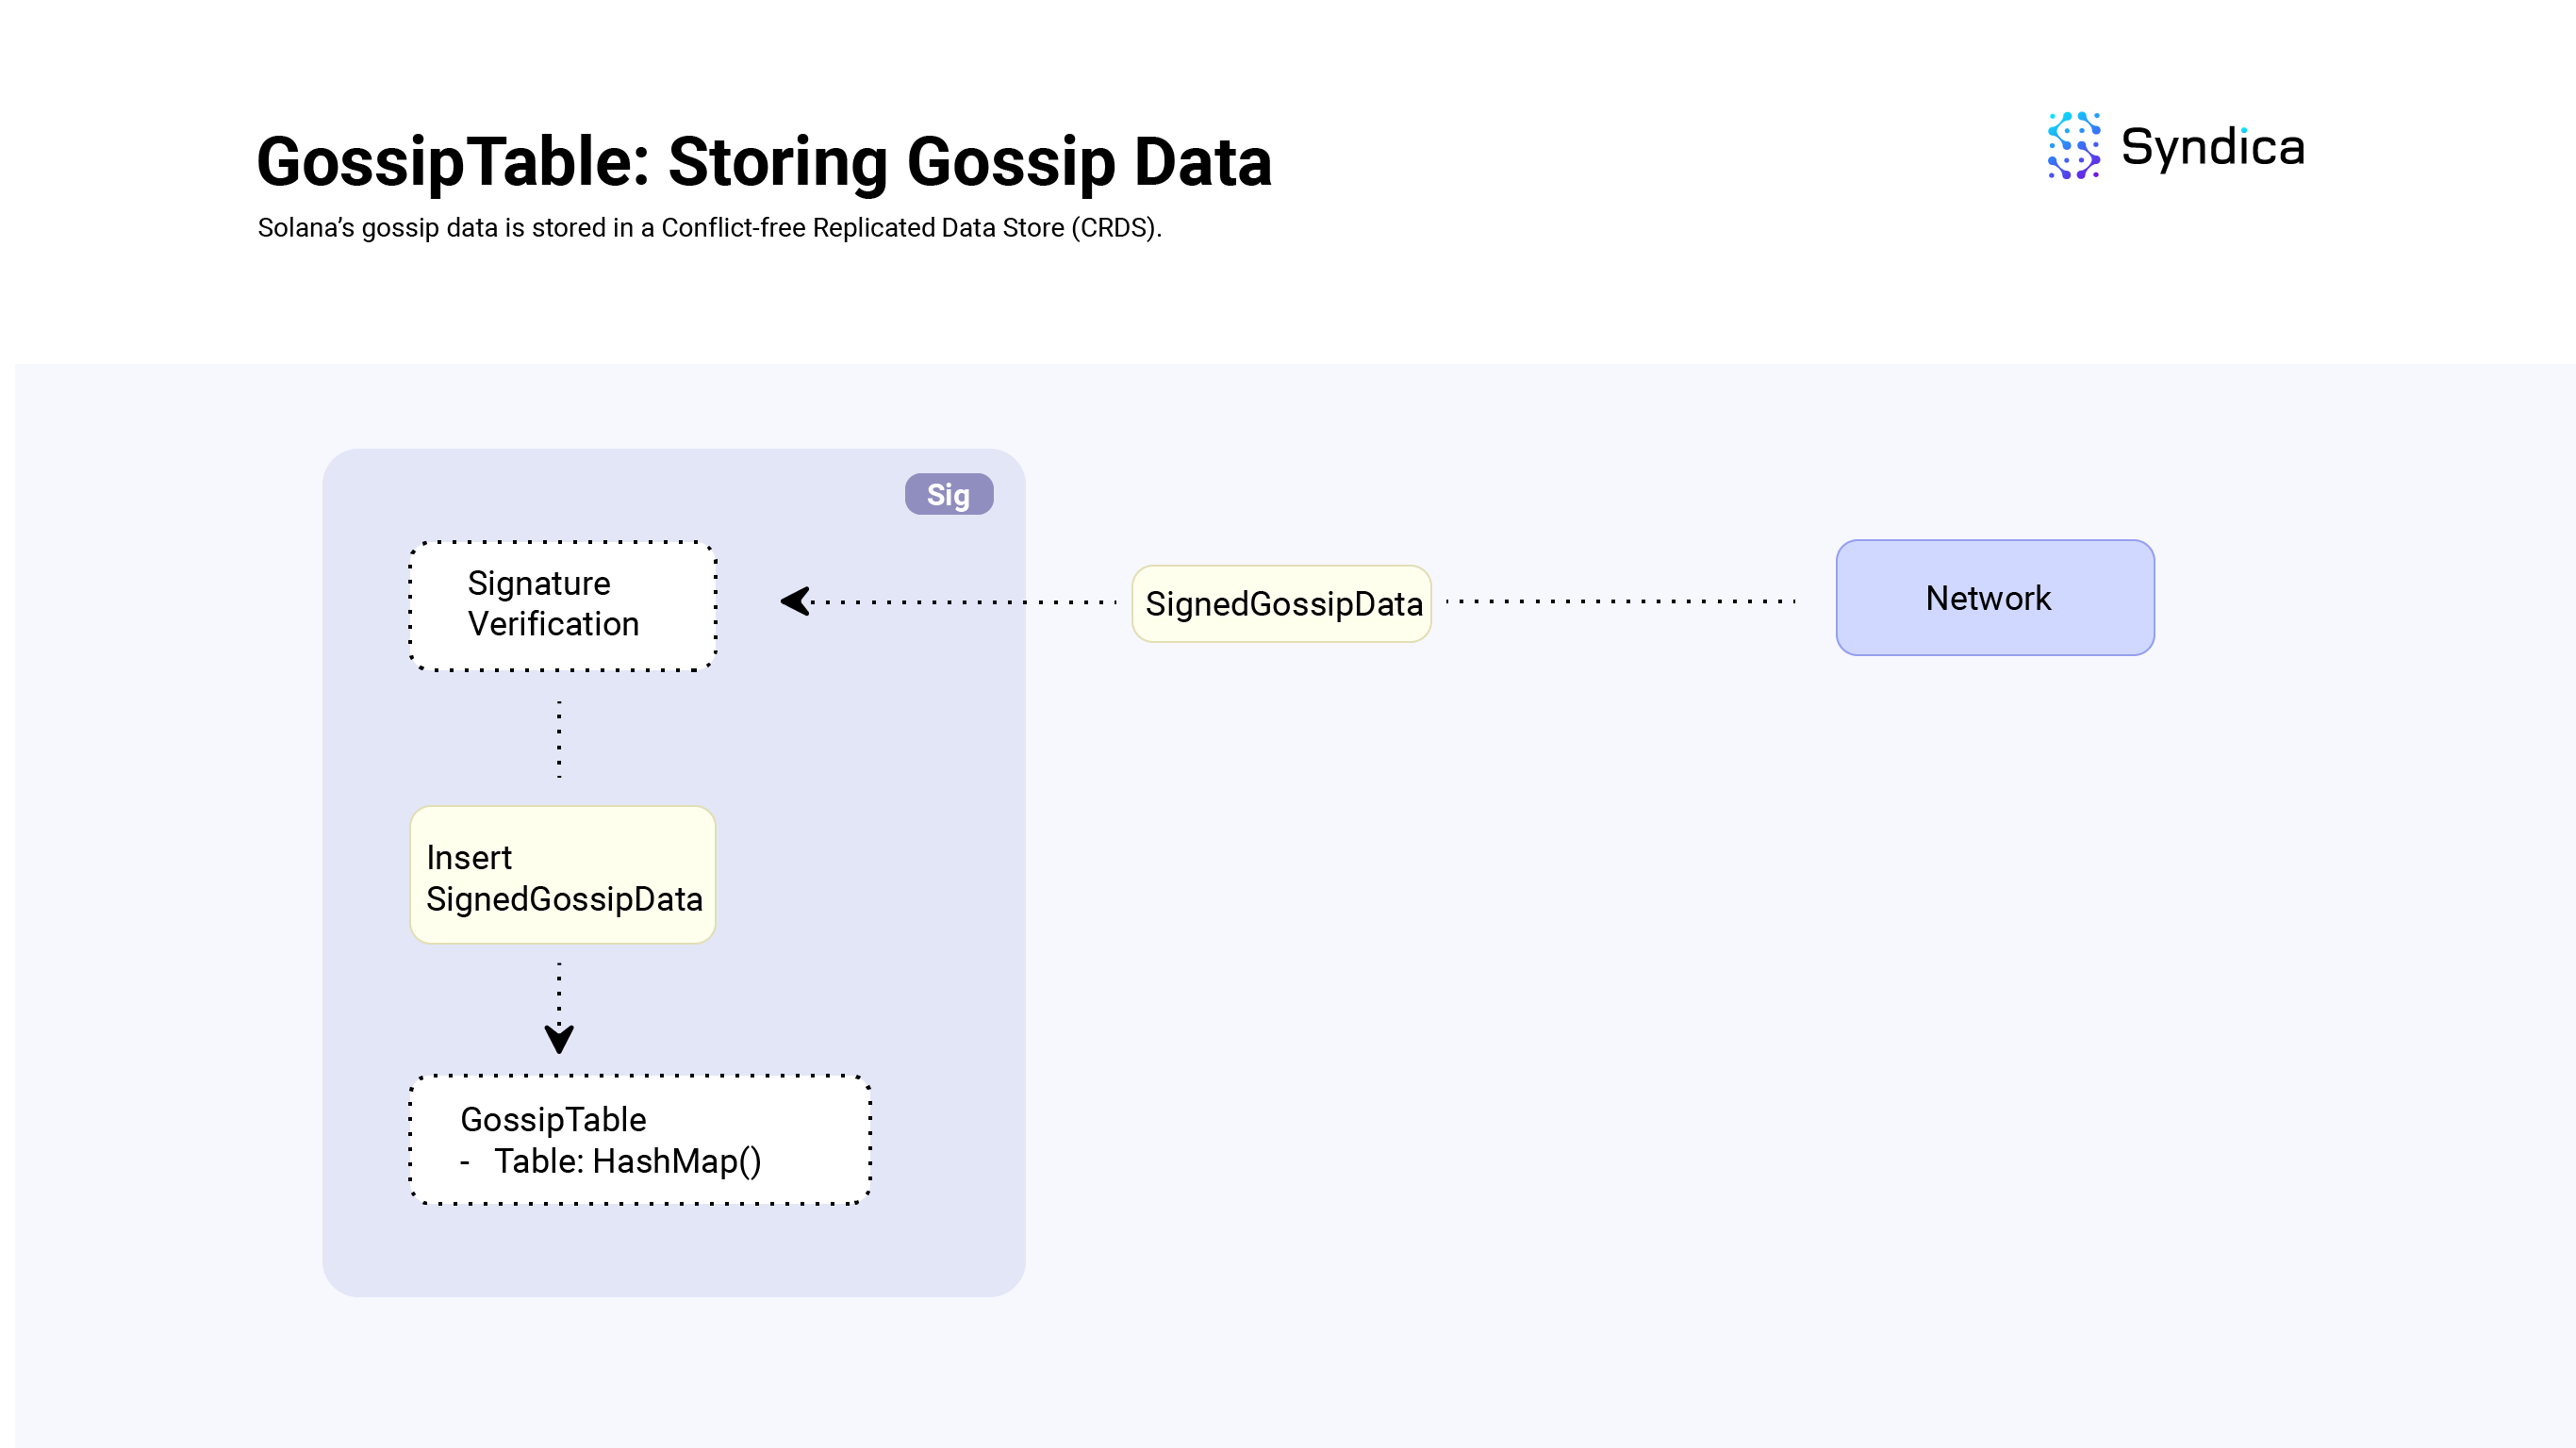
Inserting Data
The GossipTable is implemented using an indexable-HashMap.
For each SignedGossipData instance we want to store, there is a corresponding GossipKey which is used as the key for the HashMap and a GossipVersionedData structure for the value of the HashMap.
GossipKey
To understand how the GossipKey defines how data is stored, we start with an example.
One important data type we care about is the ContactInfo struct which includes the public key of the node and socket address fields that are used to communicate with the node. Its corresponding GossipKey is only its Pubkey.
This means we'll only store one ContactInfo per Pubkey in the GossipTable. If we assume that each validator corresponds to one identity Pubkey, then this means we'll only store one ContactInfo per validator.
// the full contact info struct (including pubkeys, sockets, and more)
pub const ContactInfo = struct {
    id: Pubkey,
    /// gossip address
    gossip: SocketAddr,
    /// address to send repair responses to
    repair: SocketAddr,
    /// transactions address
    tpu: SocketAddr,
    //...
}

// the corresponding key (only the Pubkey)
pub const GossipKey = union(enum) {
    ContactInfo: Pubkey,
    //...
}
When inserting data into the table, if the key already exists in the map, we keep the value with the largest wallclock time (i.e., we keep the 'newest' value).
GossipVersionedData
The GossipVersionedData structure contains the SignedGossipData inserted along with other related information including its hash, timestamps, and more.
pub const GossipVersionedData = struct {
    value: SignedGossipData,
    value_hash: Hash,
    timestamp_on_insertion: u64,
    cursor_on_insertion: u64,
};
Reading Data
When reading data stored in the table, one use case we care about is reading all the data of a specific type.
For example, when we want to broadcast data to the rest of the network, we need to retrieve all the ContactInfo values stored in the GossipTable. This is why we decided to use an indexable-HashMap.
To achieve this functionality, we need to slightly modify our insertion logic to the following:
- when we insert the value into the
GossipTable, we receive its corresponding index in the HashMap (gossip_index = gossip_table.insert(&versioned_value)), - we then store this index in an array corresponding to the specific type we’re tracking (
contact_infos.append(gossip_index)), and - when we want to retrieve all the values of that specific type, we look up all the indexes stored (
value = gossip_table[gossip_index]).
We follow this approach for the ContactInfo(s), Vote(s), EpochSlot(s) and DuplicateShred(s) data types.
Reading New Data
Another use case we care about is reading data that has been inserted after some point in time; we want to be able to read new data.
To efficiently read new data from the GossipTable, we utilize the cursor field. On each insertion, the cursor's value is stored inside the GossipVersionedData structure with the cursor_on_insertion field and cursor field is incremented by one.
To read new data, a thread can track a local cursor and periodically call a getter function such as getVotesWithCursor to retrieve values which are greater than the local cursor.
Note: This functionality is used to produce push messages - talked about in a later section.
Bounding Memory Size and Removing Old Data
To bound the memory growth of the GossipTable, it is periodically trimmed to maintain a max number of unique Pubkeys (8192 in the codebase) and values with old timestamps are removed.
We use the field pubkey_to_values to track all the values in the table associated with a specific node’s Pubkey and periodically call attemptTrim to remove all the values associated with the oldest pubkeys when close to capacity. removeOldLabels is called to remove values with old timestamps periodically as well.
In the Agave implementation, the pubkeys with the smallest stake weight are removed first, however, we don't have stake weight information yet in Sig. This will be future work.
Note: Since we are using an indexable-HashMap, when removing values we typically use the removeSwap function, which is defined as: "The entry is removed from the underlying array by swapping it with the last element and pop-ing". Since we are tracking the index of values across multiple arrays, when we removeSwap, the last value is now at a different index than how we recorded it, so we will need to update our index values. The full logic can be found in GossipTable.remove.
Sending/Receiving Requests
As gossip runs, we receive new messages from the network as raw bytes. Before processing these messages, we:
- deserialize the bytes into a
GossipMessage - verify the data contained in the message are valid, and
- verify the signatures are correct.
If any of these checks fail, we discard the value. Otherwise, we process the message.
Note: This verification logic can be found in GossipService.verifyPackets.
There are 4 types of messages used in the gossip protocol:
- Pull
- Push
- Prune
- Ping/Pong
Pull
Pull messages are used to retrieve new data from other nodes in the network. There are two types of Pull messages: PullRequest and PullResponse.
Building Pull Requests
Pull requests are requests for missing gossip data.
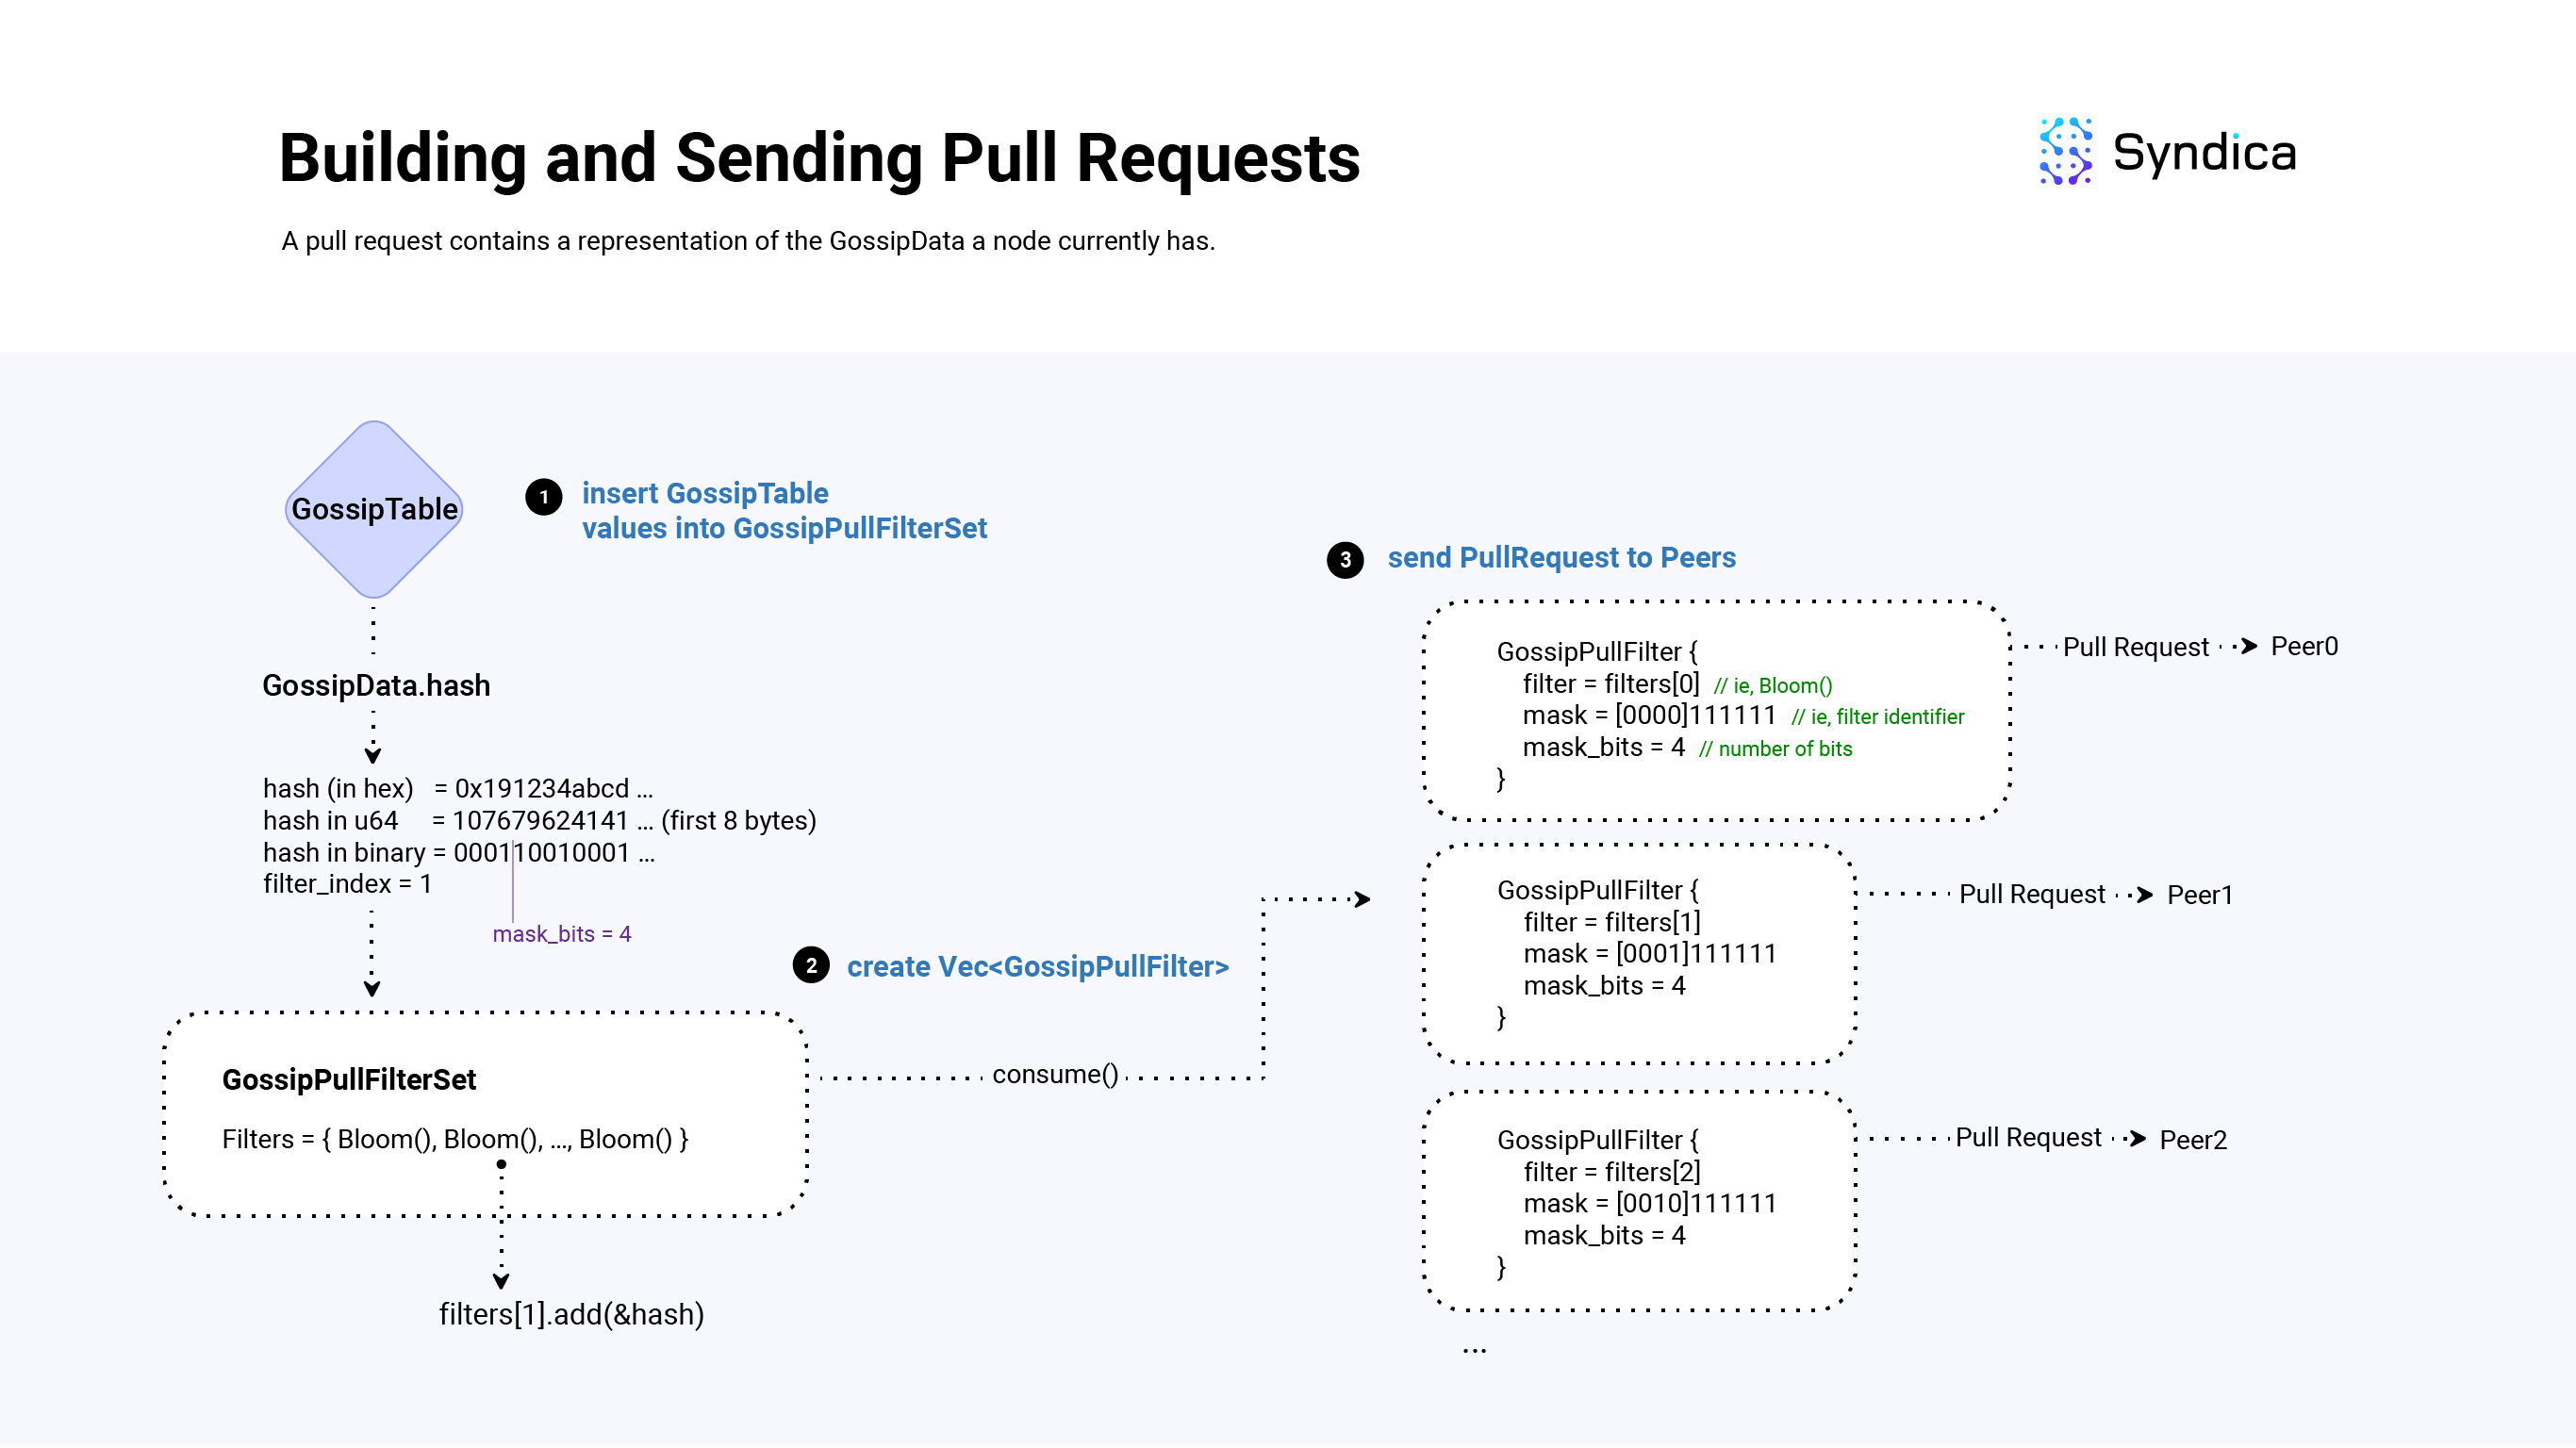
A pull request includes a Bloom filter over the values stored in the node's GossipTable to represent the SignedGossipData(s) it currently has, which the receiving node parses and uses to find SignedGossipData(s) which are missing, and sends them to the requesting node as a response.
Since the GossipTable can store a large amount of values, instead of constructing one large Bloom filter, the GossipTable is partitioned across multiple Bloom filters based on the first N bits of the SignedGossipData(s) hash.
To implement this we use the GossipPullFilterSet struct which is a list of GossipPullFilter(s).
For example, if we are partitioning on the first 3 bits of the hash, we would use 2^3 = 8 Bloom filters:
- the first Bloom filter would contain
SignedGossipDatawhose hash has its first3bits equal to000, - the second Bloom filter would contain
SignedGossipData(s) whose hash has its first3bits equal to001, - ...
- and lastly, the eighth Bloom filter would contain
SignedGossipData(s) whose hash has its first3bits equal to111.
If we are tracking a Hash with bits 00101110101, we would only consider its first 3 bits, 001, and add the hash to the first Bloom filter (@cast(usize, 001) = 1).
Note: throughout the codebase, the first bits: N, is called mask_bits. mask_bits is a field that is computed based on many factors including the desired false-positive rate of the bloom filters, the number of items in the GossipTable, and more. It will likely be different for each pull request.
After we construct the GossipPullFilterSet (i.e., compute mask_bits and init 2^mask_bits Bloom filters), we add all of the SignedGossipData(s) in the GossipTable into the set, and construct a list of GossipPullFilter(s) to send to other random nodes.
## main function for building pull requests
def buildGossipPullFilters(
    gossip_table: *GossipTable
) Vec<GossipPullFilters>:
    values = gossip_table.values()
    filter_set = GossipPullFilterSet.init(len(values))

    for value in values:
        filter_set.add(value)

    # GossipPullFilterSet => Vec<GossipPullFilter>
    return filter_set.consumeForGossipPullFilters()

class GossipPullFilterSet():
    mask_bits: u64
    filters: Vec<Bloom>

    def init(self, num_items):
        self.mask_bits = ... # compute the mask_bits
        n_filters = 1 << mask_bits # 2^mask_bits

        self.filters = []
        for i in 0..n_filters:
            self.filters.append(Bloom.random())

    def add(hash: Hash):
        # compute the hash index (i.e., the first mask_bits bits of the Hash)
        # eg:
        # hash: 001010101010101..1
        # mask_bits = 3
        # shift_bits = 64 - 3 (note: u64 has 64 bits)
        # hash >> shift_bits = 001 (first three bits) = index 1
        # == filters[1].add(hash)
        shift_bits = 64 - mask_bits
        index = @as(usize, hash >> shift_bits)
        self.filters[index].add(hash)
To build a list of GossipPullFilter(s) from a GossipPullFilterSet, each GossipPullFilter will need a Bloom filter to represent a subset of the SignedGossipData(s), and a field to identify the hash bits that the Bloom filter contains (using a field called mask).
For example, the mask of the first filter would be 000, the mask of the second filter would be 001, the mask of the third filter would be 010, ...
When a node receives a pull request, the mask is used to efficiently look up all the matching SignedGossipData(s).
For example, if you received the 010 mask, you would look up all hash values whose first 3 bits are 010 and then find values that are not included in the request's Bloom filter. These values would then be included to build a pull response.
def consumeForGossipPullFilters(self: GossipPullFilterSet) Vec<GossipPullFilters>:
    for index in 0..len(self.filters):
        filter = GossipPullFilter(
            bloom=self.filters[index],
            mask=computeMask(index, self.mask_bits),
            mask_bits=self.mask_bits,
        )
To compute the mask of a given filter index, the logic is similar to the bit operations above:
def computeMask(index: u64, mask_bits: u64) u64:
    # shift the index to the first `mask_bits` of the u64
    # e.g.,
    # index = 1
    # mask_bits = 3
    # shift_bits = 64 - 3 (note: u64 has 64 bits)
    shift_bits = 64 - mask_bits
    # shifted_index = 1 << (64 - 3) = 001000000000000...0
    shifted_index = index << shift_bits
    # ones = 000111111111111..1
    ones = (~@as(u64, 0) >> @as(u6, @intCast(mask_bits)))
    # result = 001111111111111..1
    return shifted_index | ones
Notice how the result will be ones everywhere except for the first mask_bits bits, which represent the filter's index. After getting the vector of filters, we then send each filter out to a random peer weighted by stake weight.
Note: When constructing pull requests, in addition to all the values in the GossipTable, we also insert values that were recently overwritten (which is tracked in the purged field), and invalid values that were received from a previous PullResponse (discussed more in the 'Handling Pull Responses' section) into the bloom filter.
Building Pull Responses
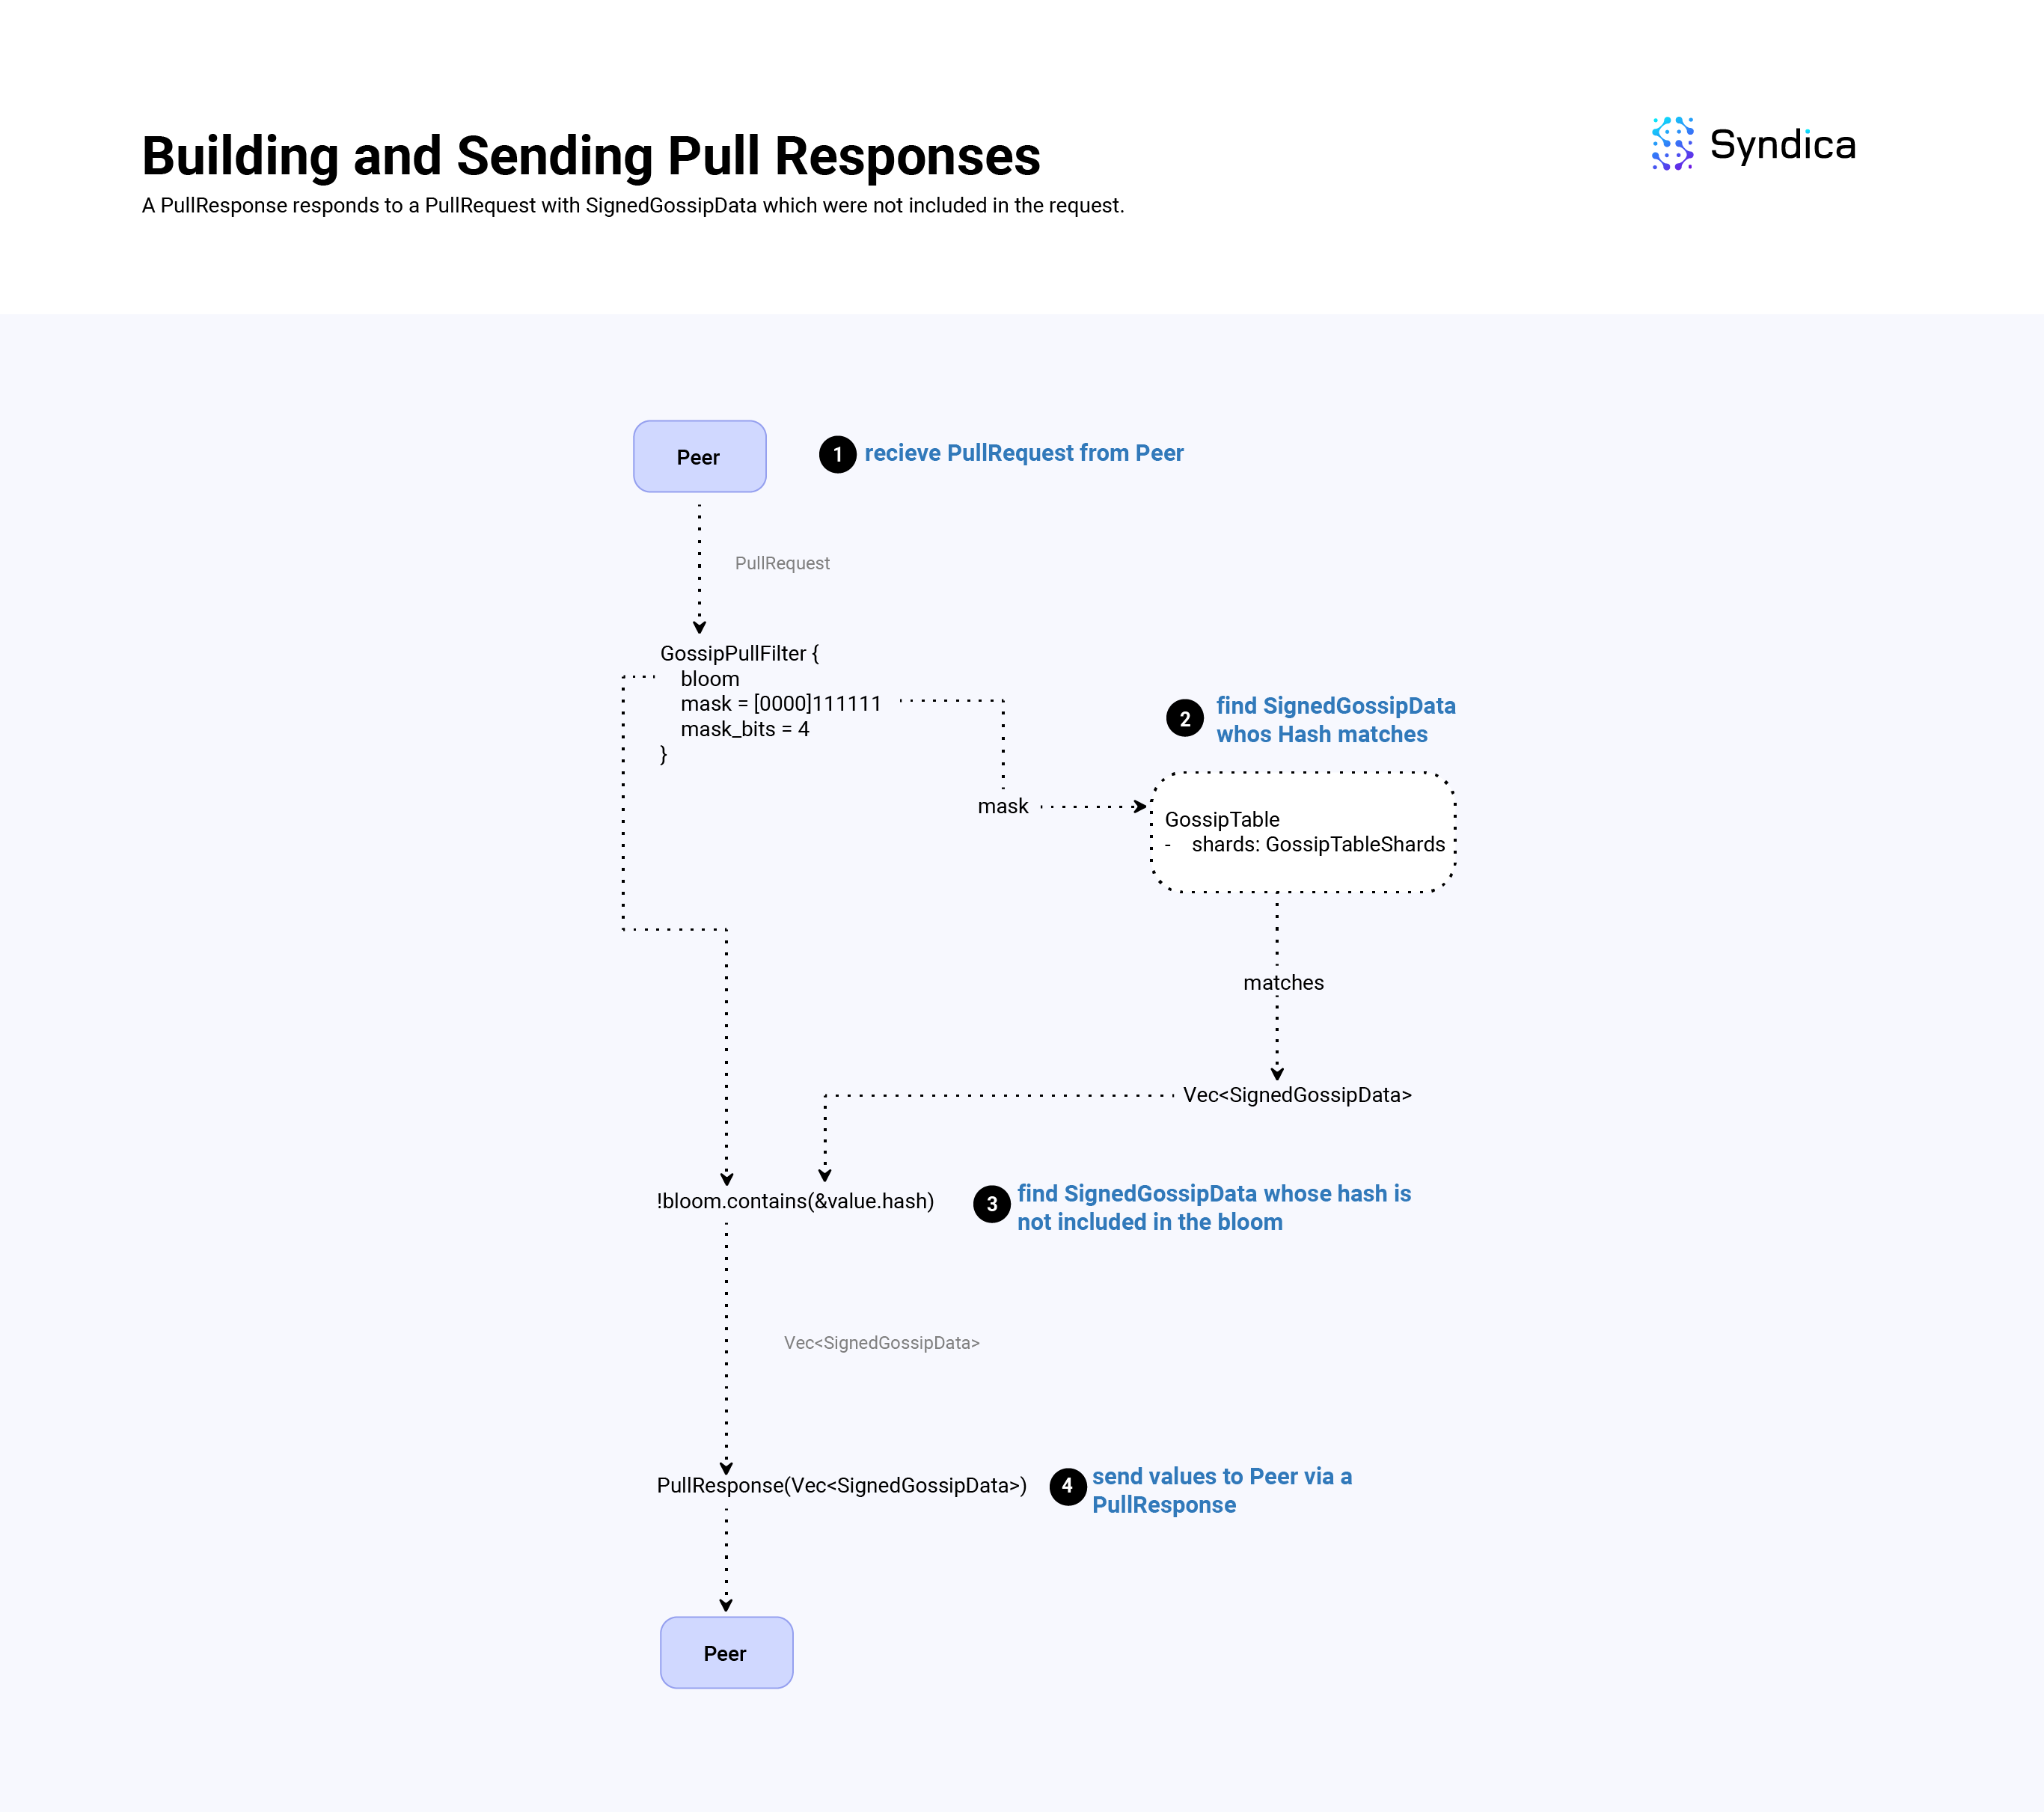
Pull responses are responses to pull requests and include missing data that was not included in the pull request.
To build a pull response, we find values that match the GossipPullFilter's mask, and respond with values that are not included in the request's Bloom filter. To find values that match the filter's mask, we use the GossipTableShards struct.
What are GossipTableShards?
The GossipTableShards structure acts as a lookup table for matching hash values stored in the GossipTable to more efficiently respond to pull requests.
More specifically, the GossipTableShards stores hash values based on the first shard_bits of a hash value (similar to the GossipPullFilterSet structure and the mask_bits). Whenever we insert a new value in the GossipTable, we insert its hash into the GossipTableShards structure.
To store these hashes efficiently we use an array of HashMaps (shards = [4096]AutoArrayHashMap(usize, u64),) where shards[k] includes SignedGossipData(s) in which the first shard_bits of their hash value is equal to k.
- The keys in the HashMap are of type
usizewhich is theGossipTableindex of the hash. - And the values of the HashMap are of type
u64which represents the hash value represented as au64.
The struct allows us to quickly look up all the SignedGossipData(s) whose hash matches a pull request's mask (compared to iterating over all the SignedGossipData(s)).
Note: shard_bits is a hardcoded constant in the program equal to 12, so we will have 2^12 = 4096 shard indexes.
After inserting a new value in the GossipTable, inserting its hash value into the GossipTableShards struct is straightforward:
- take the first 8 bytes of the
SignedGossipData(s) hash and cast it to au64(hash_u64 = @as(u64, hash[0..8])), - compute the first
shard_bitsbits of theu64by computingshard_index = hash_u64 >> (64 - shard_bits), - get the corresponding shard:
self.shards[shard_index], and lastly, - insert the
GossipTableindex along with theu64_hashinto the shard.
def insert(self: *GossipTableShards, table_index: usize, hash: *const Hash):
    shard_index = @as(u64, hash[0..8]) >> (64 - shard_bits)
    shard = self.shard[shard_index]
    shard.put(table_index, uhash);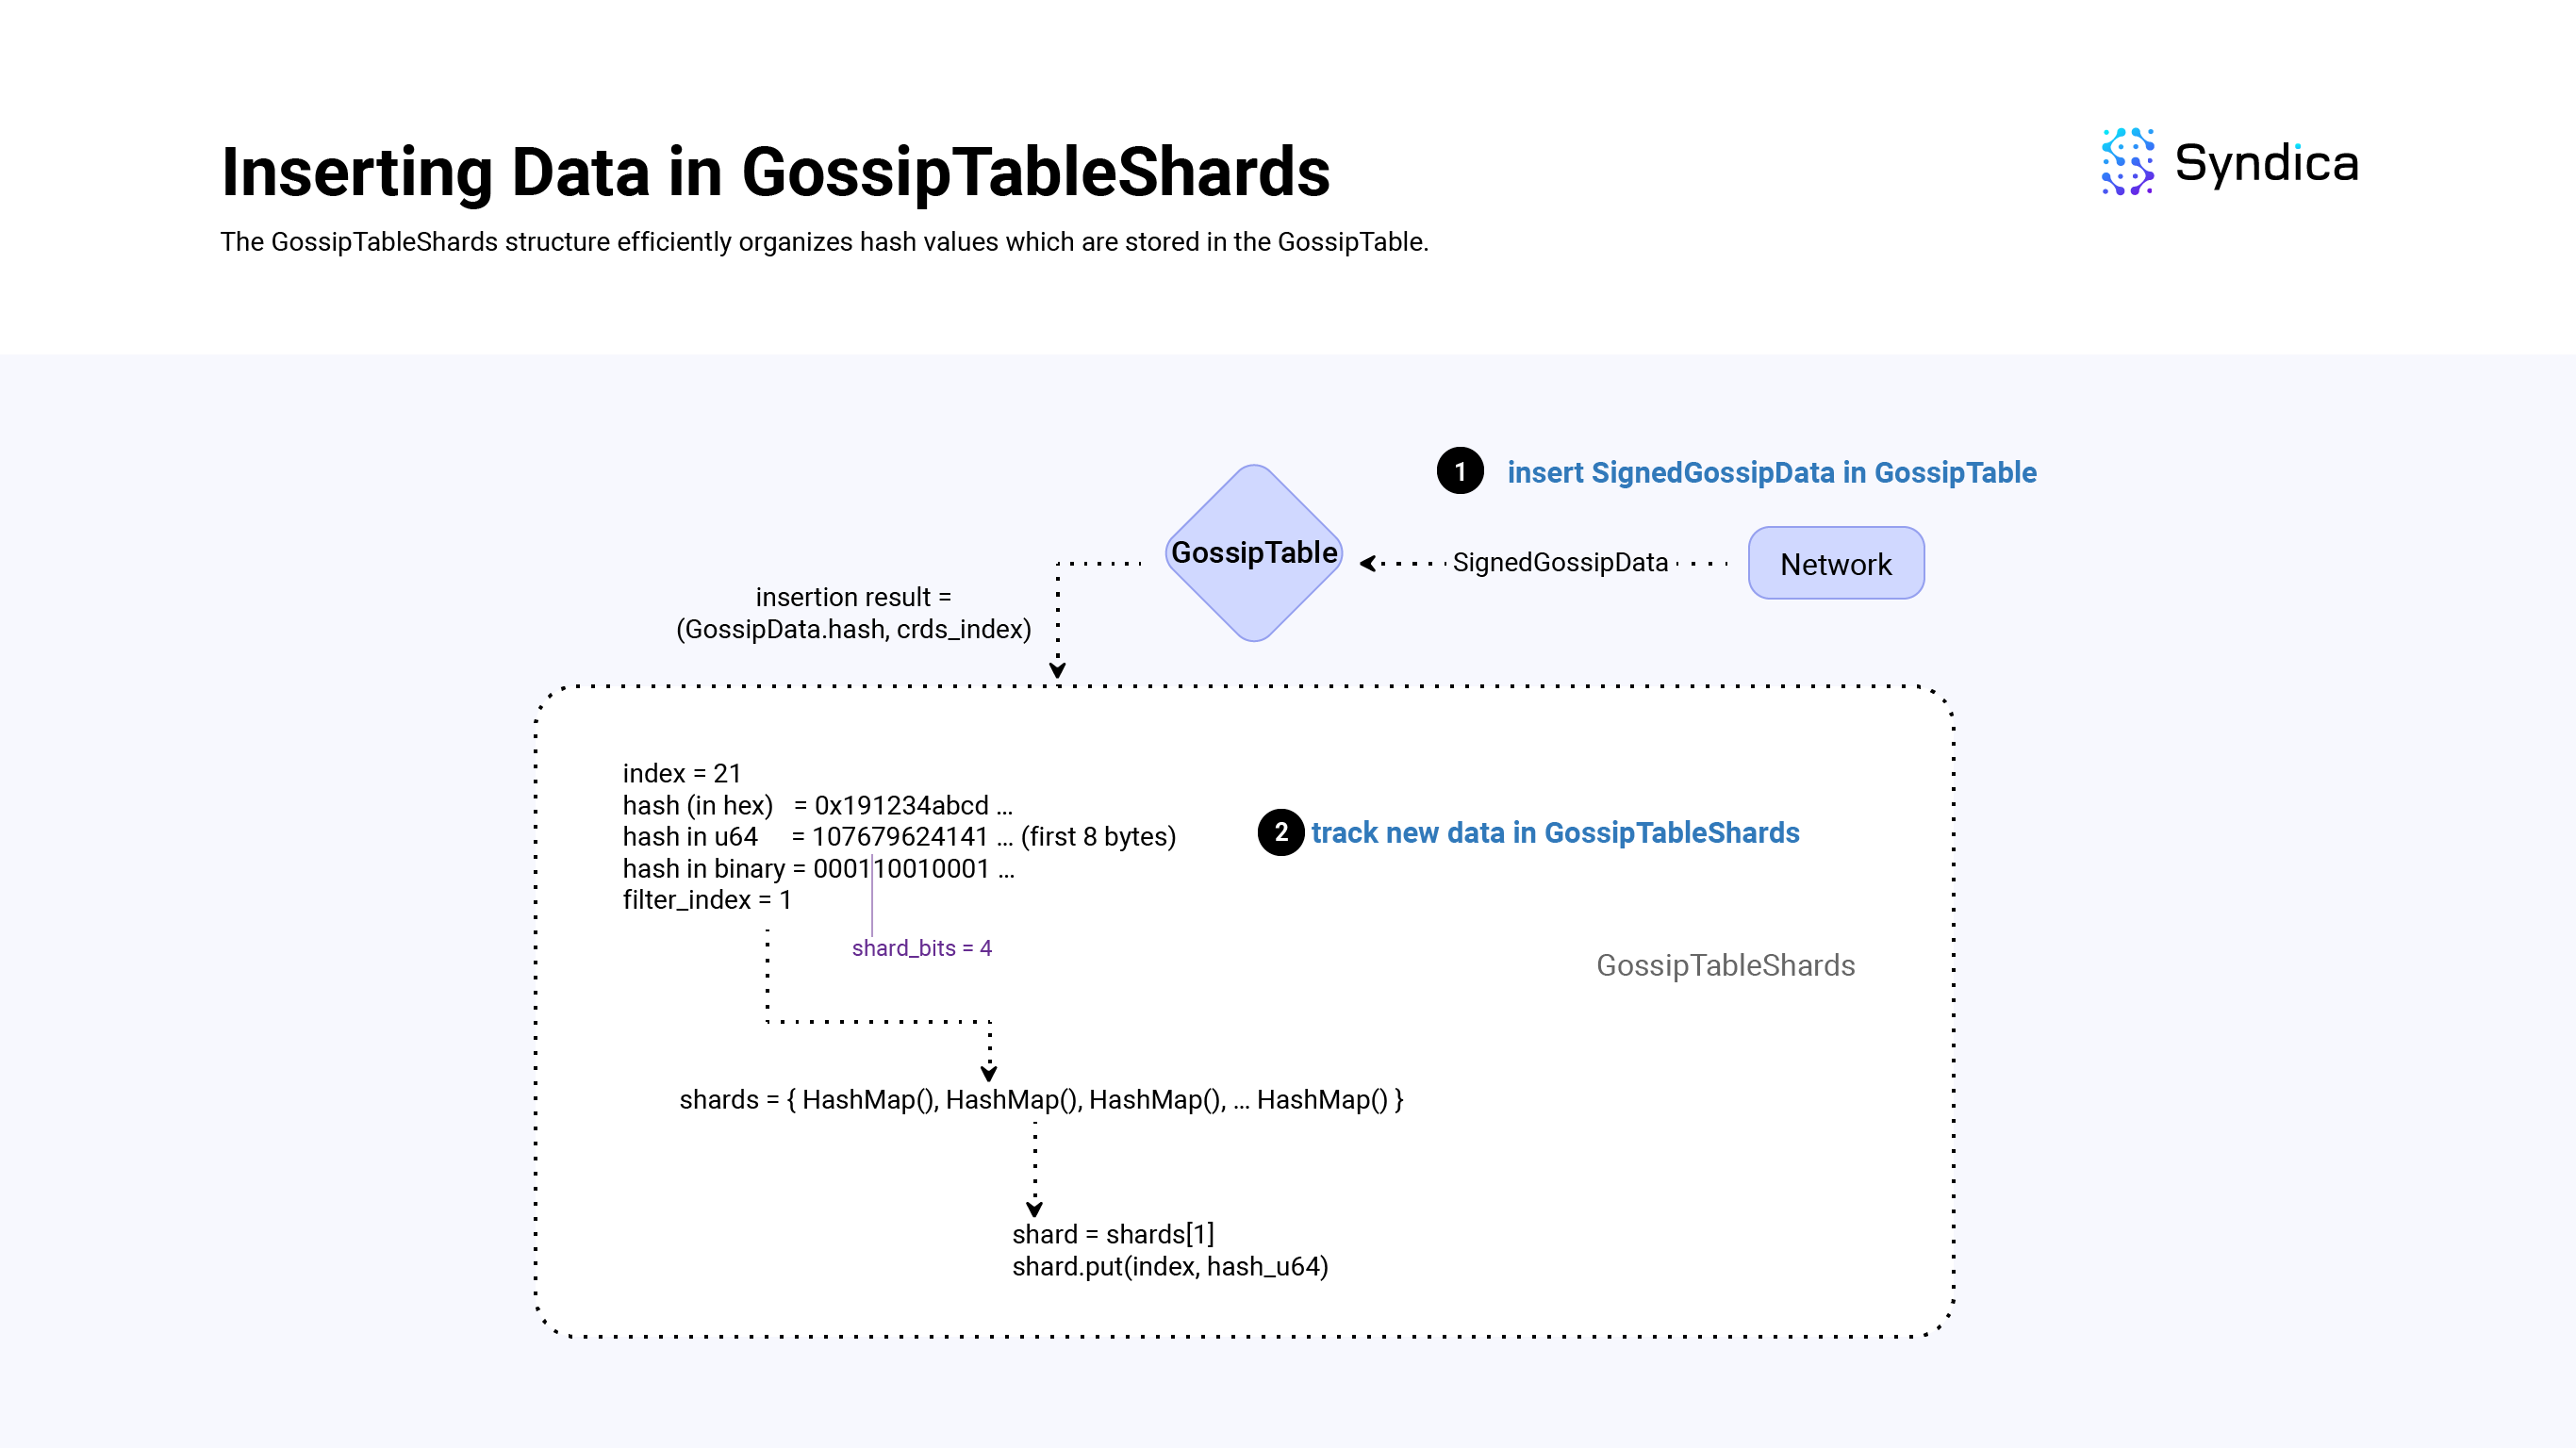
Using GossipTableShards for finding hash matches
To build a pull response, we need to retrieve values from the GossipTable whose hash matches a mask (i.e., their first mask_bit bits are equal to mask).
To find these matches there are three cases we need to consider:
shard_bits == mask_bitsshard_bits < mask_bitsshard_bits > mask_bits
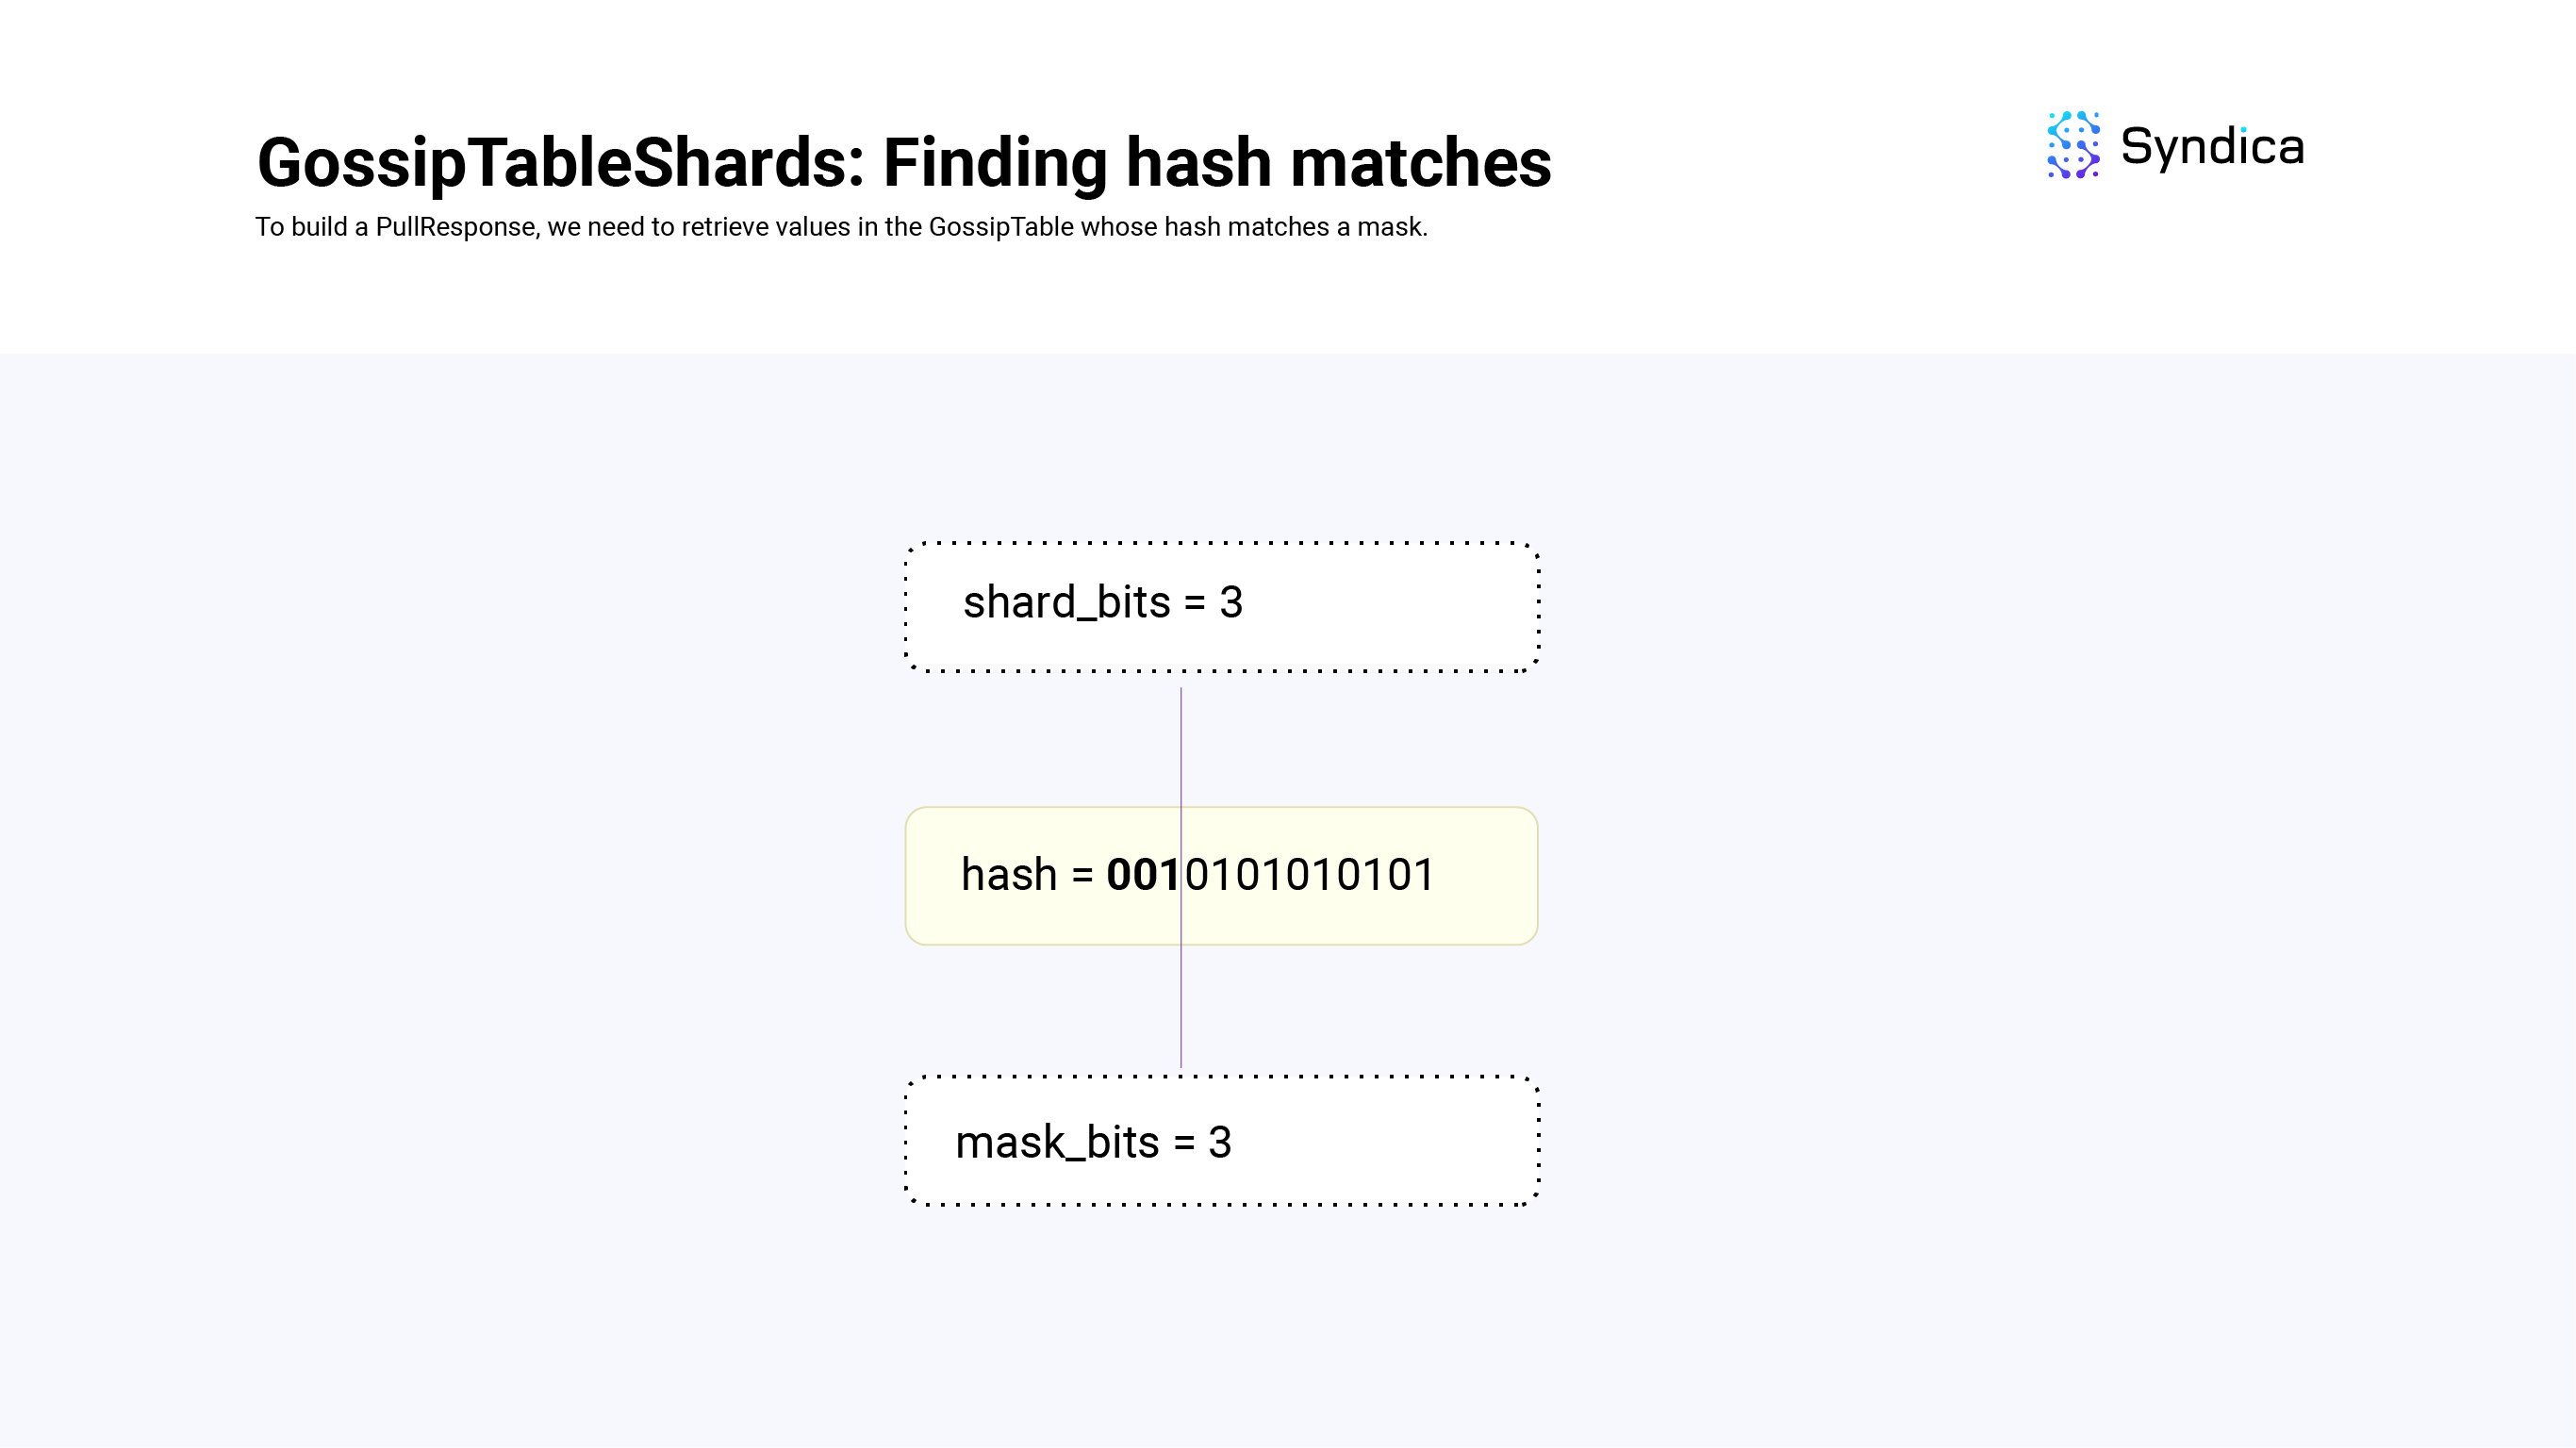
When shard_bits == mask_bits, we look at the shard corresponding to the first shard_bits of mask and return its values.
For example, if shard_bits = 3, mask_bits = 3 and our mask is 001, we can find all the GossipTable values whose first 3 bits of their hash value is equal to 001 by looking up shards[1].
def findMatches(self: *GossipTableShards, mask: u64, mask_bits: u64) Vec<usize>:
    if (self.shard_bits == mask_bits) {
        shard = self.shard[(mask >> (64 - self.shard_bits)]
        table_indexes = shard.keys()
        return table_indexes
    } else {
        # TODO:
    }
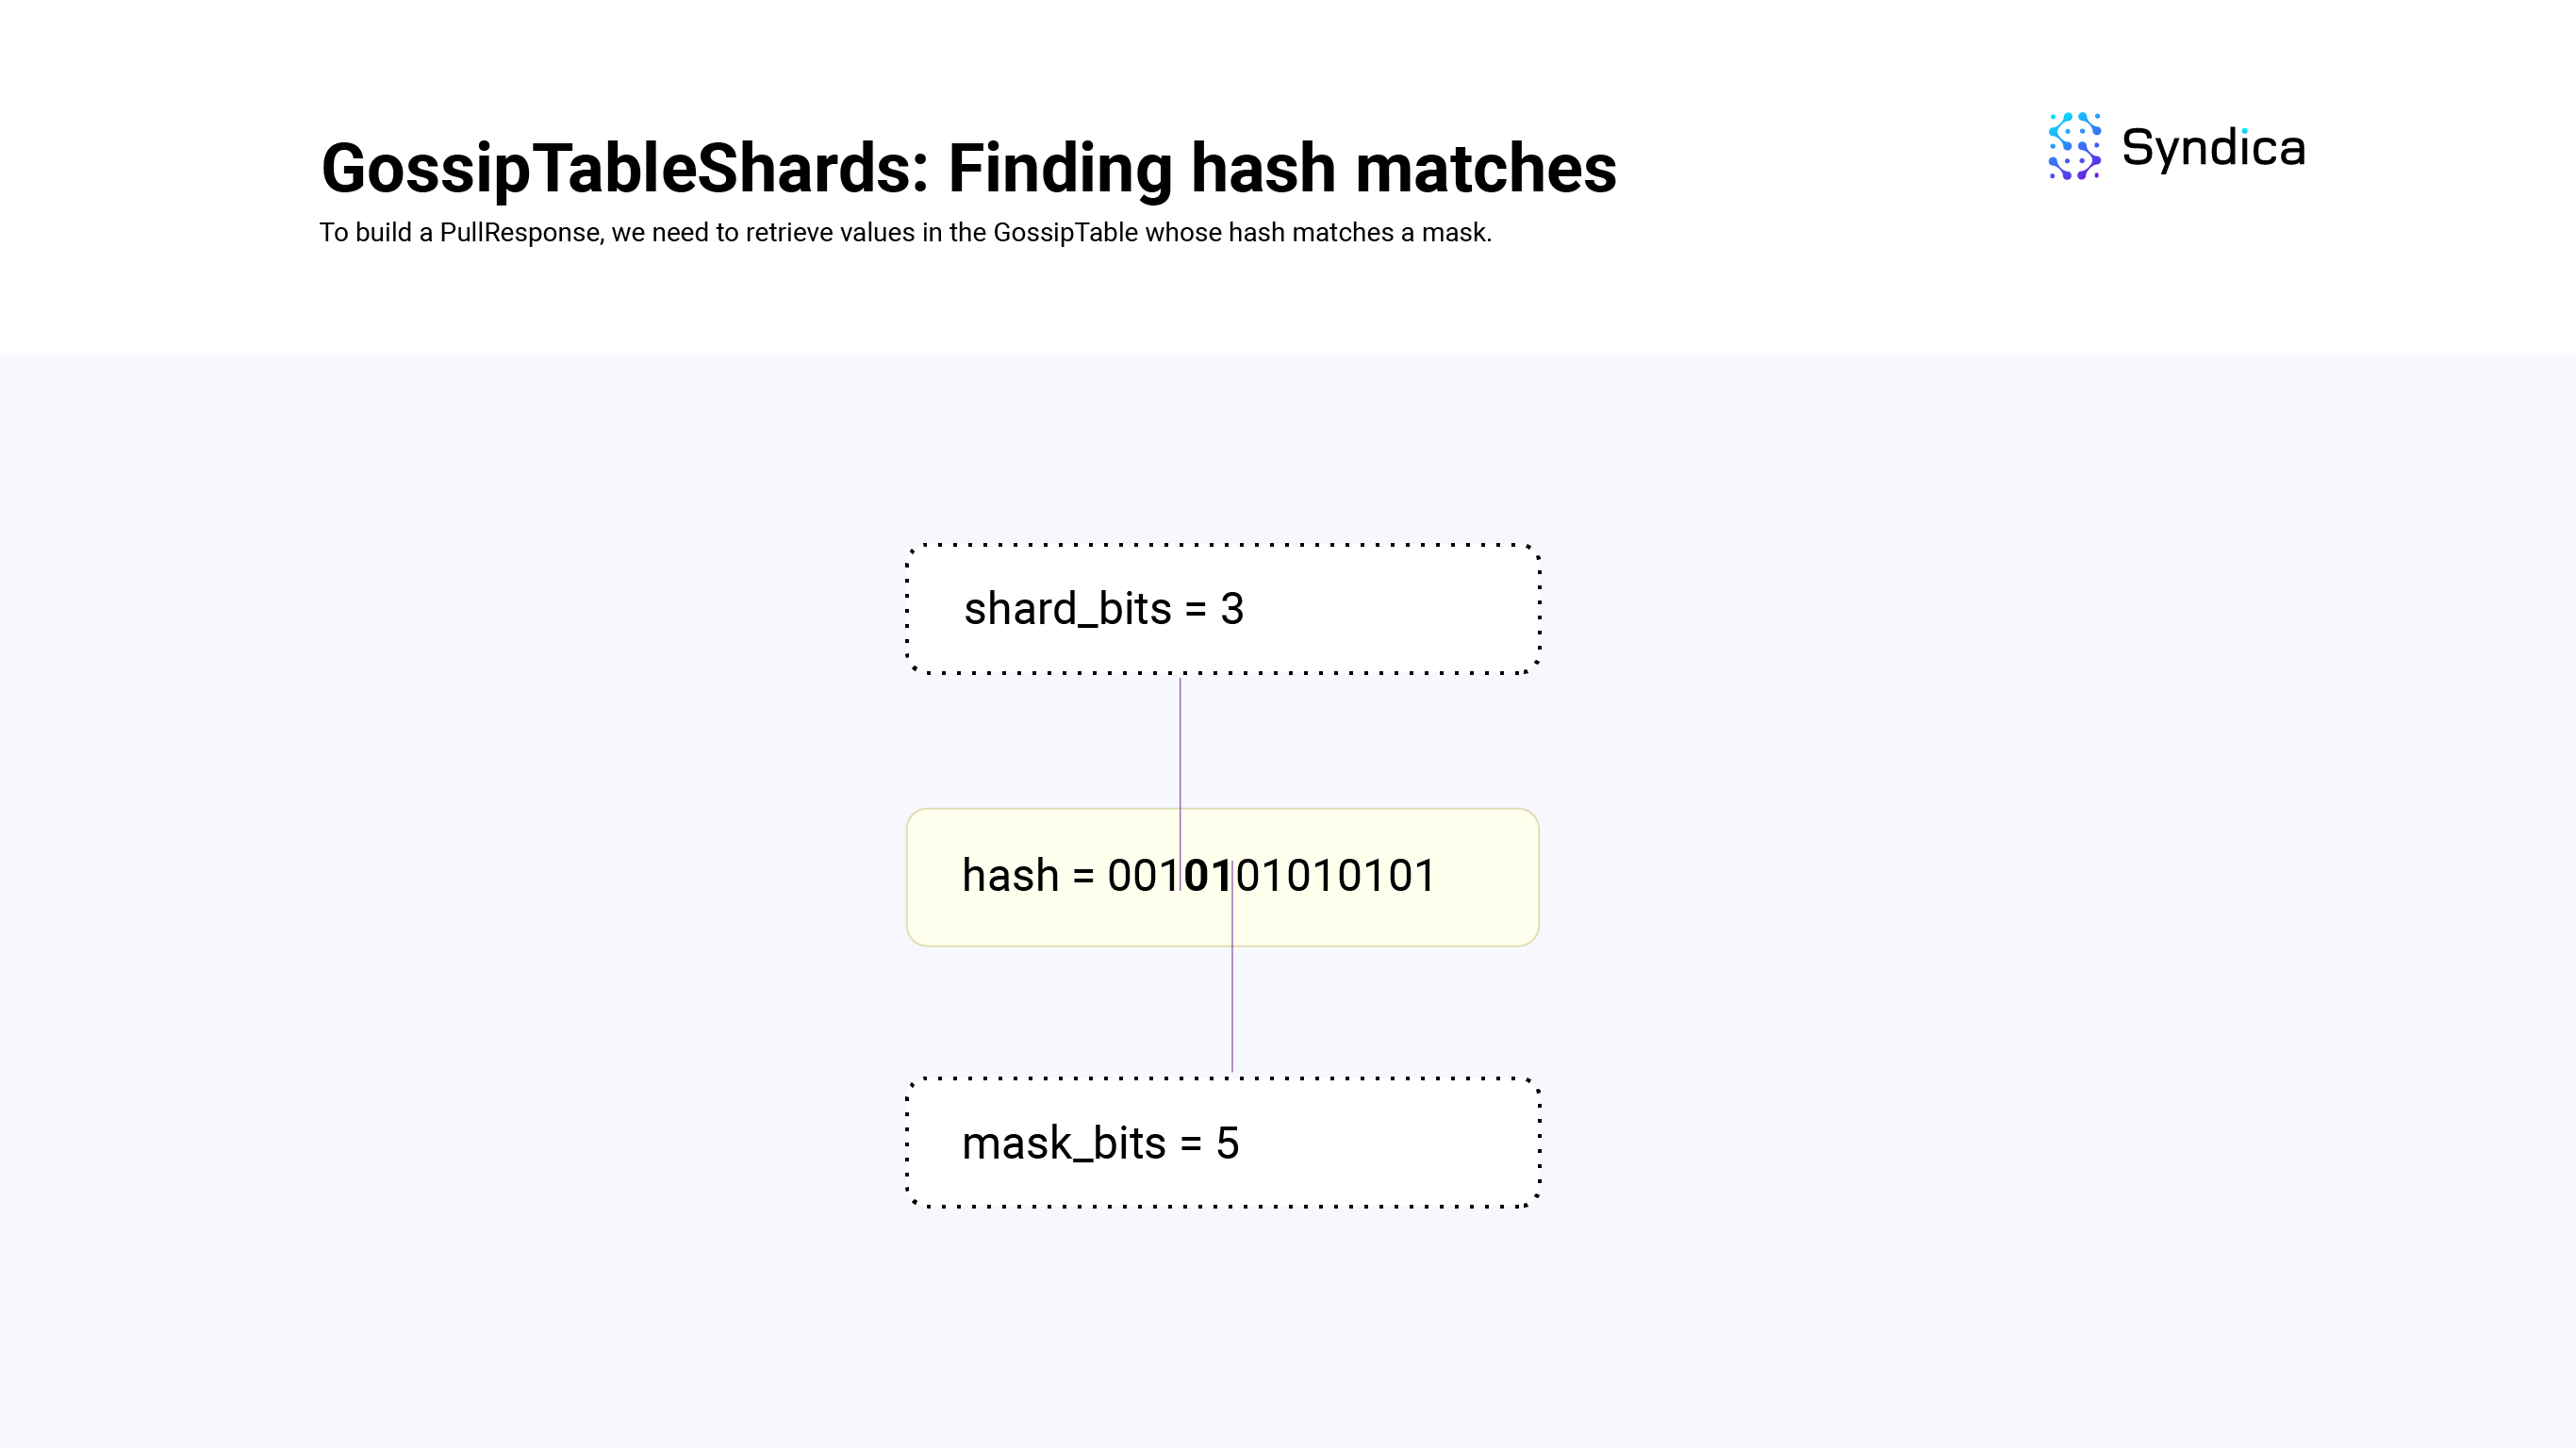
When shard_bits < mask_bits, the mask is tracking more bits than the shards are, so we can find the shard corresponding to the first shard_bits of the mask, and iterate over the values to find exact matches.
For example, truncating mask and looking up the shard gives us hashes that have a matching first shard_bits. We then need to check to make sure the last shard_bits - mask_bits matches the mask, which we do through iteration.
In another example, if shard_bits = 3, mask_bits = 5 and our mask is 00101, we would first find all the GossipTable values whose first 3 bits of their hash value is 001 by looking up shard[1]. We would then iterate over those values and make sure the fourth and fifth bits of the hash are equal to 01.
def findMatches(self: *GossipTableShards, mask: u64, mask_bits: u64) Vec<usize>:
    # ones everywhere except for the first `mask_bits`
    mask_ones = (~0 >> mask_bits)

    if (self.shard_bits == mask_bits) {
        # ...
    } else if (self.shard_bits < mask_bits) {
        # truncate the mask
        shard_index = mask << (64 - self.shard_bits)
        shard = self.shards[shard_index]

        # scan for matches
        table_indexes = []
        for (indexes, hash_u64) in shard:
            if ((hash_u64 | mask_ones) == (mask | mask_ones)): # match!
                table_indexes.append(indexes)
        return table_indexes

    } else {
        # TODO
    }
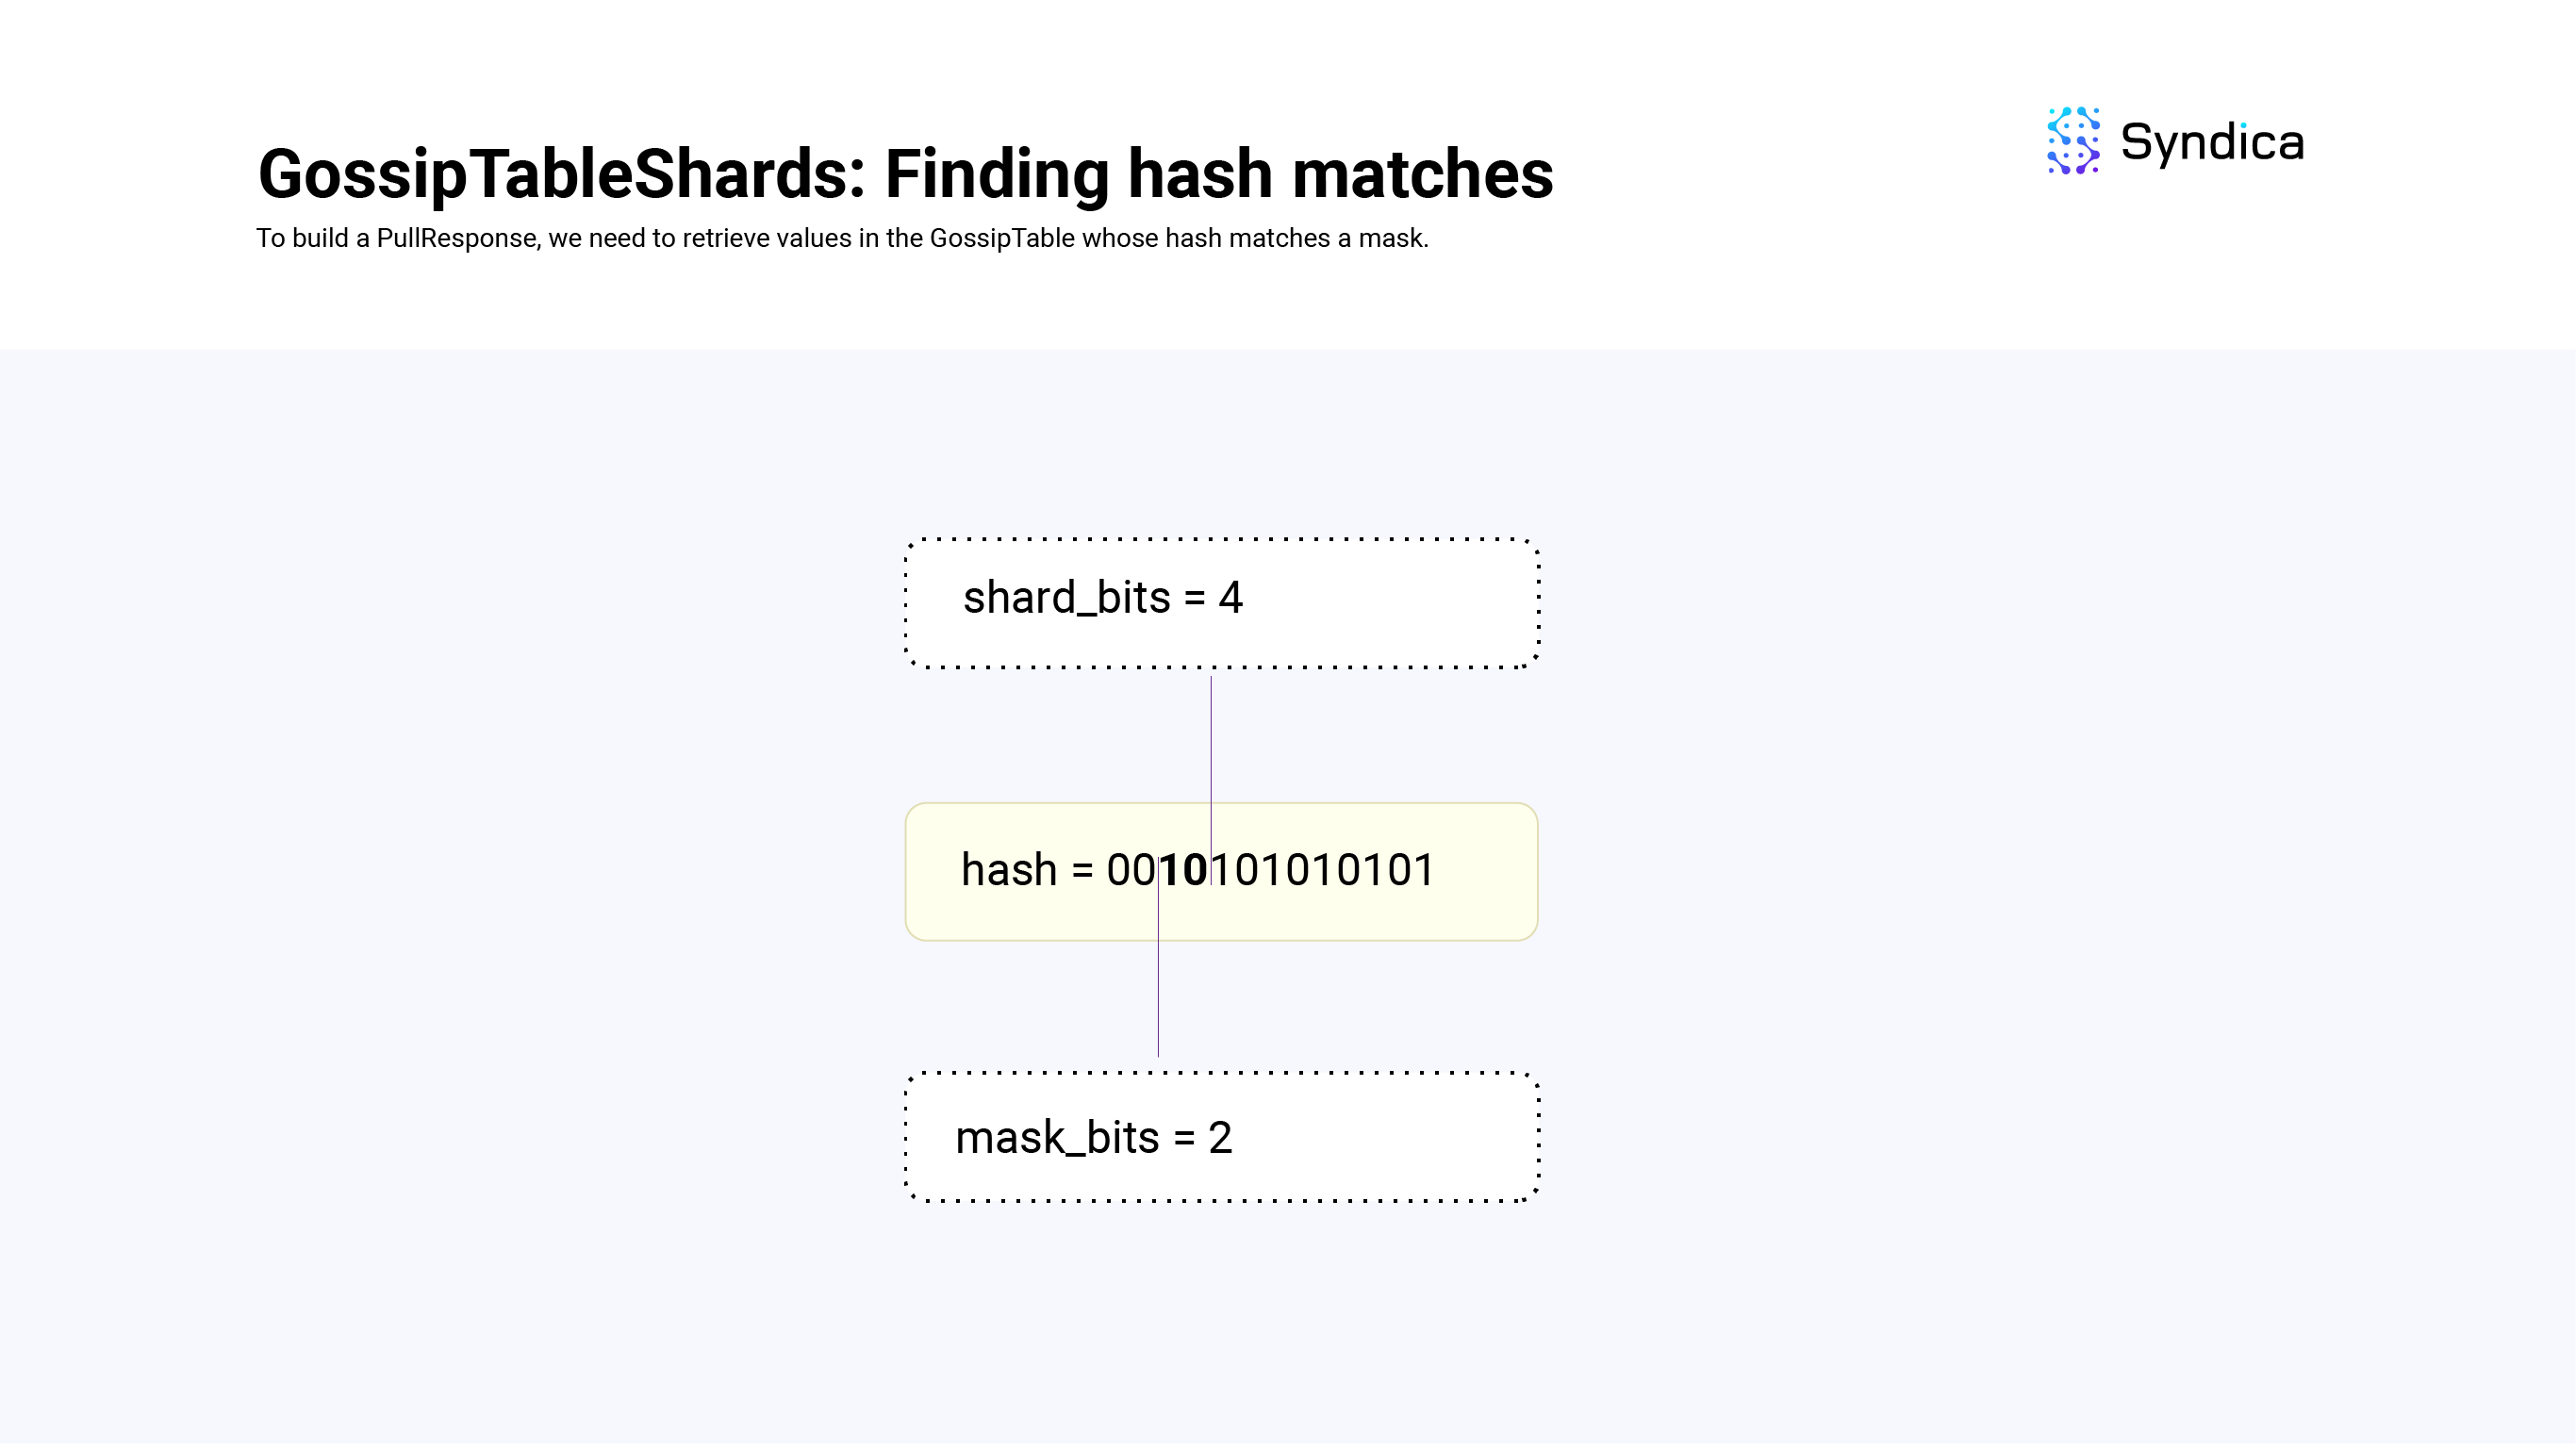
When shard_bits > mask_bits, the shards are tracking more information than the mask, so we'll need to look at multiple shards to find all the values that match mask.
For example, if shard_bits = 4, mask_bits = 2 and our mask is 01 the possible shards we'll need to lookup are: 0100, 0101, 0110, 0111 (i.e., there will be 4 shards that match the mask represented by the difference in bits). We know we'll have to look up 2^(shard_bits - mask_bits) number of shards (which can be computed using count = 1 << (shard_bits - mask_bits)). The largest shard value would be the mask followed by all ones at the end (i.e., 0111 in the example above) which can be computed as end = (mask | mask_ones) >> shard_bits. Since we know the largest shard and the number of shards we're looking for, we can iterate over them from index = (end-count)..end.
def findMatches(self: *GossipTableShards, mask: u64, mask_bits: u64) Vec<usize>:
    # ones everywhere except for the first `mask_bits`
    mask_ones = (~0 >> mask_bits)

    if (self.shard_bits == mask_bits) {
        # ...
    } else if (self.shard_bits < mask_bits) {
        # ...
    } else if (self.shard_bits > mask_bits) {
        shift_bits = self.shard_bits - mask_bits
        count = 1 << shift_bits
        end = (mask | mask_ones) >> shard_bits

        table_indexs = []
        for shard_index in (end-count)..end:
            shard = self.shards[shard_index]
            indexes = shard.keys()
            table_indexs.append(indexes)

        return table_indexs
    }
After we have all the SignedGossipData indexes that match the mask, we then check which values are not included in the pull request's Bloom filter (i.e., values that the node is missing). These values are then packed into a PullResponse message and sent to the peer who sent the corresponding PullRequest.
def filterGossipValues(
    gossip_table: *GossipTable
    filter: *GossipPullFilter
) Vec<SignedGossipData>:
    # find values whose hash matches the mask
    var match_indexes = gossip_table.get_bitmask_matches(filter.mask,filter.mask_bits);

    # find the values that are not included in the requests bloom filter
    values = []
    for index in match_indexes:
        entry = gossip_table[index]
        if (!filter.bloom.contains(entry.hash)):
            values.append(entry)

    return values
Handling Pull Responses
When receiving a PullResponse, we insert all the values received in the GossipTable. If any values fail to be inserted (e.g., due to having an old wallclock time), we track their hash in an array failed_pull_hashes. These failed hash values are then used when constructing new pull requests so the values are not received again. To ensure memory doesn’t grow without bounds, the failed_pull_hashes array is periodically trimmed to remove old values.
We also do the same thing for values that are pruned in the GossipTable (i.e., values that are overwritten) in GossipTable.purged.
For each SignedGossipData that is successfully inserted in the GossipTable, we also update the timestamps for all the values from that origin Pubkey. We do this so that when we are trimming old SignedGossipData(s) in the table, we don't remove values from an 'active' Pubkey.
Push
Sending Push Messages
Push messages propagate new gossip data to other nodes in the network.
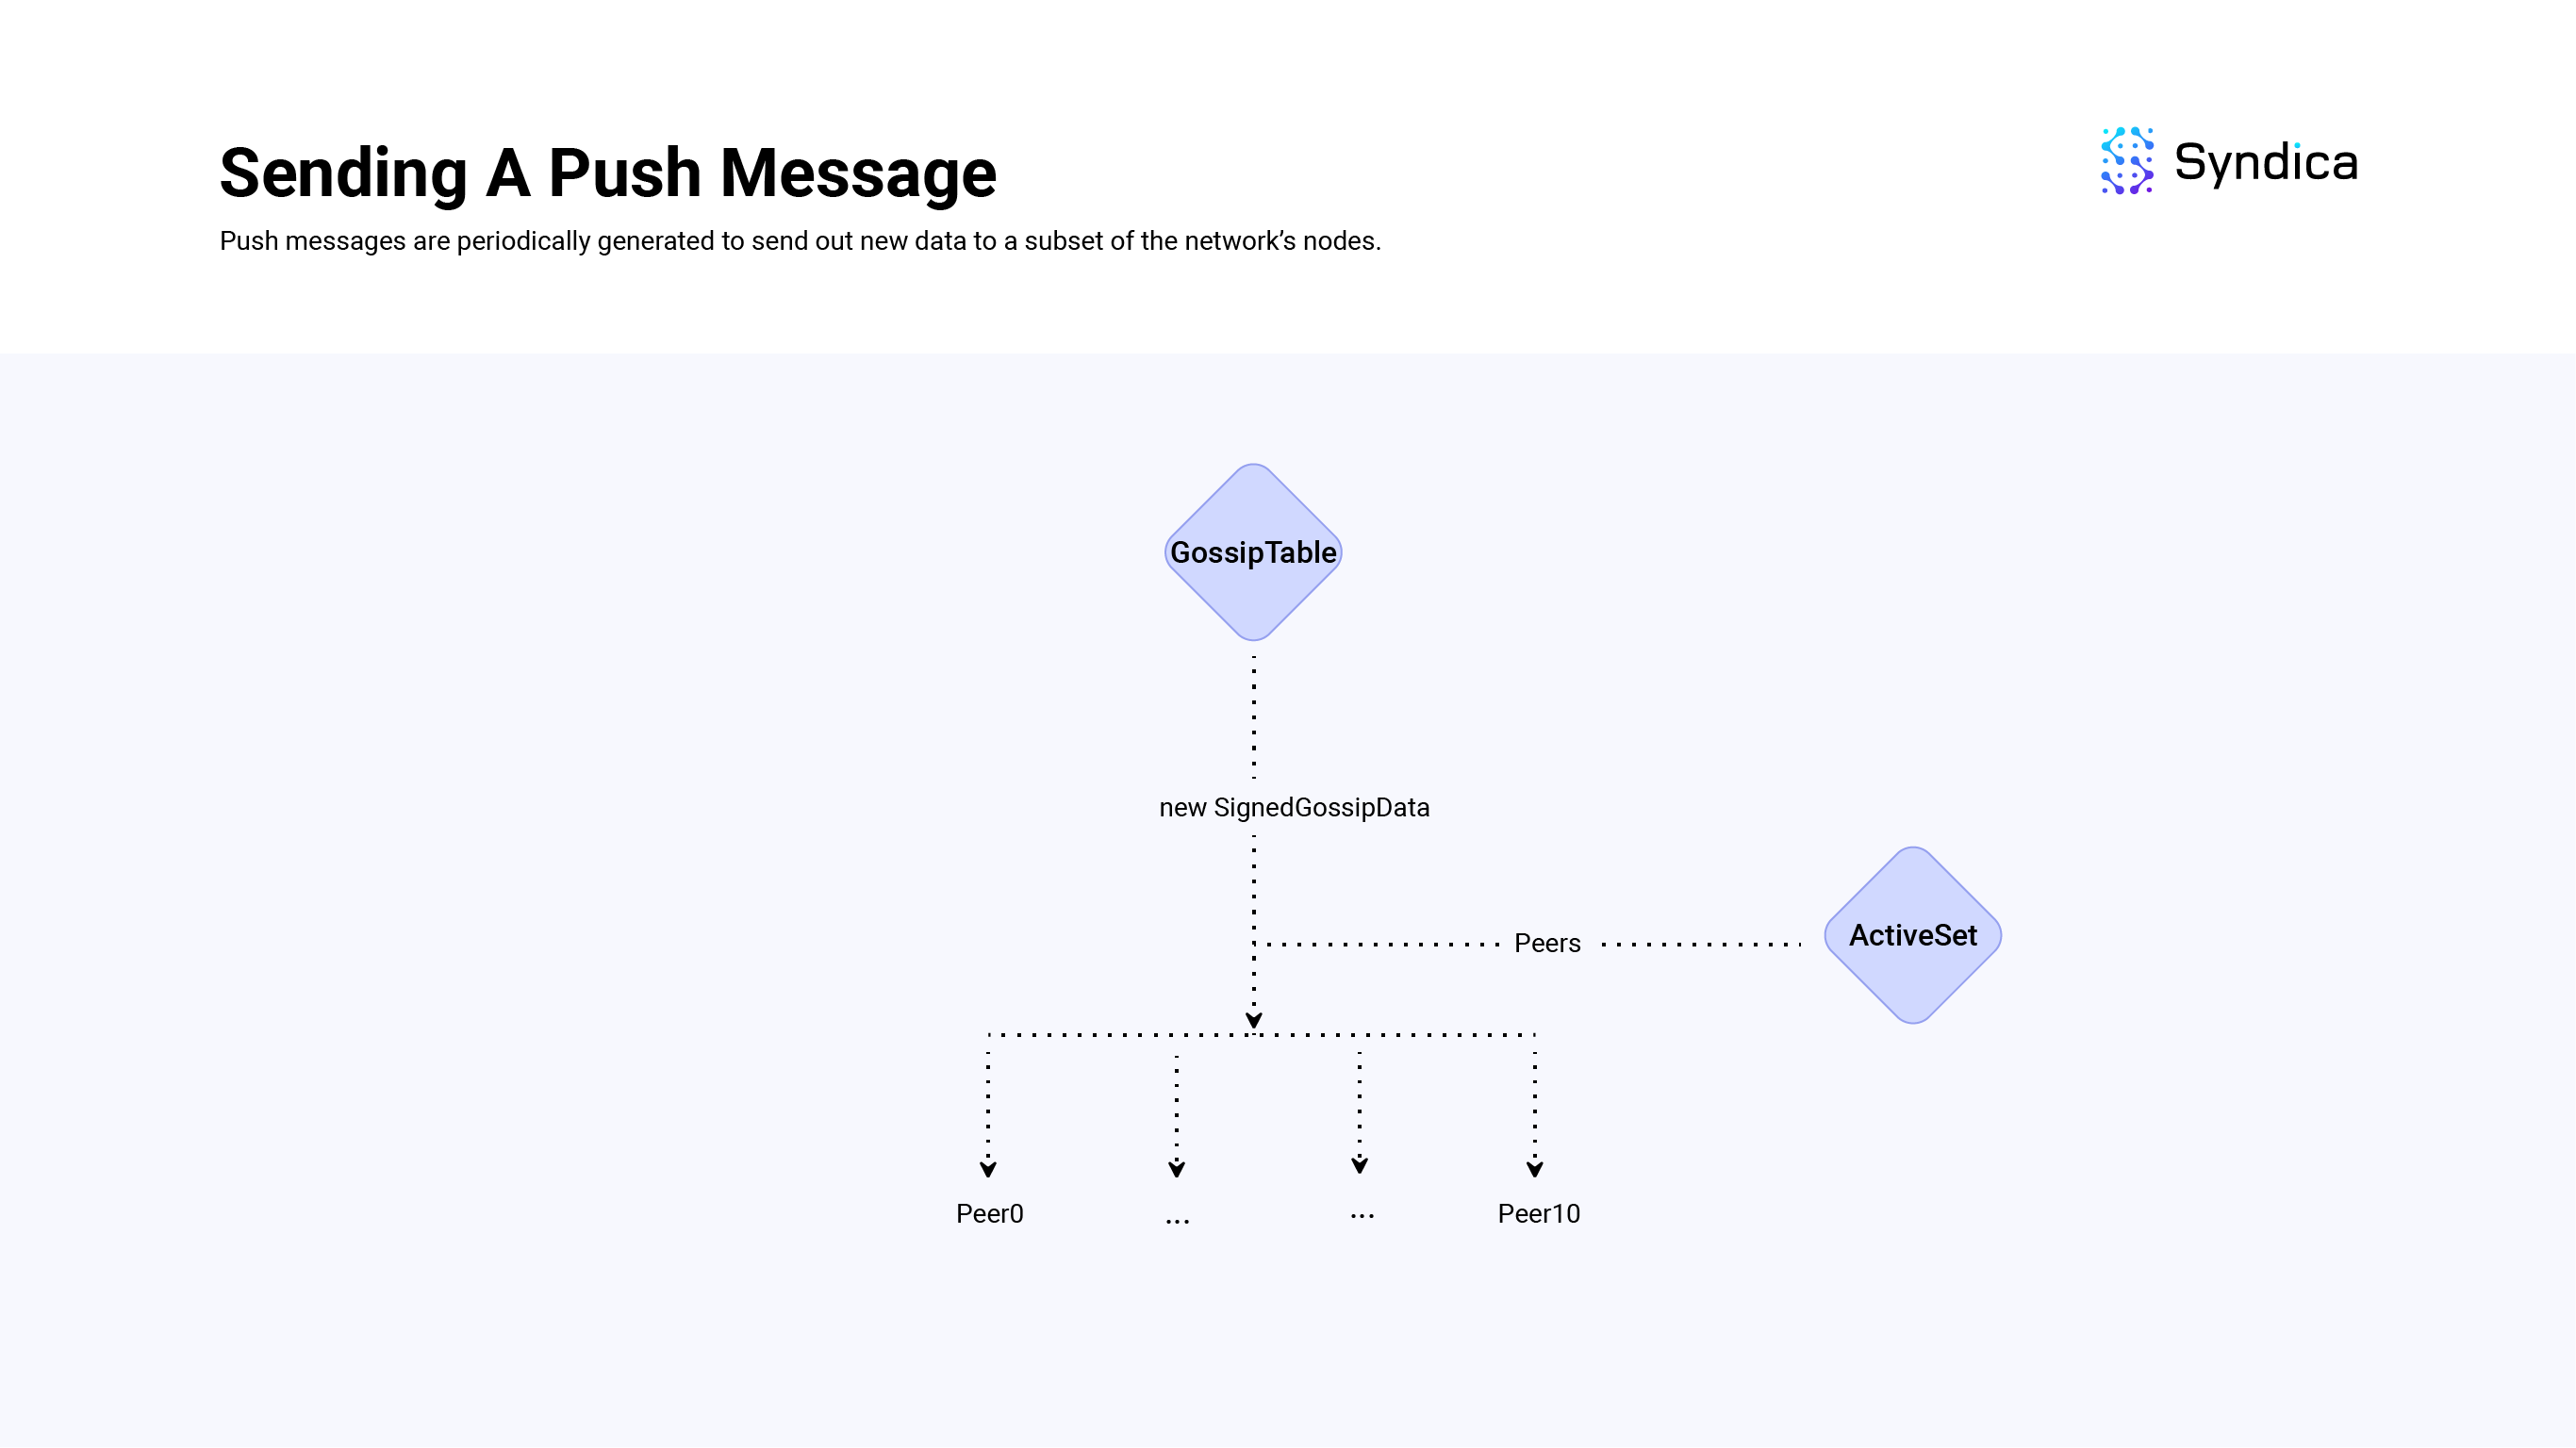
To implement this, we track a local push_cursor variable which represents the cursor value of the last pushed value, and use the getter function getEntriesWithCursor to get new SignedGossipData(s) which have been inserted past the local cursor value.
In Sig, a PushMessage is defined as struct { Pubkey, []SignedGossipData }: a source Pubkey, and an slice of SignedGossipData(s). The source Pubkey will match the local node's contact information. And the array of values will be the new SignedGossipData(s) that are being pushed.
An important note is that all messages sent through gossip should be less than or equal to a maximum transmission unit (MTU) of 1280 bytes (which is referred to as the Packet struct throughout the codebase).
Because sometimes there are more SignedGossipData(s) to push than can fit inside one of these packets (i.e., bytes([]SignedGossipData) > MTU), the SignedGossipData(s) are partitioned into packet-sized chunk PushMessage(s) instead of one large PushMessage.
These PushMessage(s) are then sent to all the nodes in the local node's ActiveSet.
The Active Set
A node's ActiveSet is a list of nodes in the gossip network with a shred version equal to the local nodes (i.e., a variable used to track hard-forks), with valid gossip ports, and other details.
The ActiveSet is a key part of the PlumTree algorithm, which enables data to be propagated in a tree-like structure instead of a full broadcast.
The ActiveSet is periodically re-sampled to reduce the chance of eclipse attacks.
Note: See the “Receiving Prune Messages” section for a more detailed explanation of how the ActiveSet is constructed on a per-origin basis.
Note: The Agave implementation uses stake weight information to build their active set. However, since Sig doesn’t have stake weight information yet so we chose to randomly sample the nodes.
Agave's Active Set
For completeness, Agave's active set implementation is also worth discussing.
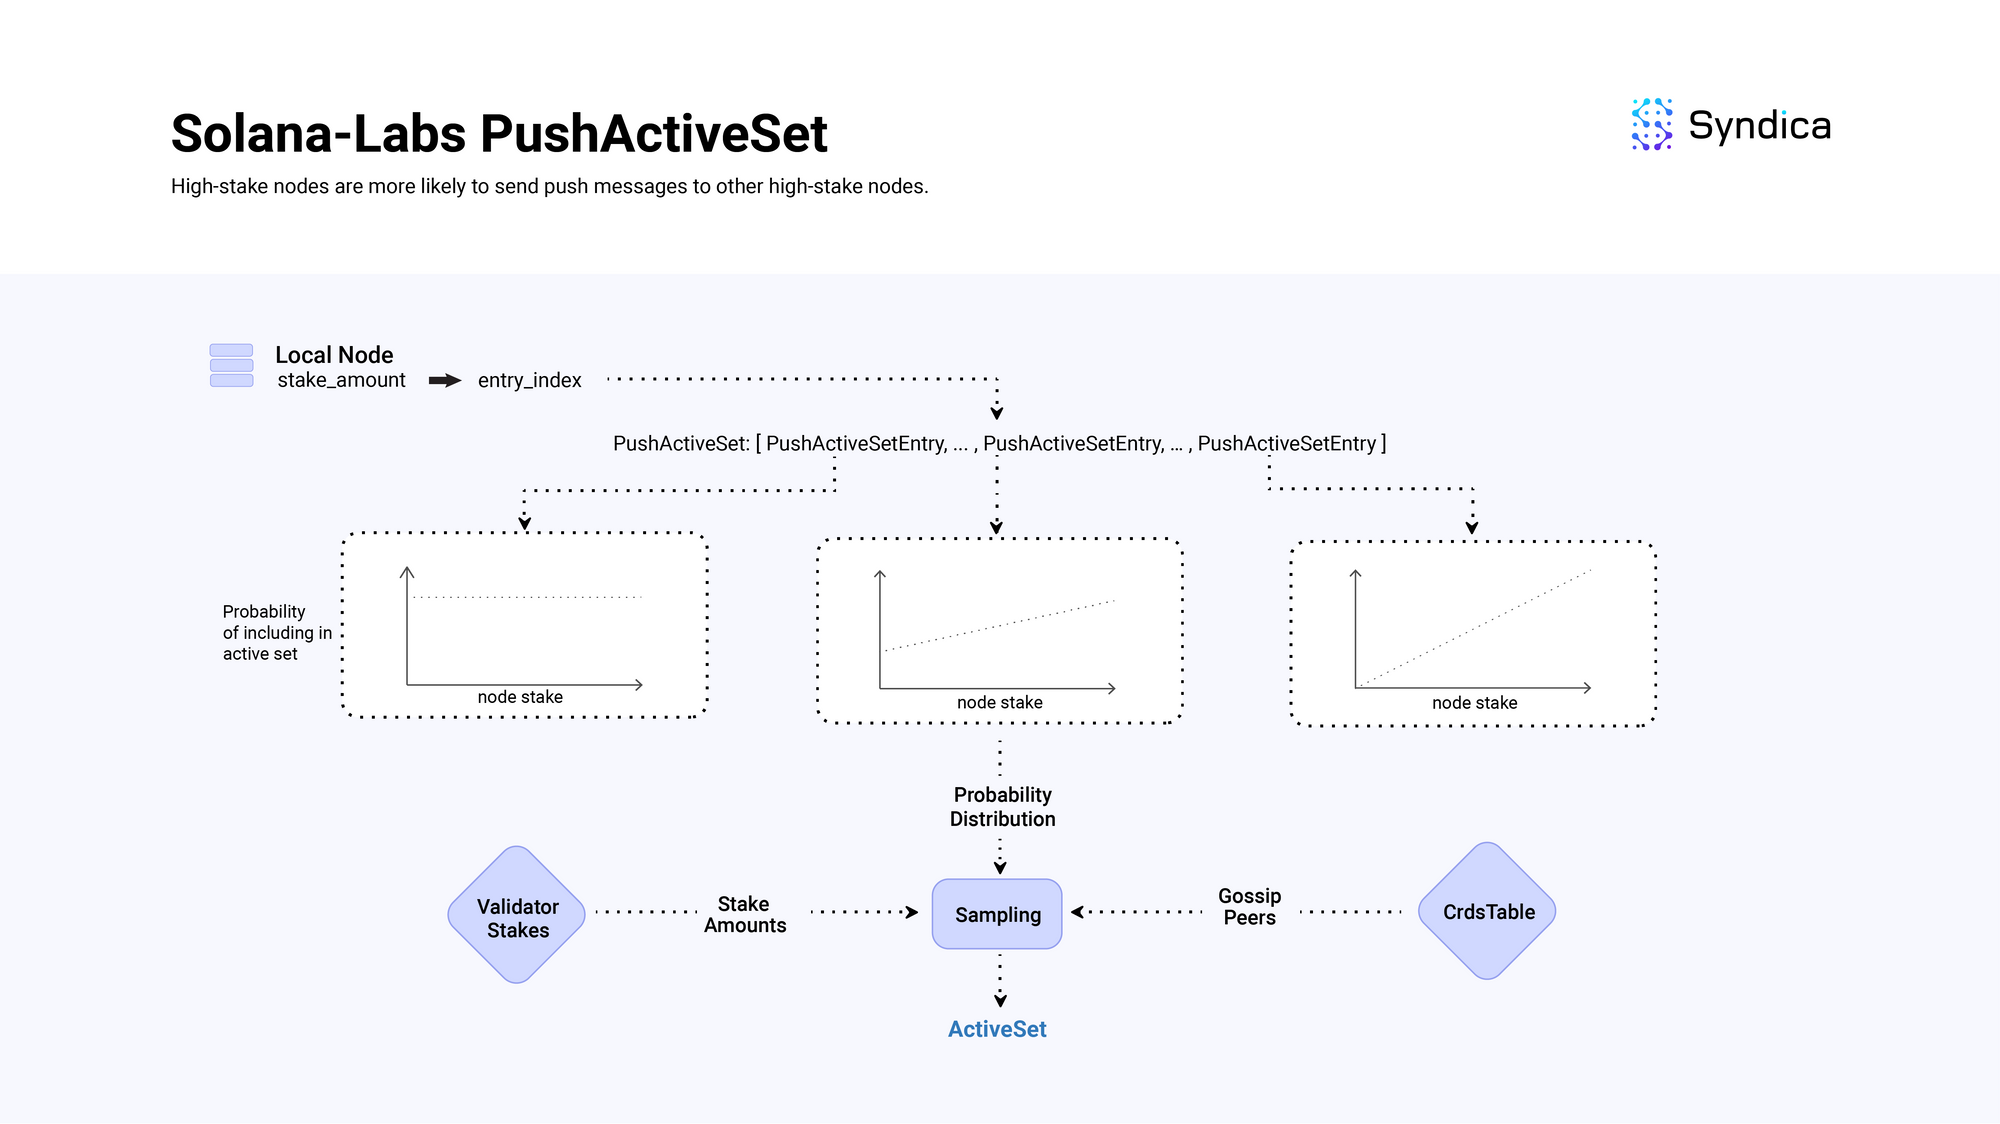
Their PushActiveSet contains multiple PushActiveSetEntry structs where each entry corresponds to a different probability distribution over possible nodes to be included in the active set.
The entries distribution is ordered by decreasing entropy over stake weight. Entries at the start of the list (with a low index - e.g., 0, 1) are a uniform distribution over the possible nodes (with high entropy) and entries at the end of the list (with a large index - e.g., 24, 25) have a distribution weighted strongly by a node's stake amount (with low entropy).
When building the active set, the local node's stake weight decides which entry to sample the nodes from. For example, if the local node has a large stake, its index will be large which corresponds to a distribution that has a higher probability of selecting another high-staked node to be included in the active set.
This means, high-stake nodes are more likely to send push messages to other high-stake nodes, while low-stake nodes send push messages to random nodes.
Receiving Push Messages
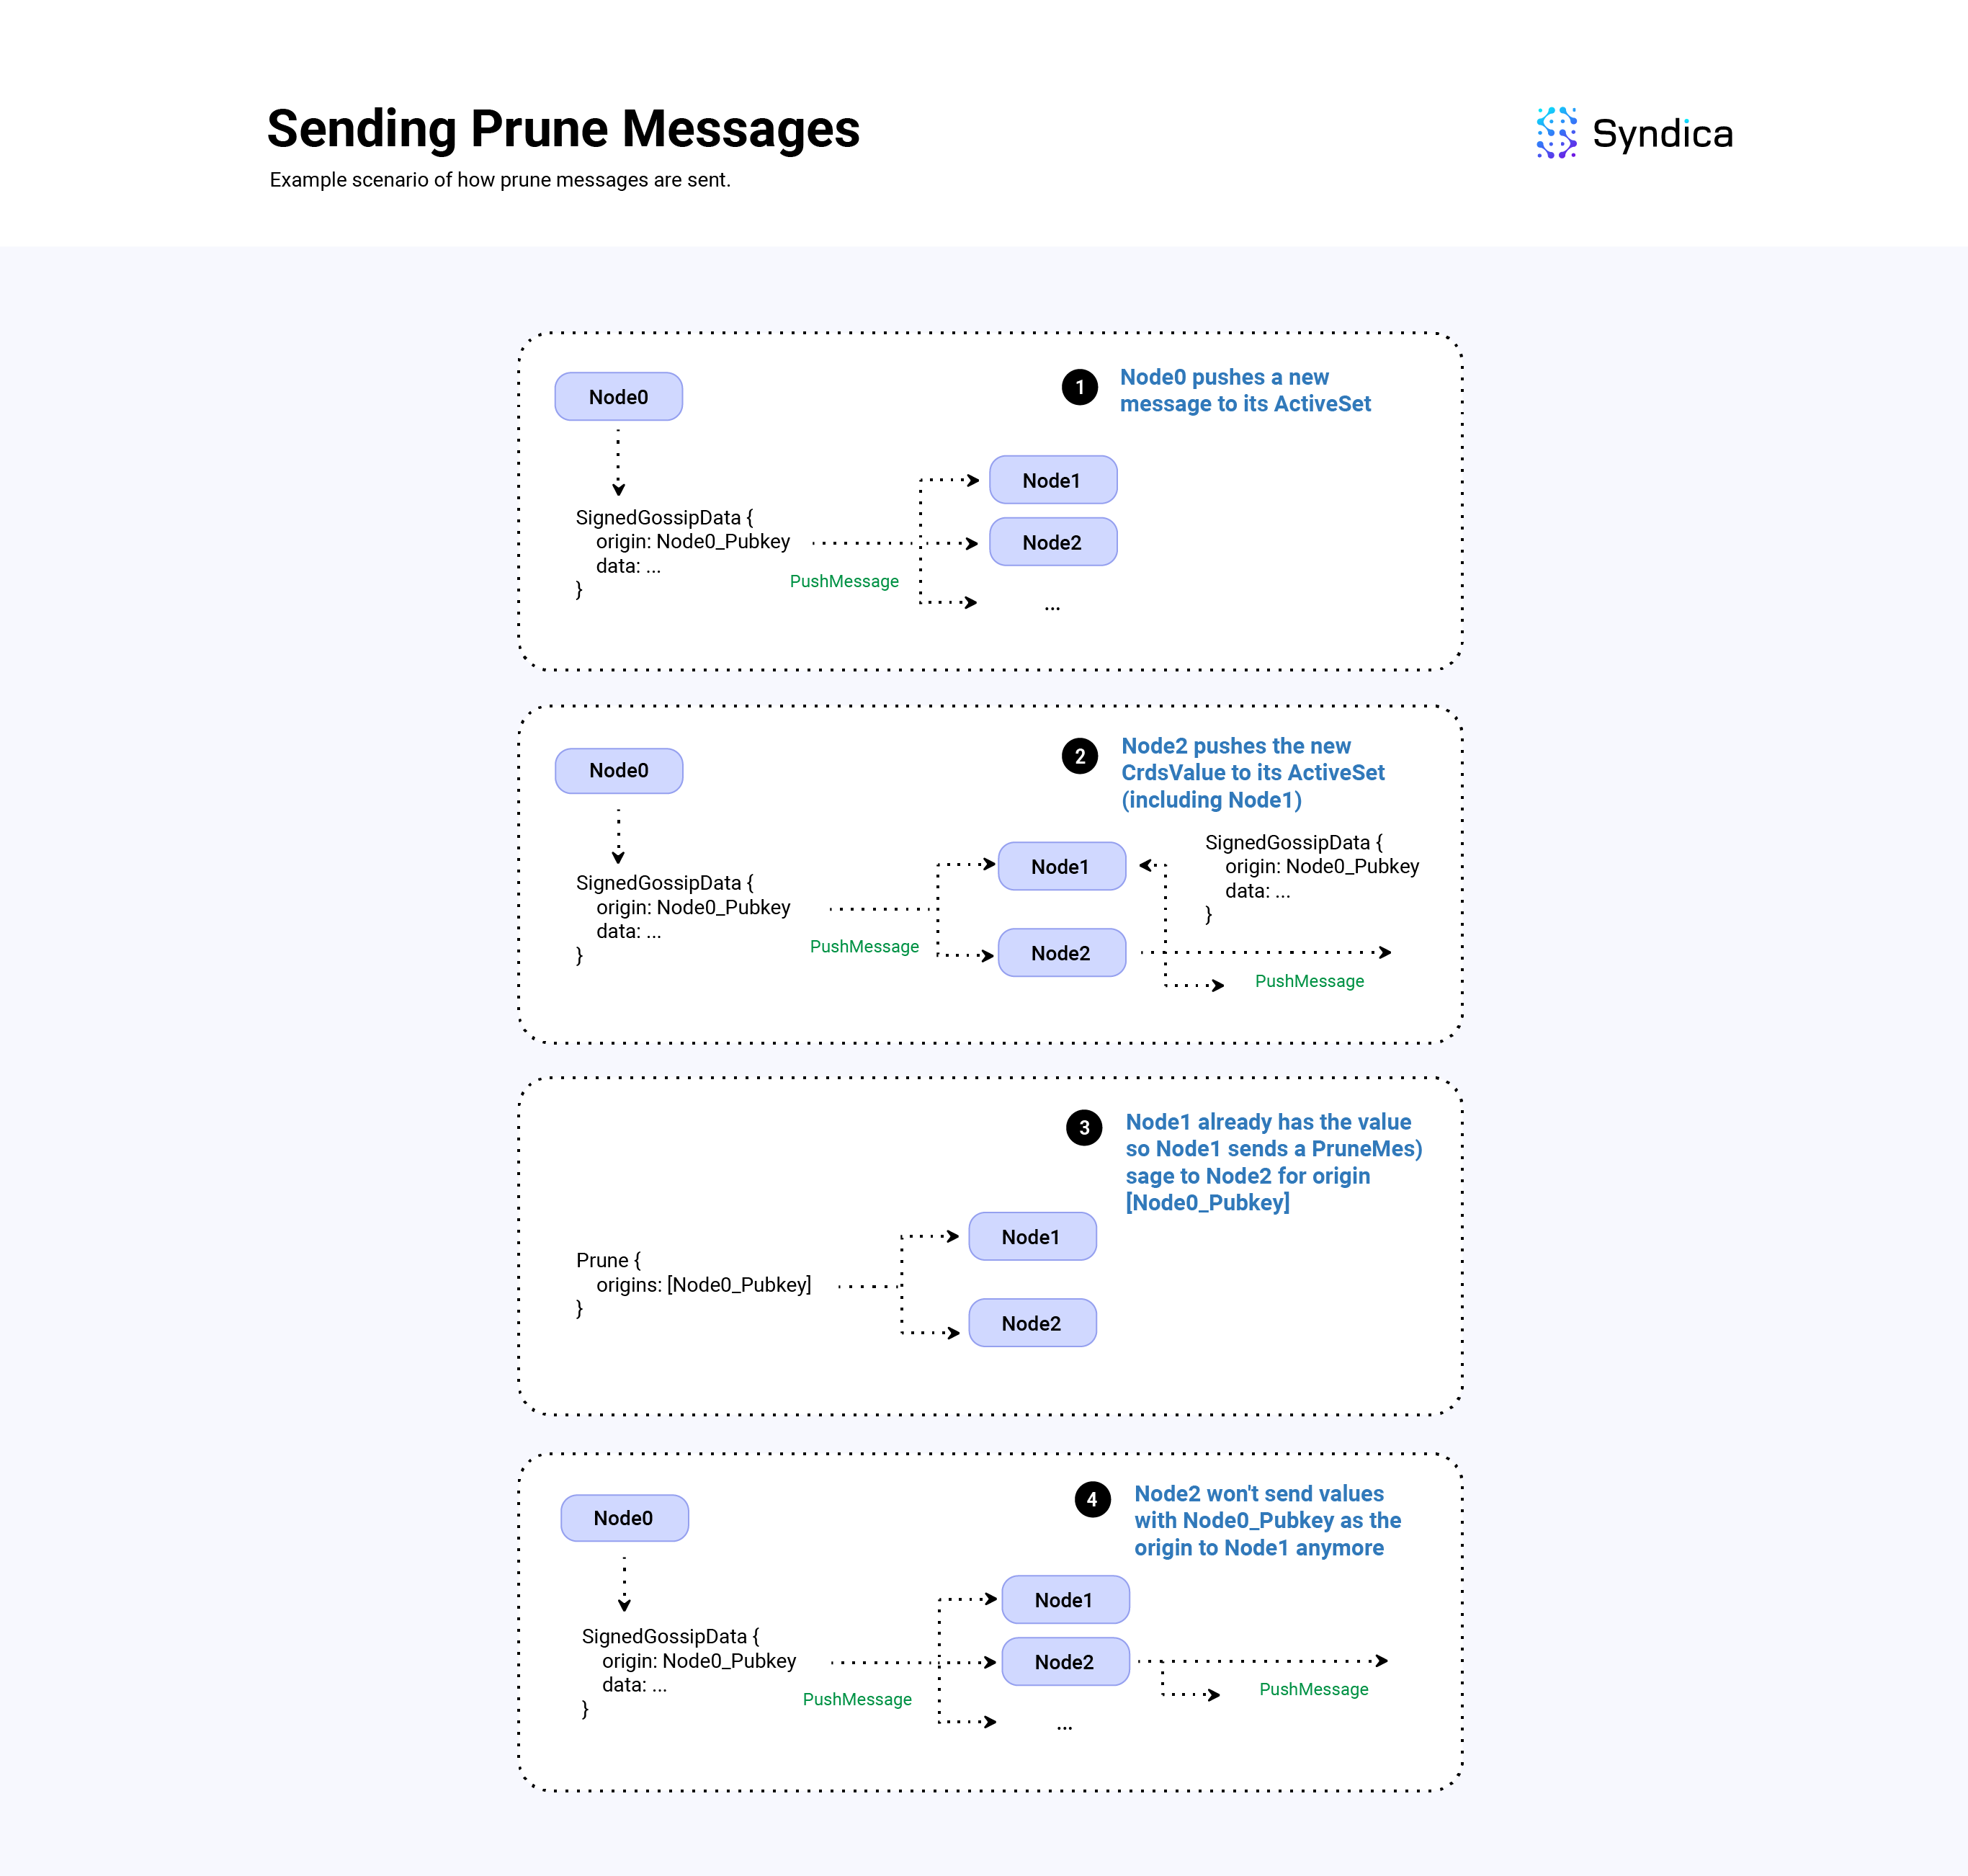
When receiving a new PushMessage, the values are inserted into the GossipTable , and values that failed the insertion (due to being a duplicate) are tracked. The nodes who sent those failed values are then sent PruneMessage(s) so the data is not received again.
Prune
PruneMessage(s) are used to prune duplicate PushMessage(s) in the broadcast tree. In essence, sending a Prune message that effectively says: “stop sending me data with this origin, I am already receiving it from another node".
Sending Prune Message
A Prune message is defined as struct { PubKey, PruneData } where PruneData is defined as follows:
pub const PruneData = struct {
    /// Pubkey of the node that sent this prune data
    pubkey: Pubkey,
    /// Pubkeys of origins that should no longer be sent to pubkey
    prunes: []Pubkey,
    /// Signature of this Prune Message
    signature: Signature,
    /// The Pubkey of the intended node/destination for this message
    destination: Pubkey,
    /// Wallclock of the node that generated this message
    wallclock: u64,
}
The prunes field is a list of origin pubkeys (pubkeys of the node which create a corresponding SignedGossipData). When inserting the received values from a new push message, if a SignedGossipData fails to be inserted into the GossipTable, the origin of the value (i.e., the Pubkey of the node that created the value) is appended to the prunes fields. And lastly, the destination field is set to the node which sent the push message.
def handlePushMessage(
    from_pubkey: Pubkey, # received from
    values: []SignedGossipData, # values from push msg
    my_pubkey: Pubkey, # local nodes pubkey
    gossip_table: *GossipTable,
) {
    pruned_origins = []
    for value in values:
	    result = gossip_table.insert(value)
	    if result.is_error():
    	    origin = value.id()
    	    pruned_origins.append(origin)

    return PruneMessage {
	    prunes: pruned_origins,
	    destination: from_pubkey,
	    pubkey: my_pubkey,
    }
}
Note: In the Agave client, to compute what nodes to send a prune message to, the client uses the number of duplicates sent, along with the node's stake weight and a minimum number of nodes to keep. Since Sig doesn't have stake weight information yet, we follow a simpler approach and send prune messages to any peers which send a value that fails to be inserted in the GossipTable.
Receiving Prune Messages
When a prune message is received, we track which from_address pruned a specific origin using a HashMap(from_address: Pubkey, origin_bloom: Bloom) where from_address: Pubkey is the address which sent the prune message to a Bloom filter which the pruned origins are inserted into.
When constructing the active set for a SignedGossipData:
- we find the
originof that value, - iterate over the peers in the
ActiveSet, - look up the peer in the HashMap to find their corresponding
Bloomfilter, and - check if the origin of the
SignedGossipDatais contained in theBloomfilter.- If the origin is not contained in the bloom filter, we haven’t received a corresponding prune message, so we add the peer to the active set.
- If the origin is contained in the bloom filter, we don’t add the peer to the active set.
Ping/Pong messages
Ping and Pong messages are used to health check nodes quickly and easily.
Ping messages are periodically sent to all of the nodes in the network (by parsing the contact information in the GossipTable). For each of these Ping messages, a corresponding Pong message is expected within a certain amount of time.
If we fail to receive the corresponding Pong message, then we don’t send that node any other protocol messages (i.e., we don’t include them in the ActiveSet so we don’t send them PushMessage(s), nor do we respond to any PullRequest(s) received from them).
We track the nodes that have responded to Ping messages with a corresponding Pong message as well as which nodes we are still waiting for a corresponding Pong message for using the PingCache structure.
What is the PingCache?
The PingCache holds important data including the amount of time a received Pong message is valid for (i.e., when the node should send a new Ping message) which is set to 1280 seconds by default and the rate limit for how often to send Ping messages which is set to only send Ping messages every 20 seconds.
When building certain messages (i.e. Push, Pull, etc.) we verify the node is valid using filterValidPeers. This returns a list of filtered valid peers along with possible Ping(s) that need to be sent out.
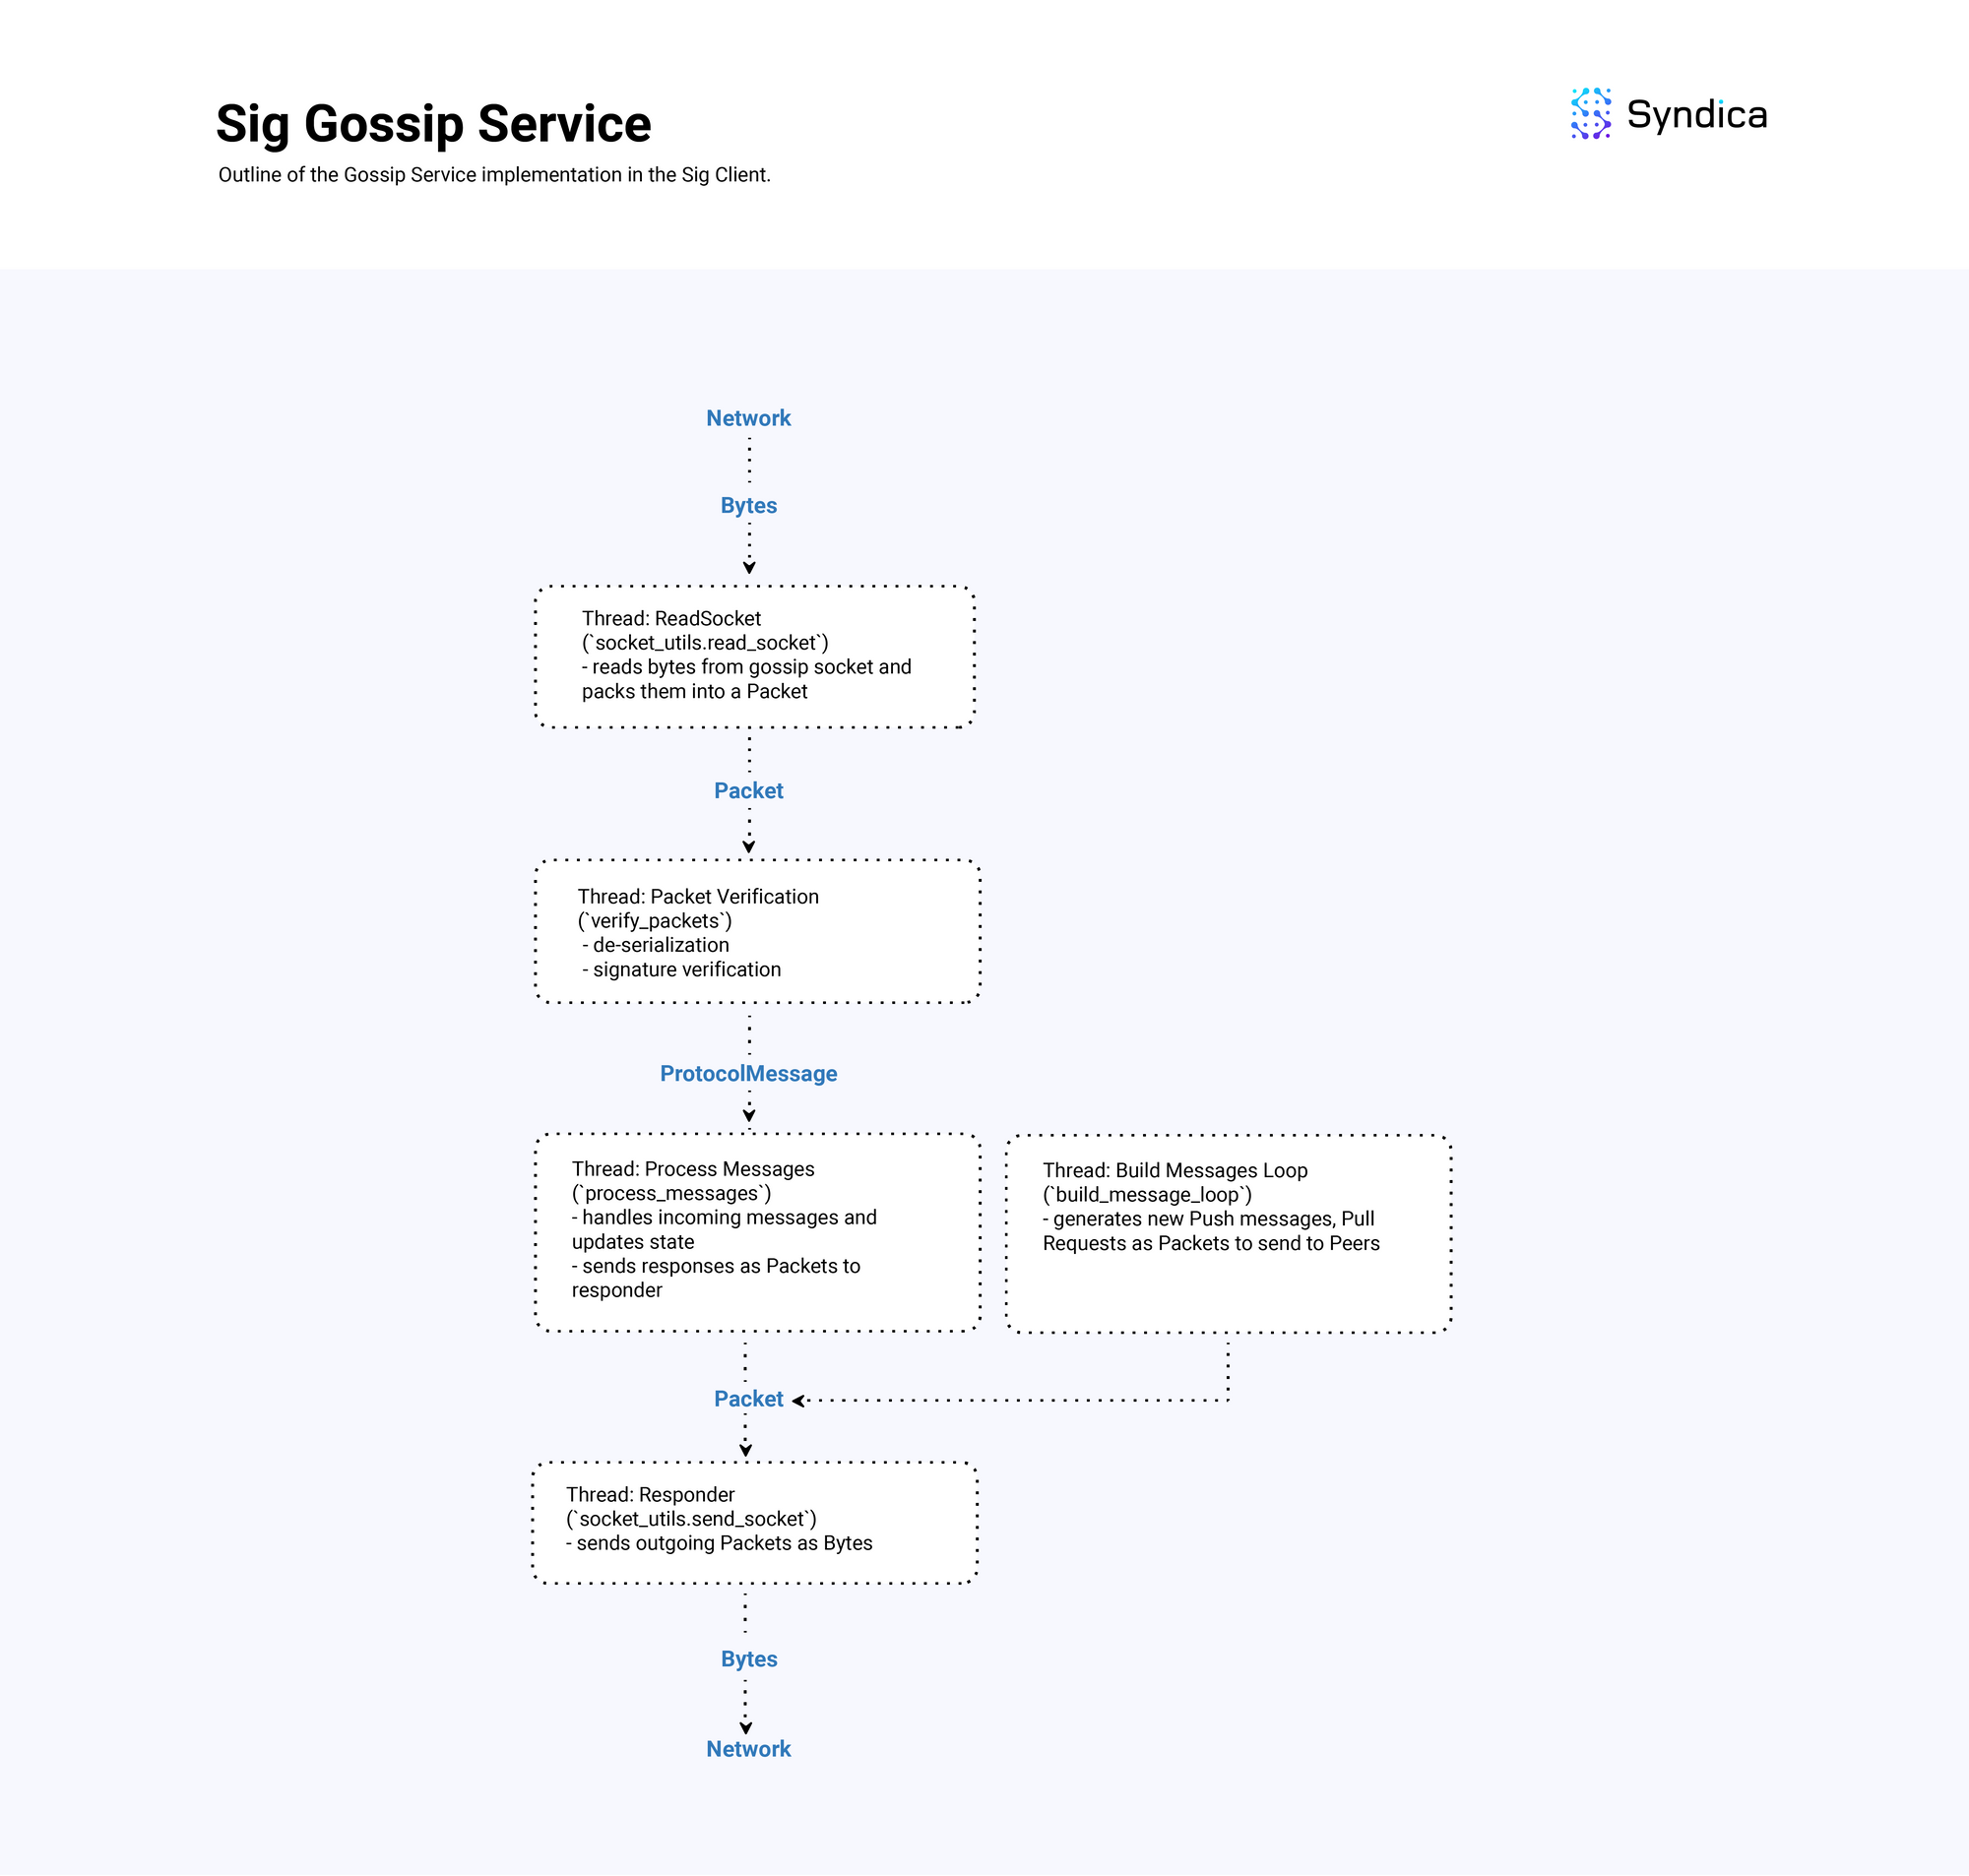
Overview Diagram
The following diagram shows the overall implementation design of the GossipService of Sig which handles receiving, processing, and sending gossip messages.
Conclusion
A working Gossip implementation is crucial for the node as it enables communication with other nodes in the network and facilitates the construction of a chain of valid blocks.
We’re building Sig open-source; feel free to step into the full gossip code here.
If you are a talented engineer who thrives in a collaborative and fast-paced environment, and you're excited about contributing to the advancement of Solana's ecosystem, we are actively hiring and would love to hear from you:
https://jobs.ashbyhq.com/syndica/15ab4e32-0f32-41a0-b8b0-16b6518158e9