Sig Engineering - Part 5 - Sig’s Ledger and Blockstore
Sig Engineering - Part 5 - Sig’s Ledger and Blockstore
This post is Part 5 of a multi-part blog post series we will periodically release to outline Sig's engineering updates. You can find other Sig engineering articles here.
In the last post, we introduced the structure and purpose of Solana’s ledger and Blockstore. Understanding that background is necessary for this deep dive into Sig’s ledger.
Building on that foundation, this article explores how we’ve implemented the ledger in the Sig validator, and how we’ve optimized it for modularity, flexibility, and performance. We’ll break down the core components of Sig’s ledger, discuss how we’ve designed it to support multiple database backends, and walk through the key operations like inserting shreds and reading transactions.
Components
Sig’s ledger employs a modular architecture anchored by a pluggable database at its core. Specialized components build on this database abstraction to handle specific ledger responsibilities, resulting in a flexible and maintainable system.
By default, Sig’s ledger uses RocksDB for storage (similar to Agave). However, the pluggable backend allows any arbitrary database to be used. Sig currently supports three different databases, and it is easy to add support for more.
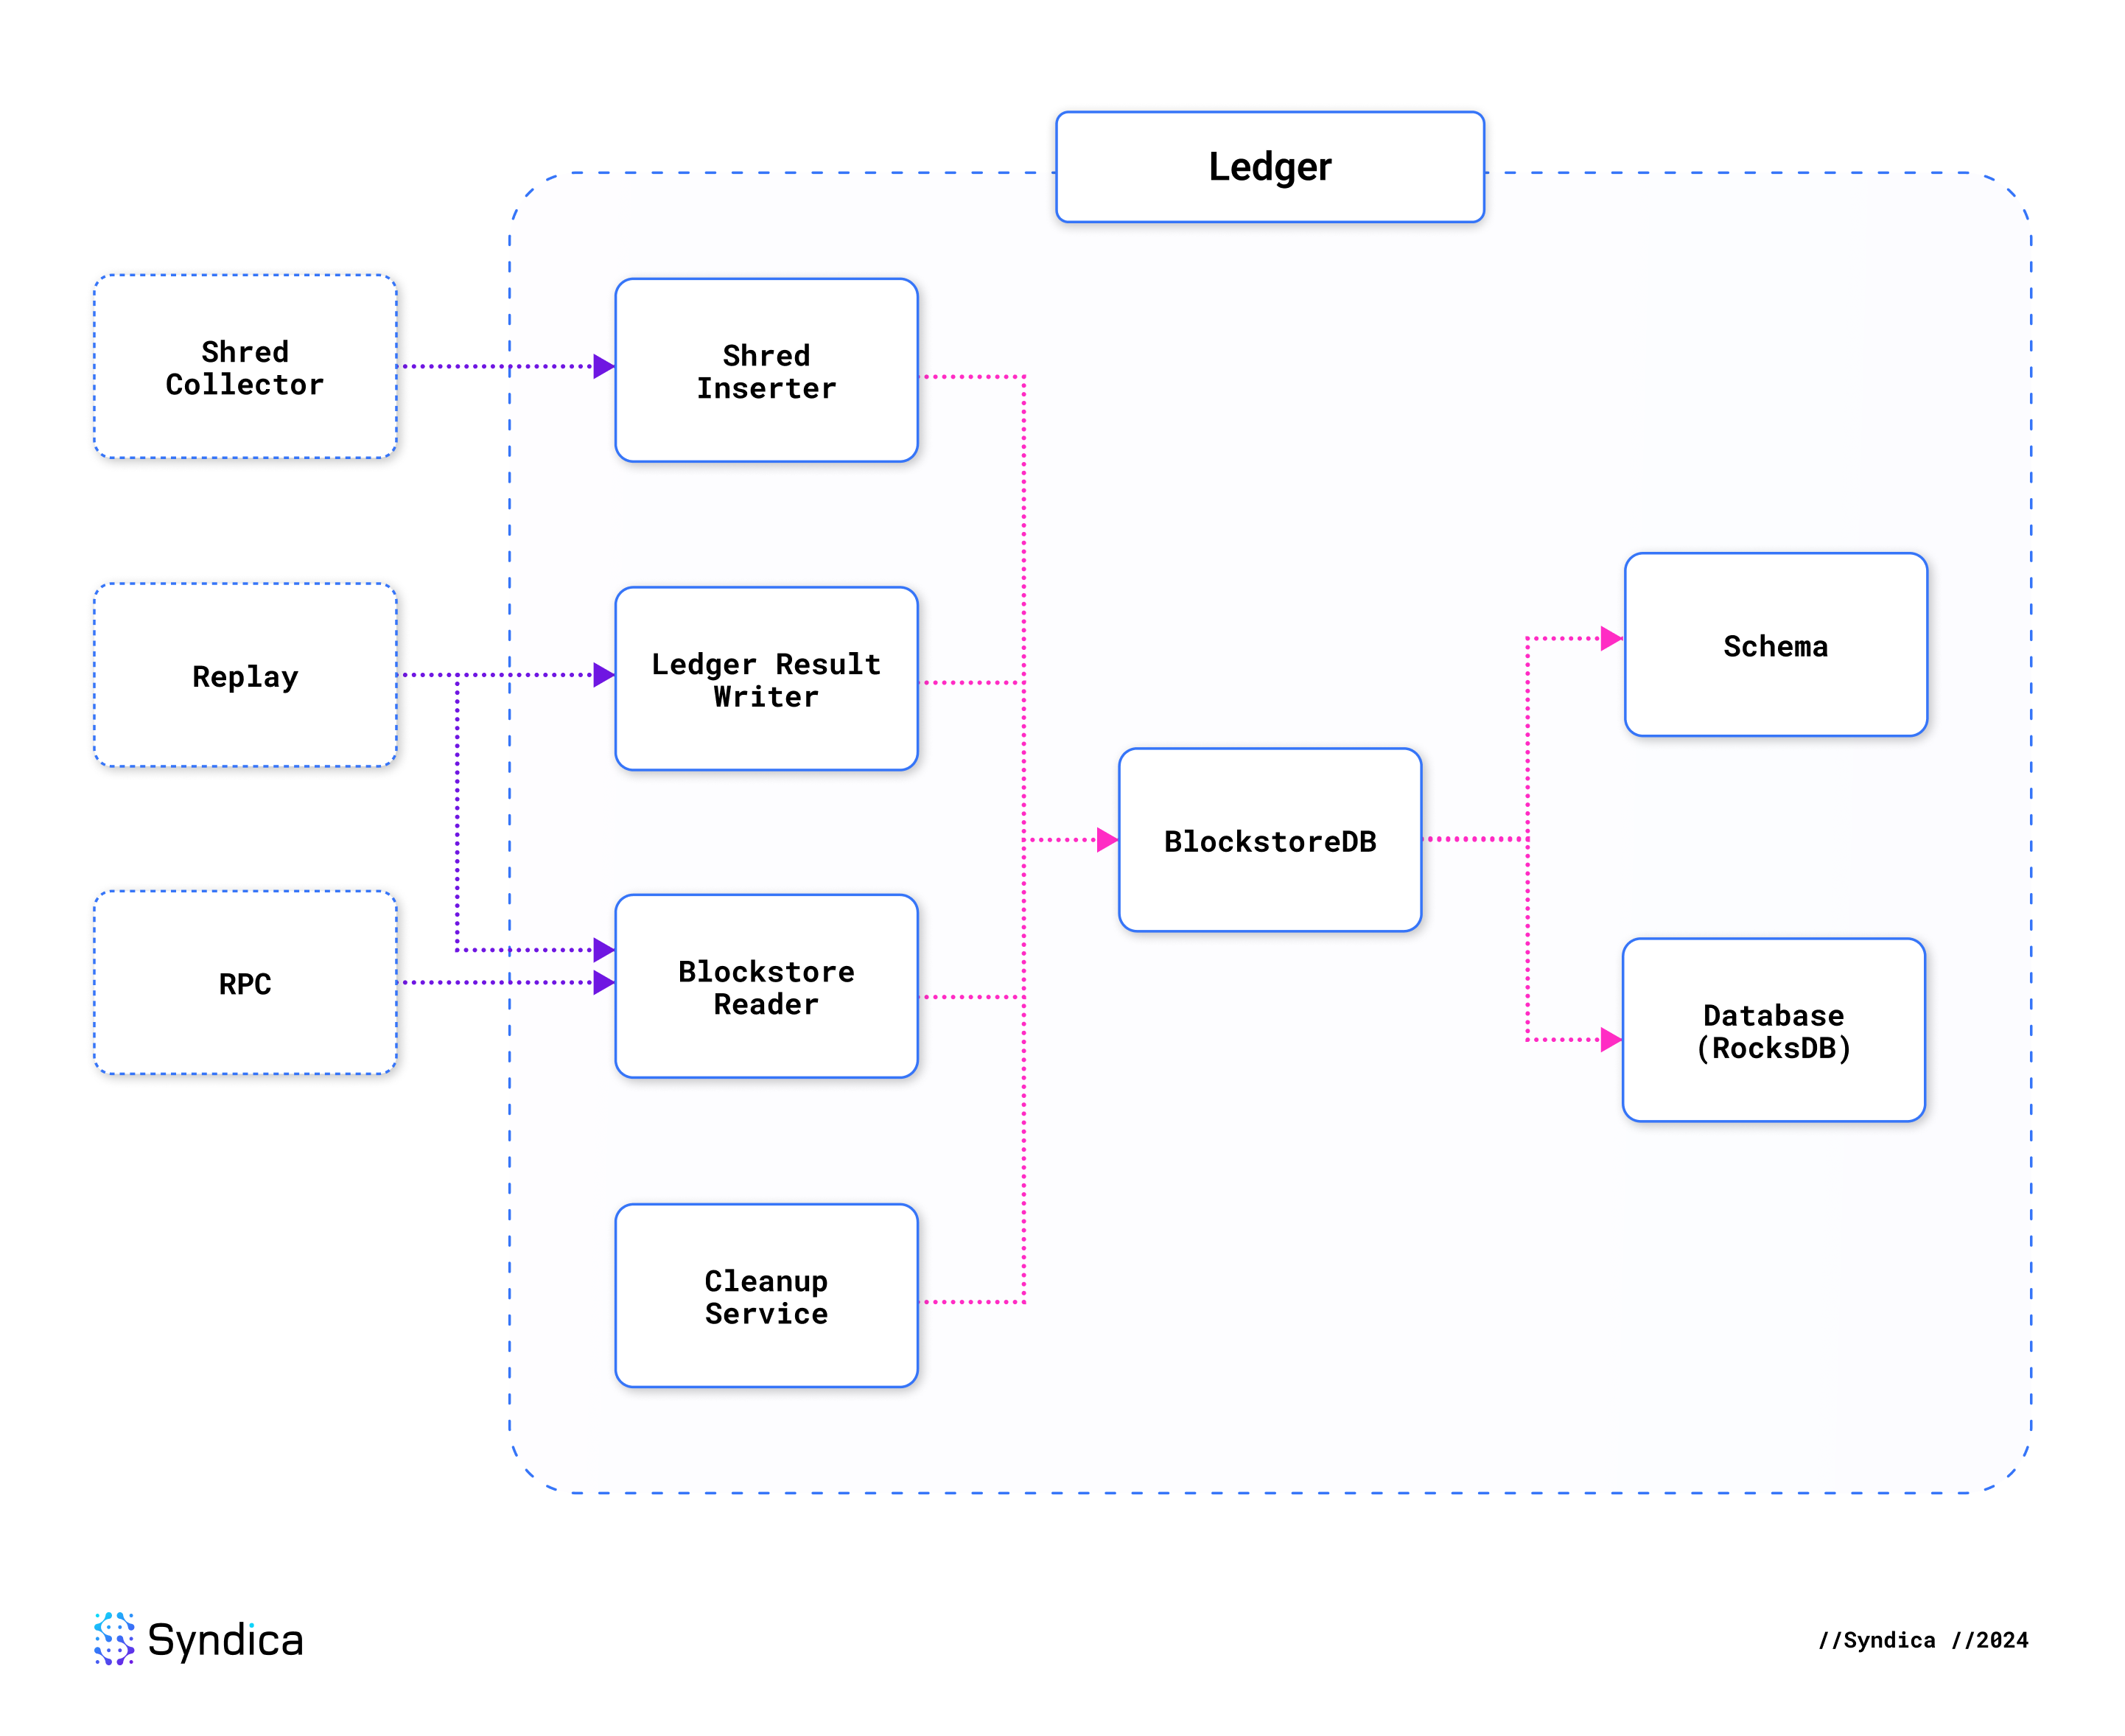
The Shred Inserter, Blockstore Reader, and Ledger Result Writer form the next layer atop the database. They are responsible for all the operations that read and write data in the database. Together, these three components are analogous to the Blockstore struct in Agave.
Sig’s ledger is composed of the following:
- Data Structures:
VersionedTransaction: A transaction in the ledger.Entry: A collection of transactions within a block.Shred: Represents both data and code shreds.Database: The database abstraction layer, supporting multiple implementations.BlockstoreDB: The database implementation and schema, currently using RocksDB.- Schema: The list of data types contained in the Blockstore.
- Data Processors:
- Shred Inserter: Validates, recovers, and inserts shreds into the database.
- Ledger Result Writer: Writes replay and consensus results into the database.
- Blockstore Reader: For reading anything out of the database.
- Cleanup Service: To prune old ledger data and limit storage usage.
The following diagram shows how these components depend on each other. The dotted boxes on the left are a sample of some validator components that depend on the ledger.
Data Structures
The data structures in Sig's ledger store transactions, blocks, and metadata.
VersionedTransaction
To represent any Solana transaction, Sig has a struct called VersionedTransaction. It contains a list of cryptographic signatures and a message.
pub const VersionedTransaction = struct {
    signatures: []const Signature,
    message: VersionedMessage,
};
The message can come in one of two different formats: legacy or the newer v0 message. We represent this with a tagged union, which expresses that one of these variants must be present.
pub const VersionedMessage = union(enum) {
    legacy: Message,
    v0: V0Message,
};
The legacy message is the traditional Message that was used in the original Solana Transaction struct. It contains a list of instructions that describe how to execute the transaction and the list of accounts that will be used by the transaction.
pub const Message = struct {
    header: MessageHeader,
    account_keys: []const Pubkey,
    recent_blockhash: Hash,
    instructions: []const CompiledInstruction,
};
The MessageHeader indicates how many signatures are required for the transaction and which accounts are allowed to be modified by the transaction.
pub const MessageHeader = struct {
    num_required_signatures: u8,
    num_readonly_signed_accounts: u8,
    num_readonly_unsigned_accounts: u8,
};
Each instruction specifies which onchain program_id needs to be invoked, which accounts will be used by that instruction, and the input data that will be interpreted by the program to execute that instruction.
pub const CompiledInstruction = struct {
    program_id_index: u8,
    accounts: []const u8,
    data: []const u8,
};
The newer V0Message is nearly the same as a legacy message, except that it includes an extra piece of information called address_table_lookups.
pub const V0Message = struct {
    header: MessageHeader,
    account_keys: []const Pubkey,
    recent_blockhash: Hash,
    instructions: []const CompiledInstruction,

    address_table_lookups: []const MessageAddressTableLookup,
};
Legacy transactions must include a complete list of every account address involved in a transaction, which restricts their flexibility due to their 1232-byte size limit. Address lookup tables release this constraint by storing account addresses onchain. Instead of needing to fit multiple addresses in a transaction, you may reference a single lookup table address. The Solana runtime retrieves the necessary addresses from the table, enabling DApp developers to build more complex transactions for a wider range of use cases.
Entry
Entry is the data structure representing a collection of transactions that are bundled together by the leader and distributed as a single cohesive unit across the network. Entries form the basis of shreds, as they are bundled into a list, serialized into a single blob of data, and then broken up into shreds, as described in a previous blog post.
Along with the list of transactions, entries also include their hash from the Proof-of-History chain, and the number of hashes that occurred in the chain since the previous entry.
pub const Entry = struct {
    num_hashes: u64,
    hash: core.Hash,
    transactions: std.ArrayListUnmanaged(core.VersionedTransaction),
};
Shred
Shreds come in two different flavors: data shreds and code shreds. The primary data held in a shred is the large chunk of bytes representing a portion of the entries from which the shreds are derived. Data shreds hold the actual data directly from the serialized entries, and code shreds hold the Reed-Solomon erasure codes that can be used to recover missing data. In either case, the data type is the same; it’s just a big chunk of bytes called a fragment.
While 1228 bytes are allocated to shreds, data shreds are arbitrarily confined to fit within 1203 of those bytes. After leaving space for metadata, this means the erasure fragment can be no more than 1003 bytes. The binary layout of a shred is as follows:
- Common Header: 83 bytes
- Custom Header: 5 bytes (data shred) or 6 bytes (code shred)
- Erasure Fragment: Up to 1003 bytes. This is the largest fragment that can fit with the minimum amount of metadata.
- Padding: If the fragment is smaller than the maximum, there will be unused bytes here.
- Chained Merkle Root: 32 bytes
- Merkle Proof: At least 80 bytes. Each Merkle node is 20 bytes, and you need a minimum of 4 layers to represent 18 shreds–the smallest erasure set.
- Retransmitter Signature: 0-32 bytes (only included for the last erasure set)

Since data and code shreds each contain slightly different types of metadata, each shred is represented in the code with a different data type: DataShred and CodeShred.
To generically represent either shred type, we define Shred as a tagged union (also known as an “enum” in some languages) with two variants.
pub const Shred = union(ShredType) {
    code: CodeShred,
    data: DataShred,
};
DataShred and CodeShred are each structs that contain a collection of fields. While there are some key differences, the high-level structure is similar. Some fields are used by both data and code shreds (CommonHeader), some fields are specific to the different types of shreds (DataHeader and CodeHeader), and the payload is the entire chunk of bytes representing the whole shred (including the serialized headers).
pub const DataShred = struct {
    common: CommonHeader,
    custom: DataHeader,
    allocator: Allocator,
    payload: []u8,
};

pub const CodeShred = struct {
    common: CommonHeader,
    custom: CodeHeader,
    allocator: Allocator,
    payload: []u8,
};
Common Fields
CommonHeader is metadata present in every shred. It contains the leader's signature, which must be verified before processing the shred. The variant field defines the shred as either a data or code shred, along with some associated metadata. It also specifies the shred's slot and its unique numeric index in the sequence of shreds for the slot. The version identifies the fork that the shred comes from. The erasure_set_index identifies which erasure set the shred is a part of, and it's equal to the index of the first shred in that set.
pub const CommonHeader = struct {
    leader_signature: Signature,
    variant: ShredVariant,
    slot: Slot,
    index: u32,
    version: u16,
    erasure_set_index: u32,
};
Data Fields
DataHeader is the custom header used in data shreds.
pub const DataHeader = struct {
    parent_slot_offset: u16,
    flags: ShredFlags,
    size: u16,
};
parent_slot_offset indicates which slot was the parent slot for this shred (parent_slot = slot - parent_slot_offset). If the parent offset is greater than 1, the previous slot was skipped. When a slot is skipped, it means that no block is included in the chain for that slot. One reason a slot may be skipped is if the leader for that slot fails to produce a block. In that case, the leader for the next slot must specify that its parent is a block from 2 slots earlier.
The flags indicate whether the current shred is the final shred of the erasure set or the slot. It also includes a reference tick to indicate when the erasure set was created.
size tells us how much space is consumed by the headers and the fragment combined. It is used when extracting the erasure fragment from the shred.
Code Fields
CodeHeader is the custom header for code shreds. This indicates the total number of data shreds and code shreds to expect within the erasure set and the index of the code shred among other code shreds in the set.
pub const CodeHeader = struct {
    num_data_shreds: u16,
    num_code_shreds: u16,
    erasure_code_index: u16,
};
Other Data
Those are the only fields found in the shred structs. The remaining data only exists in the shred payload (defined as a byte array), which can be extracted on-demand with specific methods.
After the headers is the erasure fragment. This is combined with fragments from other shreds in the erasure set to reconstruct a collection of entries.
The chained Merkle root is next. This is the Merkle root for the previous erasure set. It is used to verify that the leader produced a linear sequence of erasure sets.
The Merkle proof comes next. It proves that the current shred is part of the Merkle tree constructed for the erasure set. The Merkle root is not directly included in the shred. It is calculated by recursively hashing the shred fragment with the hashes in the proof.
Finally, the retransmitter signature is added by the node who retransmitted the shred to us over Turbine. This is only used for the shreds in the final erasure set of the slot.
Database
Database is an interface in Sig that defines the concept of a key-value store. It does not implement any particular database. It only defines an abstraction that enables Sig to connect to any database.
Through this abstraction, Sig can work with any arbitrary database backend. Currently, Sig supports three backends: RocksDB, LMDB, and hash maps. The database backend is selected using the blockstore build option. For example, this command builds Sig with LMDB as the database.
zig build -Dblockstore=lmdbAn interface is an agreed-upon set of rules or a blueprint that specifies how different parts of a program can interact without describing the inner workings of those parts. By specifying available actions but not how they are performed, interfaces allow us to write modular and flexible code. This enables programs to work with various systems or components adhering to the same interface—like different file systems or databases—without altering the core code. This approach simplifies development, enhances code readability, and facilitates future updates.
For a database, we need to support many operations. The main ones are:
put: save data into the databaseget: load data from the databasedelete: remove data from the database
The database is a key-value store. When you put data in the database, you provide a key and a value. The value is the data that you'd like to store, and the key is a label that is used to locate the value. When you get data out of the database, you specify a key, which the database uses to locate the value, and the database provides the value as the output.
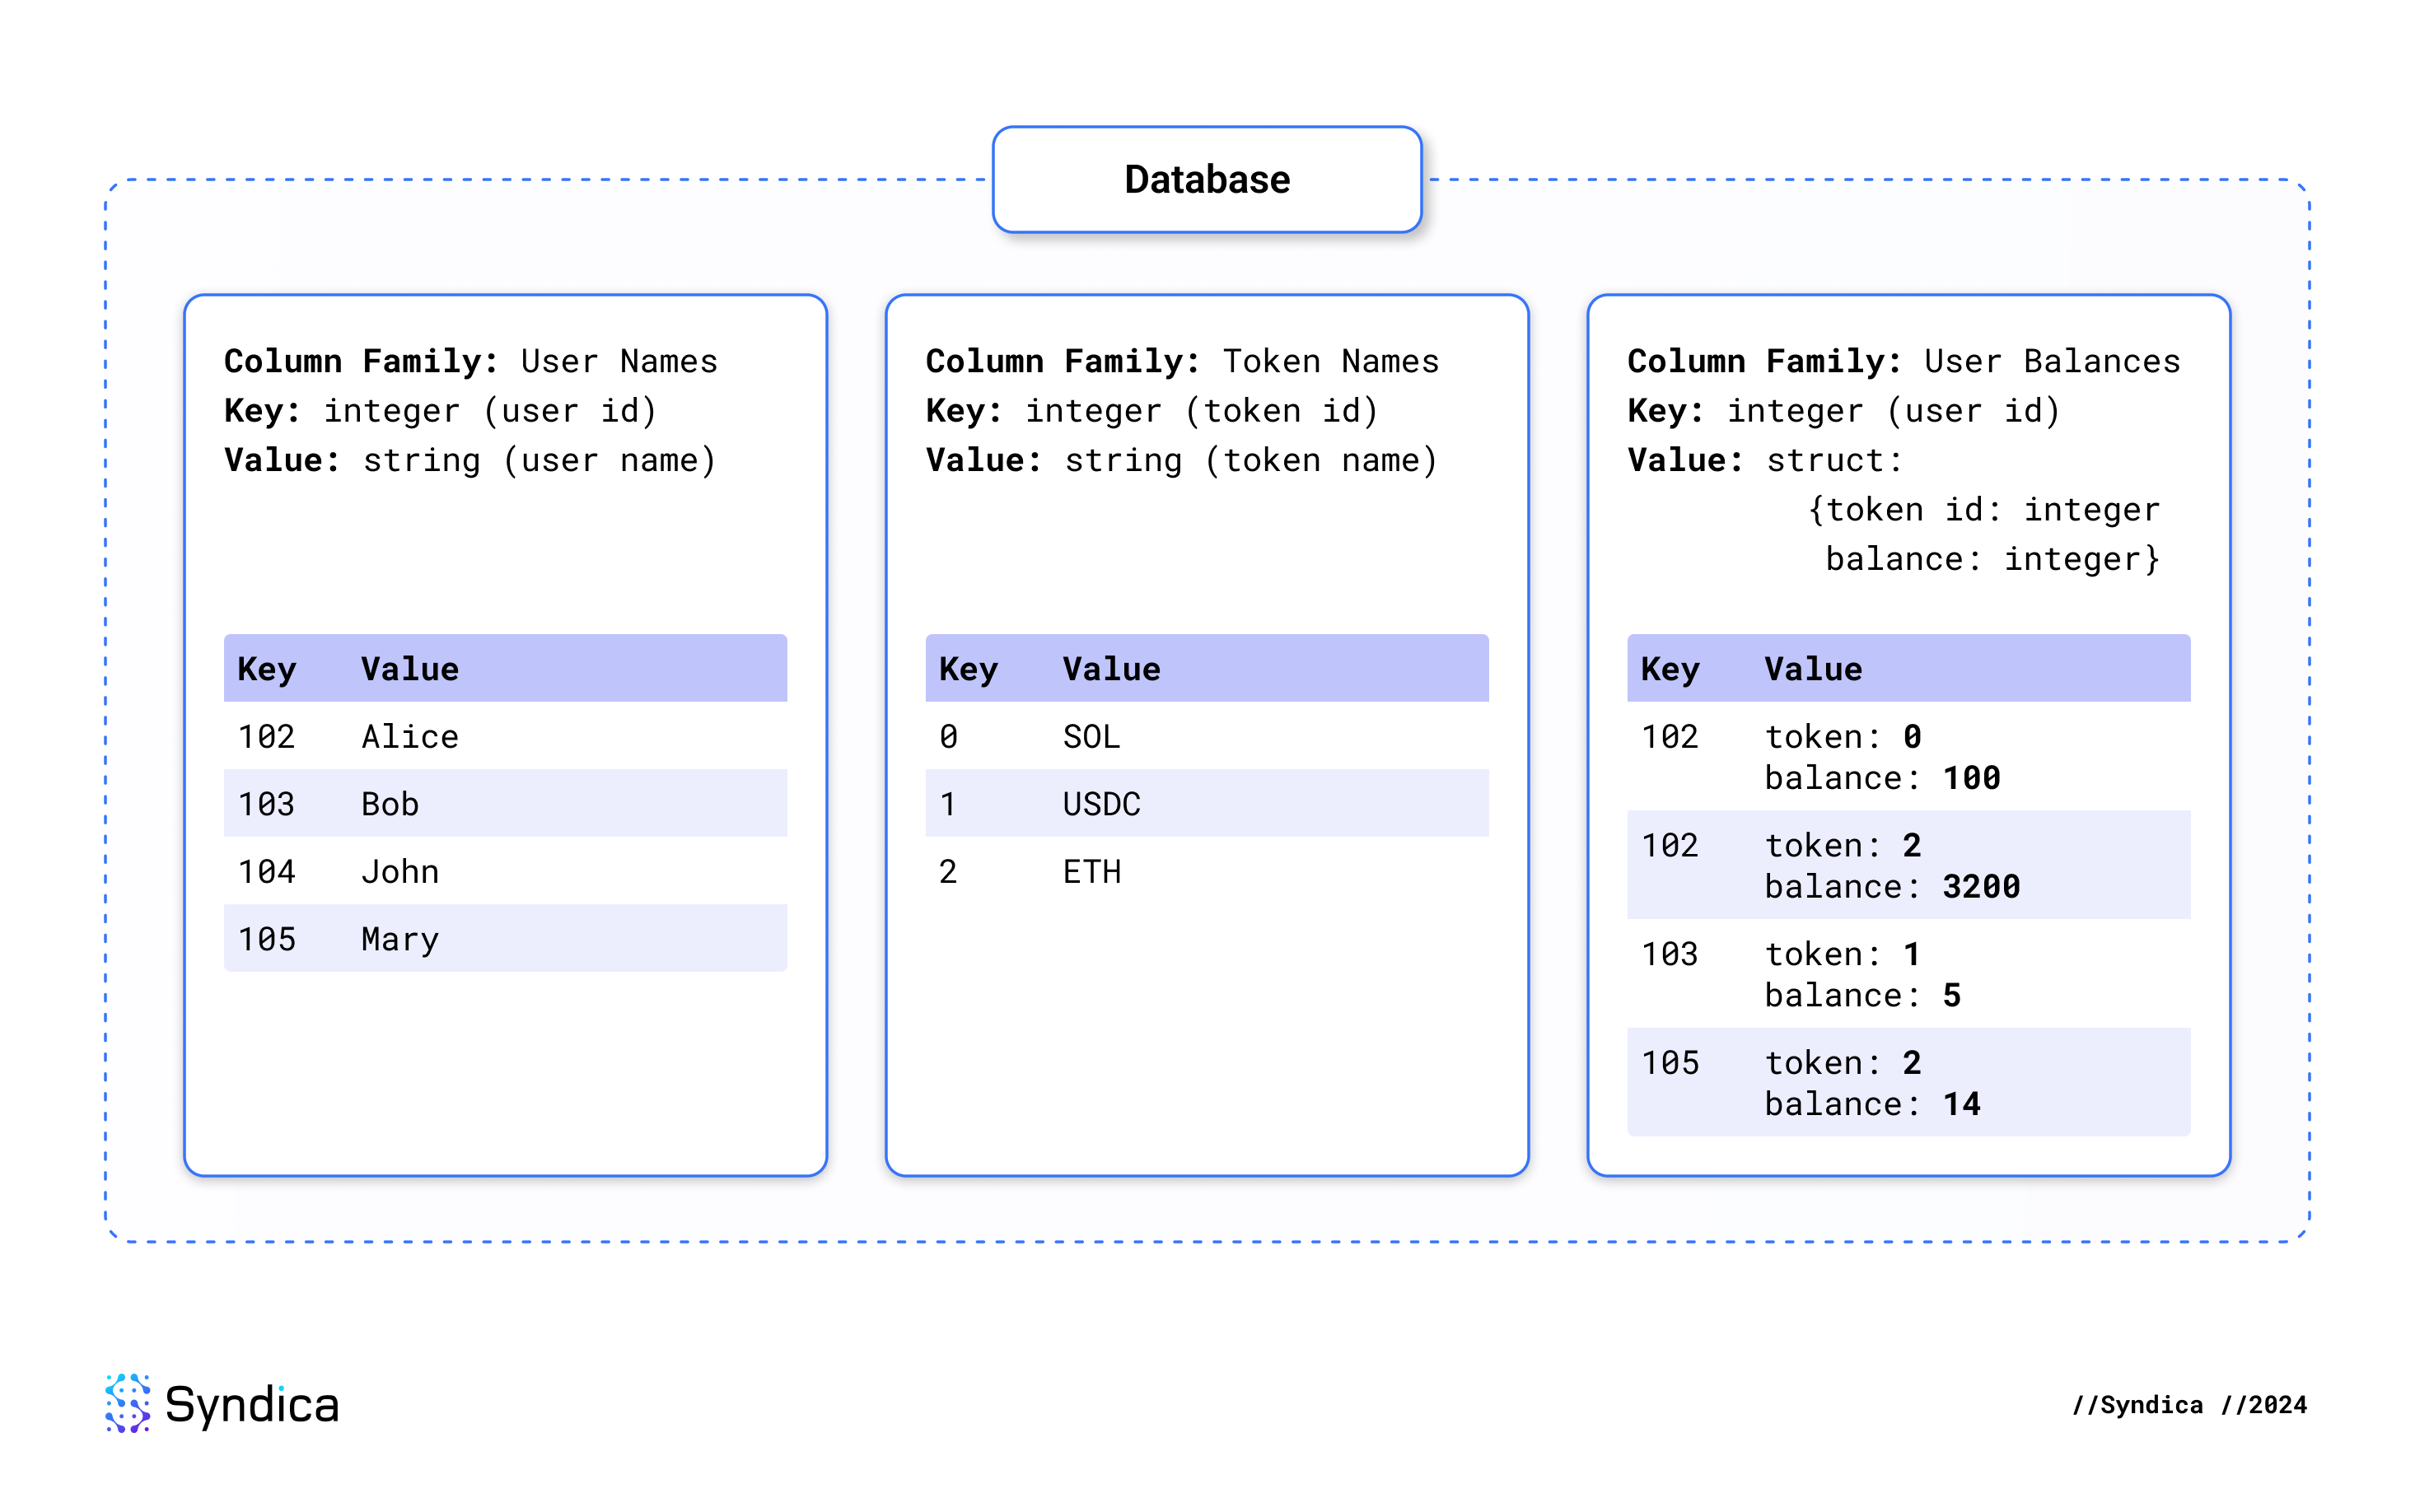
Column Families
Within a Database, there are many sections called column families. A column family is an individual key-value store. It’s analogous to a table in a relational database.
ColumnFamily is a data type in Sig. It specifies the column family’s name and the type of information we expect to find in it within the database.
pub const ColumnFamily = struct {
    name: []const u8,
    Key: type,
    Value: type,
};
For example, suppose you have a column family called "country populations." The key type could be a "string" representing the country's name, and the value type could be an "integer" representing the population. That column family would be defined like this:
const country_pop_cf = ColumnFamily{
    .name = "country populations,"
    .Key = []const u8,  // "[]const u8" is how you say "string" in Zig
    .Value = u64,       // u64 is a type of integer
};
Here’s another example that illustrates using a database with multiple column families. This database identifies users, tokens, and user token balances. Joining data across all column families, you can see that Alice has a balance of 100 SOL and 3200 ETH, Bob has a balance of 5 USDC, and Mary has a balance of 14 ETH.
Database Definition
This is how Database defines the three core operations: get, put, and delete:
/// Interface defining the ledger's dependency on a database.
pub fn Database(comptime Impl: type) type {
    return struct {
        impl: Impl,

        /// Save the provided key-value pair in the specified column family.
        pub fn put(
            self: *Self,
            comptime cf: ColumnFamily,
            key: cf.Key,
            value: cf.Value,
        ) anyerror!void {
            return try self.impl.put(cf, key, value);
        }

        /// Load the value associated with the provided key from the specified column family.
        pub fn get(
            self: *Self,
            allocator: Allocator,
            comptime cf: ColumnFamily,
            key: cf.Key,
        ) anyerror!?cf.Value {
            return try self.impl.get(allocator, cf, key);
        }

        /// Delete the value associated with the provided key from the specified column family.
        pub fn delete(self: *Self, comptime cf: ColumnFamily, key: cf.Key) anyerror!void {
            return try self.impl.delete(cf, key);
        }
    };
}
Let’s hone in on the region of code that starts with pub fn get. This is the definition of the get operation described by the interface. These are the inputs and the output:
- Inputs:
self: *Self: This means the database is needed for the operation.allocator: Allocator: This is a low-level feature of Zig. It enables the caller to define how the function should access memory from the operating system. This great feature of Zig allows us to directly control the performance of our program in a way that languages like Rust and C cannot easily support.cf: ColumnFamily: The database contains many column families, so we must be specific about which one we want to get data from.key: cf.Key: This is the key in the key-value pair. By passing it into thegetfunction, we’re asking the database to look in the specified column family for the value associated with this key. Its type iscf.Key, which means it is the type specified as the key type in the column family. The type provided here must conform to the type expected by the column family.
- Output: The output is a single piece of data with the type
anyerror!?cf.Value. This type is complicated, but what it means is that the function has three different choices of what it can output. Let’s break it down by each part.anyerror!: This means that the function could potentially have an error. For example, if the database files get deleted, it will return an error.?: This indicates that the output might be null. This would mean that the database could not locate the key in the database.cf.Value: This means that the function could return data with the type specified as the “value” type by the column family. If this data is returned, it means the key was found in the database, and the function is outputting the associated value that we were looking for.
You may have noticed that Database is not simply a struct; it’s actually a function that returns a type as its output. This is how Sig allows multiple backend implementations to be plugged in without changing the core ledger code.
pub fn Database(comptime Impl: type) type {
    return struct { ... };
}
This means that Database is a generic type. Generic types are one way the interface pattern can be implemented in Zig. There are an unlimited number of potential variants of Database, which are all technically different types. Database defines a set of behaviors that can use any arbitrary implementation type (Impl). You can describe a concrete database instance as having a type like Database(RocksDB).
Database simply delegates all operations to the Impl field. Each function body looks something like this:
return try self.impl.put(cf, key, value);This means that the Impl type is expected to implement the same set of behaviors defined by Database. For example, Database(RocksDB) uses RocksDB under the hood to implement all operations.
Database Implementations: RocksDB
RocksDB is a key-value store implemented in C++ by Facebook. It is the database used in Agave for the Blockstore, and we also support it in Sig.
zig build -Dblockstore=rocksdbRocksDB is a library. It is not a separate application that we run separately and connect to using the network. Our application needs to use it directly by including its code as a part of Sig. RocksDB is implemented in C++, which is not the same language as Agave or Sig. So, how has each project integrated it?
In Agave, RocksDB is integrated with the rocksdb crate. This is a pre-existing Rust library that integrates with the C++ library. Under the hood, the crate includes a build.rs script to build RocksDB using a C++ compiler called Clang, which must be installed on the host system before you can build the library. This introduces complexity into the build process and limits the flexibility of rust programs that depend on it.
Zig RocksDB Library
For Sig, we couldn’t use an existing RocksDB library implemented in Zig. There have been some previous efforts, but none were satisfactory for our needs. However, Zig makes it easy to build and integrate C and C++ projects directly with the Zig compiler. So we wrote our own Zig library called rocksdb-zig. Just like Sig, rocksdb-zig is open source. We encourage you to use it for your projects, and we are open to contributions.
Since we're using Zig, we don't need to depend on any external compilers. Zig is a C and C++ compiler. The build process is implemented in build.zig. Here are the critical lines of code to create a Zig library called rocksdb that includes the C++ source files from the RocksDB project:
const librocksdb_a = b.addStaticLibrary(.{ .name = "rocksdb" };
librocksdb_a.addCSourceFiles(.{
    // list of c++ files from RocksDB
});
b.installArtifact(librocksdb_a);
This can be imported as an ordinary Zig dependency. Here’s how you can open a RocksDB database with two column families:
const rdb = @import("rocksdb");

// set up arguments
const path = "/path/to/db";
const cf_names: [2][]const u8 = .{
	"default",
	"other cf",
};
const cf_options: [2]?*const rdb.rocksdb_options_t = .{
	rdb.rocksdb_options_create().?,
	rdb.rocksdb_options_create().?,
};
const cf_handles: [2]?*rdb.rocksdb_column_family_handle_t = .{ null, null };
const maybe_err_str: ?[*:0]u8 = null;

// open database
const database = rdb.rocksdb_open_column_families(
	db_options.convert(),
	path.ptr,
	@intCast(cf_names.len),
	@ptrCast(cf_names[0..].ptr),
	@ptrCast(cf_options[0..].ptr),
	@ptrCast(cf_handles[0..].ptr),
	&maybe_err_str,
);

// handle errors
if (maybe_err_str) |error_str| {
	return error.RocksDBOpen;
}
Since this directly invokes C code, you need to use some clunky programming patterns inherent to RocksDB’s C API. For example:
- You need to pass many extra parameters into functions that normally would be handled by structs or return values in a modern language.
- You need to use C pointers instead of Zig slices, which are not as safe.
- Structs are opaque and require getters and setters to access their state.
- Every name in the API is redundantly prefixed with
rocksdb_.
That's why we wrote our own idiomatic bindings library in Zig. You'll find this in the src folder. Our library wraps RocksDB's C API with a more user-friendly Zig API and takes full advantage of Zig's modern language features. This is how to use the bindings library to accomplish the same thing as the example above:
const rocks = @import("rocksdb-bindings");

const col_fams = .{
    .{ .name = "default" },
    .{ .name = "other cf" },
};

const database, _ = try rocks.DB.open(allocator, "/path/to/db", .{}, col_fams, &null);
rocksdb-zig provides these Zig libraries:
rocksdbfor direct access to the RocksDB C APIrocksdb-bindingsfor the Zig API
RocksDB Database in Sig
Using RocksDB as the Blockstore database is straightforward. We only need to define a struct that implements the required methods from Database. This struct in Sig is called RocksDB. Most of the work is handled by delegating to rocks.DB from rocksdb-zig, but it also has a few responsibilities of its own:
- Serialization to convert between Sig data types and the raw bytes stored by RocksDB
- Map from the
ColumnFamilydescription used in the Blockstore schema to theColumnFamilyHandlethat RocksDB uses internally to identify column families - Log errors
This is how the put method makes use of the rocksdb-bindings library:
const rocks = @import("rocksdb-bindings");

pub fn RocksDB(comptime column_families: []const ColumnFamily) type {
    return struct {
        allocator: Allocator,
        db: rocks.DB,
        logger: Logger,
        cf_handles: []const rocks.ColumnFamilyHandle,
        path: []const u8,

        pub fn put(
            self: *Self,
            comptime cf: ColumnFamily,
            key: cf.Key,
            value: cf.Value,
        ) anyerror!void {
            const key_bytes = try key_serializer.serializeToRef(self.allocator, key);
            defer key_bytes.deinit();
            const val_bytes = try value_serializer.serializeToRef(self.allocator, value);
            defer val_bytes.deinit();
            return try callRocks(
                self.logger,
                rocks.DB.put,
                .{
                    &self.db,
                    self.cf_handles[cf.find(column_families)],
                    key_bytes.data,
                    val_bytes.data,
                },
            );
        }
    };
}
Database Implementations: LMDB
LMDB is a lightweight alternative to RocksDB that is implemented in C. Like RocksDB, we are building LMDB using the Zig build system. lmdb-zig is fully open source, and you can easily import it directly into a Zig project. LMDB is lighter than RocksDB, and for some workloads, LMDB performs better. We aim to take advantage of this in future performance optimizations.
zig build -Dblockstore=lmdbHere’s a sample of the put function in our LMDB Database implementation. You can see that we implemented it directly using the LMDB C library.
pub fn LMDB(comptime column_families: []const ColumnFamily) type {
    return struct {
        allocator: Allocator,
        env: *c.MDB_env,
        dbis: []const c.MDB_dbi,
        path: []const u8,

        const Self = @This();

        pub fn put(
            self: *Self,
            comptime cf: ColumnFamily,
            key: cf.Key,
            value: cf.Value,
        ) anyerror!void {
            const key_bytes = try key_serializer.serializeToRef(self.allocator, key);
            defer key_bytes.deinit();
            const val_bytes = try value_serializer.serializeToRef(self.allocator, value);
            defer val_bytes.deinit();

            const txn = try ret(c.mdb_txn_begin, .{ self.env, null, 0 });
            errdefer c.mdb_txn_abort(txn);

            var key_val = toVal(key_bytes.data);
            var val_val = toVal(val_bytes.data);
            try result(c.mdb_put(txn, self.dbi(cf), &key_val, &val_val, 0));
            try result(c.mdb_txn_commit(txn));
        }
    };
}
Database Implementations: Hash Map DB
We also implemented a database in pure Zig using hash maps. The entire implementation is 500 lines of Zig with no dependencies. It uses ordinary hash maps and writes them to the disk using a disk-backed allocator. Zig's flexible Allocator interface made this design possible. The hash map database is a basic proof-of-concept, not intended to be ACID-compliant, but it is sufficient to support a functional ledger. This database is extremely lightweight and reduces external dependencies, which makes it useful for testing or running a light client. In our benchmarks, it performs similarly to RocksDB.
zig build -Dblockstore=hashmapHere’s how put works in the SharedHashMapDB:
pub fn SharedHashMapDB(comptime column_families: []const ColumnFamily) type {
    return struct {
        /// For small amounts of metadata or ephemeral state.
        fast_allocator: Allocator,
        /// For database storage.
        storage_allocator: Allocator,
        /// Implementation for storage_allocator
        batch_allocator_state: *BatchAllocator,
        /// Backing allocator for the batch allocator
        disk_allocator_state: *DiskMemoryAllocator,

        /// Database state: one map per column family
        maps: []SharedHashMap,

        /// shared lock is required to call locking map methods.
        /// exclusive lock is required to call non-locking map methods.
        /// to avoid deadlocks, always acquire the shared lock *before* acquiring the map lock.
        transaction_lock: *RwLock,

        const Self = @This();

        pub fn put(
            self: *Self,
            comptime cf: ColumnFamily,
            key: cf.Key,
            value: cf.Value,
        ) anyerror!void {
            const key_bytes = try key_serializer.serializeAlloc(self.storage_allocator, key);
            errdefer self.storage_allocator.free(key_bytes);

            const val_bytes = try serializeValue(self.storage_allocator, value);
            errdefer val_bytes.deinit(self.storage_allocator);

            self.transaction_lock.lockShared();
            defer self.transaction_lock.unlockShared();

            return try self.maps[cf.find(column_families)].put(key_bytes, val_bytes);
        }
    };
}

const SharedHashMap = struct {
    allocator: Allocator,
    map: SortedMap([]const u8, []const u8),
    lock: DefaultRwLock = .{},

    const Self = @This();

    pub fn put(self: *Self, key: []const u8, value: RcSlice(u8)) Allocator.Error!void {
        self.lock.lock();
        defer self.lock.unlock();
        const entry = try self.map.getOrPut(key);
        if (entry.found_existing) {
            self.allocator.free(key);
            entry.value_ptr.deinit(self.allocator);
        }
        entry.value_ptr.* = value;
    }
}
Schema
The database contains 20 column families, each defined and documented in schema.zig as an instance of the ColumnFamily struct described above.
The most important data stored in the Blockstore are the shreds since all blocks and transactions are contained in them. data_shred and code_shred each get their own column family. This is what the data_shred definition looks like. It’s just a constant defined in the schema file.
/// Every data shred received or recovered by the validator.
pub const data_shred: ColumnFamily = .{
    .name = "data_shred",
    .Key = struct { Slot, u64 },
    .Value = []const u8,
};
Reading a data shred out of the database looks like this:
const data_shred = try database.get(allocator, schema.data_shred, .{slot, index});The remaining column families have two general purposes. Seven column families are used to track information while receiving shreds from the network, and these will be described in the Shred Inserter section. Ten column families are used to track the results of executing blocks and transactions, and they will be described in the Ledger Result Writer section. Two other column families, program_costs and transaction_status_index, do not serve any important purpose in Sig or Agave and are currently only kept for compatibility.
Blockstore DB
While Database defines the interface for the Blockstore, the actual implementation is provided through the BlockstoreDB type alias.
BlockstoreDB is a concrete instance of a Database, and it is configured to support the full schema described above. The implementation is selected on the command-line with the blockstore build option.
pub const BlockstoreDB = switch (build_options.blockstore) {
    .rocksdb => ledger.database.RocksDB(&ledger.schema.list),
    .hashmap => ledger.database.SharedHashMapDB(&ledger.schema.list),
    .lmdb => ledger.database.LMDB(&ledger.schema.list),
};
We guarantee the interface is properly implemented with the assertIsDatabase function, which runs at compile-time. This means the application will not compile unless BlockstoreDB implements the Database interface.
test BlockstoreDB {
   ledger.database.assertIsDatabase(BlockstoreDB);
}
assertIsDatabase is backed by a generic function defined in Sig called assertImplements. In this function, we wrote a novel implementation of the interface pattern in Zig, which can be used to enforce any interface.
Data Processors
The data processors are the components that are responsible for executing the ledger's core operations: inserting shreds, reading data, and writing transaction results. These are the modular components that reflect the set of behaviors implemented within the Blockstore struct in Agave.
Shred Inserter
When new shreds arrive from the network, we must insert them into the database to keep the ledger up-to-date. This is the sole responsibility of the Shred Inserter, which exposes only one public method called insertShreds to perform the entire process.
Inserting shreds is complex because we need to make sense of the shreds before inserting them. We need to constantly monitor metadata about the shreds, perform many validations for each shred, and reconstruct missing shreds using Reed-Solomon erasure codes. Let's break it down step by step.
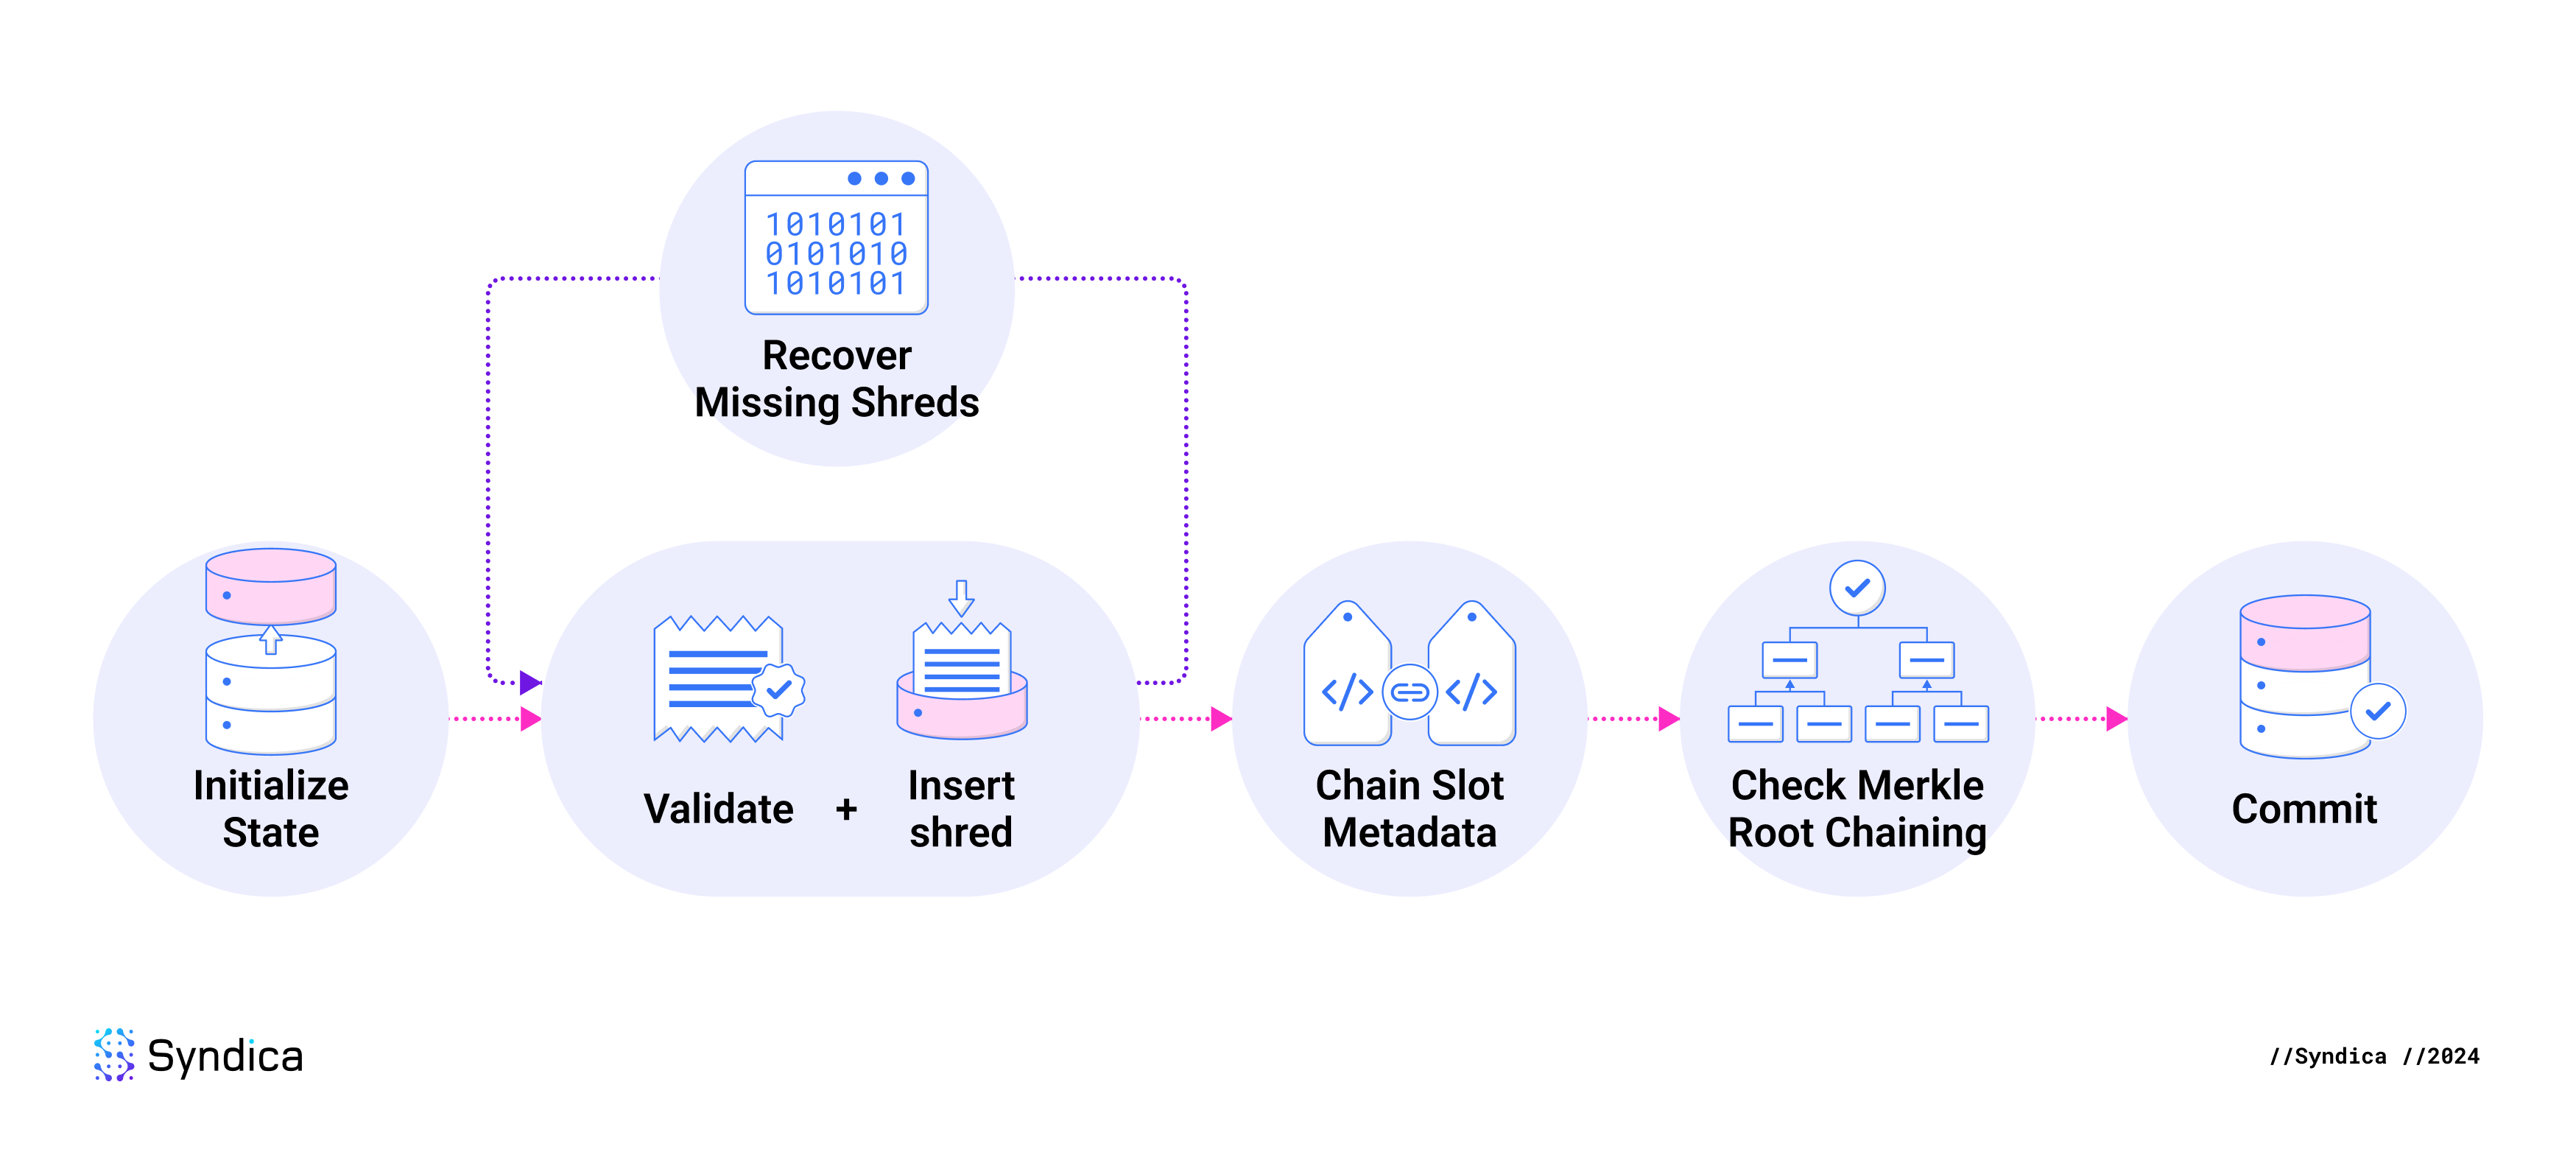
When inserting shreds, the steps are:
- Initialize the insertion state.
- Run the Validate + Insert loop for each shred.
- Validate shred.
- Insert shred to pending state.
- Insert metadata to pending state.
- Recover missing shreds.
- Insert recovered shreds by re-running the Validate + Insert loop.
- Chain slot metadata.
- Check Merkle root chaining.
- Commit the pending state to the Database.
Shred Insertion Database Schema
While inserting shreds received from the network, we track various types of metadata about those shreds. This is aggregated at a high level and tracked for each slot or each erasure set. This metadata helps us understand if we’ve received all the shreds for a slot (meaning we have a complete block) or if we can recover missing shreds. It also helps us compare different shreds and ensure they are all consistent so it can flag slots with inconsistent data. This metadata is stored in the following seven column families:
Slot Metadata:
slot_meta: Information about the slot, including how many shreds we have received for the slot and whether we've processed data from any of the adjacent slots.index: A unified data structure for each slot that indicates which shreds have been received for that slot.dead_slots: Indicates whether a slot is "dead." A dead slot is a slot the leader has downgraded to have fewer shreds than initially planned. This means it may not be possible to derive a complete block from this slot.duplicate_slots: Indicates whether the leader has produced duplicate blocks for the slot. If a leader commits this offense, the data cannot be included in the ledger.orphan_slots: Tracks slots for which we’ve received shreds but haven’t received any for their parent slots. A slot's parent is the slot that was supposed to come immediately before it.
Erasure Set Metadata:
erasure_meta: Metadata about each Reed-Solomon erasure set, such as how many shreds are in the set.merkle_root_meta: Stores the Merkle root for each Reed-Solomon erasure set and the shred it came from.
Initialize Insertion State
Shred insertion must be atomic: all the shreds and their metadata should be inserted simultaneously, or none can be inserted.
For example, one column family tracks shreds, and another tracks their insertion status. If these become inconsistent (from updating their insertion status but not inserting the shreds), the database will be corrupted, and many errors will ensue. Many other relationships require atomicity like this.
To ensure this, we use atomic database transactions called write batches to write to the database. Databases like RocksDB and LMDB are able to guarantee that a collection of changes is executed atomically.
One might assume that a simple approach using write batches alone would be a good solution for atomicity. However, this is insufficient for two reasons:
- Some data may need to be modified multiple times, requiring repeated database insertions, which is inefficient.
- Shred insertion needs to read up-to-date data from the database, but since new data is only in the write batch, the database view becomes stale. We need a way to check the new data before looking in the database.
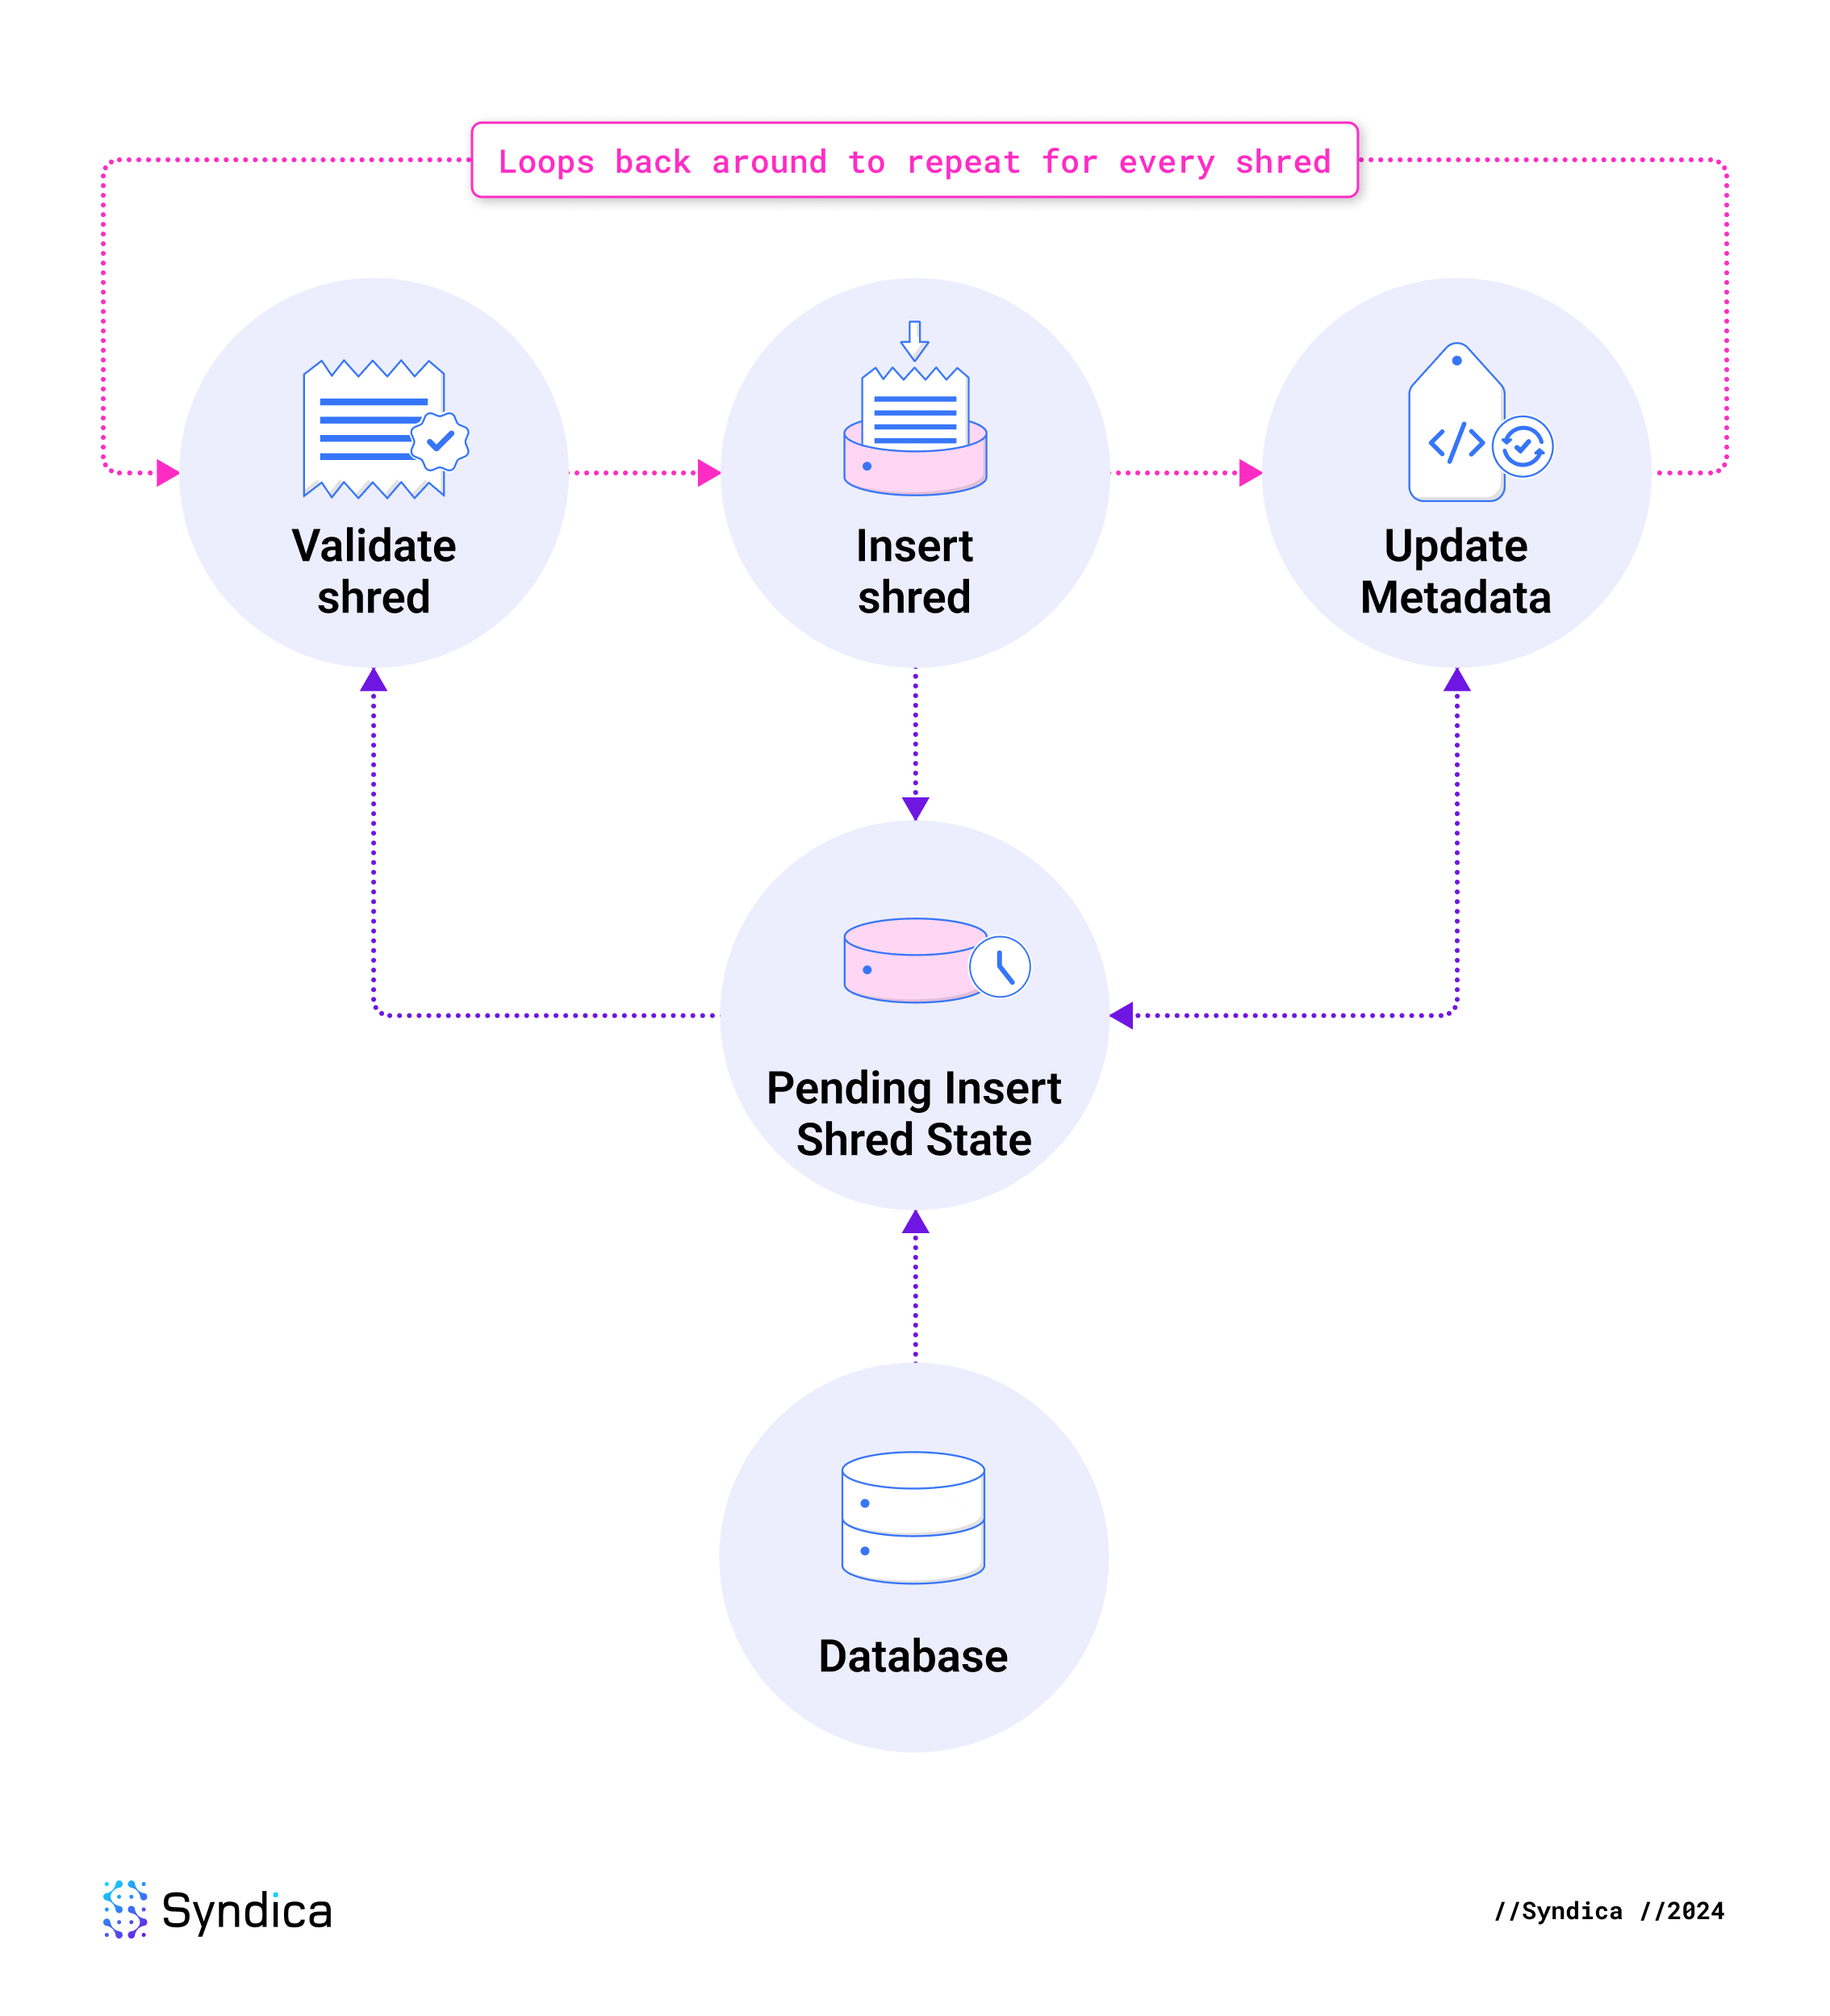
To handle this, we created the PendingInsertShredsState struct, which acts as a proxy for the database during shred insertion. It tracks real-time updates, allowing you to read the latest state at any time, and it generates redundancy-free write batches. You can find this struct in ledger/shred_inserter/working_state.zig.
Validate-Insert Loop
The next three steps repeat for every shred in the current batch. The shred is validated and inserted, and then metadata is updated accordingly.
Validate shreds
To ensure byzantine fault tolerance in an adversarial network, we can't trust any of the data we receive. We must verify each shred’s validity before it can be inserted. If any requirements are not met, then we discard that shred. The verifications are implemented in checkInsertCodeShred, checkInsertDataShred, and shouldInsertDataShred.
Requirements for all shreds:
- The entire shred must conform to a valid binary layout. For example, if the shred’s header indicates that it contains a retransmitter signature, 32 bytes must be present to account for that signature.
- The shred index must not exceed the maximum number of shreds per slot: 32,768.
- The shred must be a part of the erasure set’s Merkle tree. This is verified by deriving the Merkle root from the Merkle proof and ensuring the calculated root equals the root calculated for previously received shreds from the same erasure set.
- There must not be a shred previously inserted for this slot and shred index.
- The shred’s signature must contain a valid signature from the leader of the Merkle root. (Note: This requirement is enforced by the Shred Verifier, a separate component of Sig, not the Shred Inserter.)
Requirements for data shreds:
- The shred must not claim to be the last in the slot if a previous shred said that a different shred would be last. If this occurs, we also mark the slot as "dead" because the leader has misbehaved, which means the slot is corrupted.
- The shred must not be a "duplicate," which means one of the following conditions is met. If it is found to be a duplicate, the slot is corrupted, and the shred’s slot is saved in
duplicate_slots.- The shred has an index greater than the index that a previous shred already claimed was the last index of the current slot.
- The shred claims to be the last index in the slot, but we've received shreds with a higher index than this one.
- The shred’s parent slot must not be…
- …greater than this shred’s slot. This would be a temporal contradiction.
- …earlier than the highest rooted slot. This means the shred’s slot should already be rooted, so we don’t need it.
Requirements for code shreds:
- The specified number of code shreds in the header must be less than 256.
- It must be possible to calculate a valid position of the shred's fragment within the erasure set.
- The shred must not be from a rooted slot.
- The erasure fields on the shred must be consistent with those from the first shred received from this erasure set.
Insert Received Shreds
Once a shred passes all the integrity checks, it is stored in PendingInsertShredsState. This means we added a put instruction into the current write batch, and they are also stored in the pending state variable, where they can be accessed later in the current insertShreds operation.
Insert Metadata
After tracking the validated shreds, the following column families are updated (in the pending state) to record new information that we got from the shred:
index: Acknowledge that we received this shred.slot_meta: The shred might have the highest index we’ve received, or it may tell us which index is the last one in the slot. Either scenario updates the slot's metadata.erasure_meta: If it’s the first code shred we’ve received from the erasure set, save the metadata about the erasure set.merkle_root_meta: If it’s the first shred we’ve received from the erasure set, save the Merkle root’s hash, plus identify this shred as the source.
Recover Shreds and Insert Them
After updating the metadata from newly received shreds, the next step is to attempt to reconstruct the missing shreds.
For example, let’s say an erasure set contains 5 data shreds, and we have already received 2 data and 2 code shreds. Receiving any new shred from this erasure set gives us a total of 5 shreds, which allows us to reconstruct the complete erasure set.
To determine if we can recover shreds, we first check the ErasureMeta to understand how many are needed to recover the entire erasure set.
pub const ErasureMeta = struct {
    /// Which erasure set in the slot this is
    erasure_set_index: u64,
    /// First code index in the erasure set
    first_code_index: u64,
    /// Index of the first received code shred in the erasure set
    first_received_code_index: u64,
    /// Erasure configuration for this erasure set
    config: ErasureConfig,
};

pub const ErasureConfig = struct {
    /// number of data shreds in the erasure set
    num_data: usize,
    /// number of code shreds in the erasure set
    num_code: usize,
};
We then compare this to the number of shreds we have received. For each shred in the erasure set, we check the Index to see if it was received. We count the number of hits to determine the total number of received shreds from the set.
pub const Index = struct {
    slot: Slot,
    /// The indexes of every data shred received for the slot
    data_index: Set(u64),
    /// The indexes of every code shred received for the slot
    code_index: Set(u64),
};
If we have enough shreds to reconstruct the entire set, we gather the available shreds from the pending state or read from the database if the shred does not exist in its state.
The erasure fragments from the shreds are passed into ReedSolomon.reconstruct, where we have implemented the Reed-Solomon error correction algorithm in Zig. This function outputs the complete collection of all shreds from the erasure set.
Due to the sheer size of the numbers involved in the Reed-Solomon algorithm (each fragment is about 1 KB, or in decimal form, a number with ~3,000 digits), the Lagrange Interpolation process described in our previous blog post is reformulated into matrix operations over a finite field to make the process more suitable for computers to execute efficiently.
After reconstructing the missing shreds, they are validated and inserted in the same way as the shreds we received over the network.
Chain slot metadata
To organize information about each slot, we use the slot_meta column family, which maps a slot number to a SlotMeta:
/// The slot_meta column family
pub const SlotMeta = struct {
    /// The number of slots above the root (the genesis block). The first
    /// slot has slot 0.
    slot: Slot,
    /// The total number of consecutive shreds starting from index 0 we have received for this slot.
    /// At the same time, it is also an index of the first missing shred for this slot, while the
    /// slot is incomplete.
    consecutive_received_from_0: u64,
    /// The index *plus one* of the highest shred received for this slot.  Useful
    /// for checking if the slot has received any shreds yet, and to calculate the
    /// range where there is one or more holes: `(consumed..received)`.
    received: u64,
    /// The timestamp of the first time a shred was added for this slot
    first_shred_timestamp_milli: u64,
    /// The index of the shred that is flagged as the last shred for this slot.
    /// None until the shred with LAST_SHRED_IN_SLOT flag is received.
    last_index: ?u64,
    /// The slot height of the block this one derives from.
    /// The parent slot of the head of a detached chain of slots is None.
    parent_slot: ?Slot,
    /// The list of slots, each of which contains a block that derives
    /// from this one.
    child_slots: std.ArrayList(Slot),
    /// Connected status flags of this slot
    connected_flags: ConnectedFlags,
    /// Shreds indices which are marked data complete.  That is, those that have the
    /// data_complete_shred set.
    completed_data_indexes: SortedSet(u32),
};
When processing shreds, we not only update the shred’s slot’s metadata, but we also update its parent and children slot metadata. We call this chaining slots. This includes updating the following fields on the relevant SlotMeta instances:
- parent_slot: Any shreds from this slot will specify which slot came before it, so we'll update
parents_slotto identify it. - connected_flags: If the current slot is completed (meaning all shreds were received), and all the slots before it are also completed, then we mark it as "connected."
- child_slots: If all the shreds have finally been received from a slot, we update every
SlotMetawhose list of connections can now be updated. For example, let's say we've received every shred from slots 1-3 and 5-7 and only some from slot 4. That means each of those slots has a set ofchild_slotsthat looks like this:

After receiving the final shred from slot 4, they are updated like so:

This is implemented in ledger/shred_inserter/slot_chaining.zig.
Check Merkle root chaining
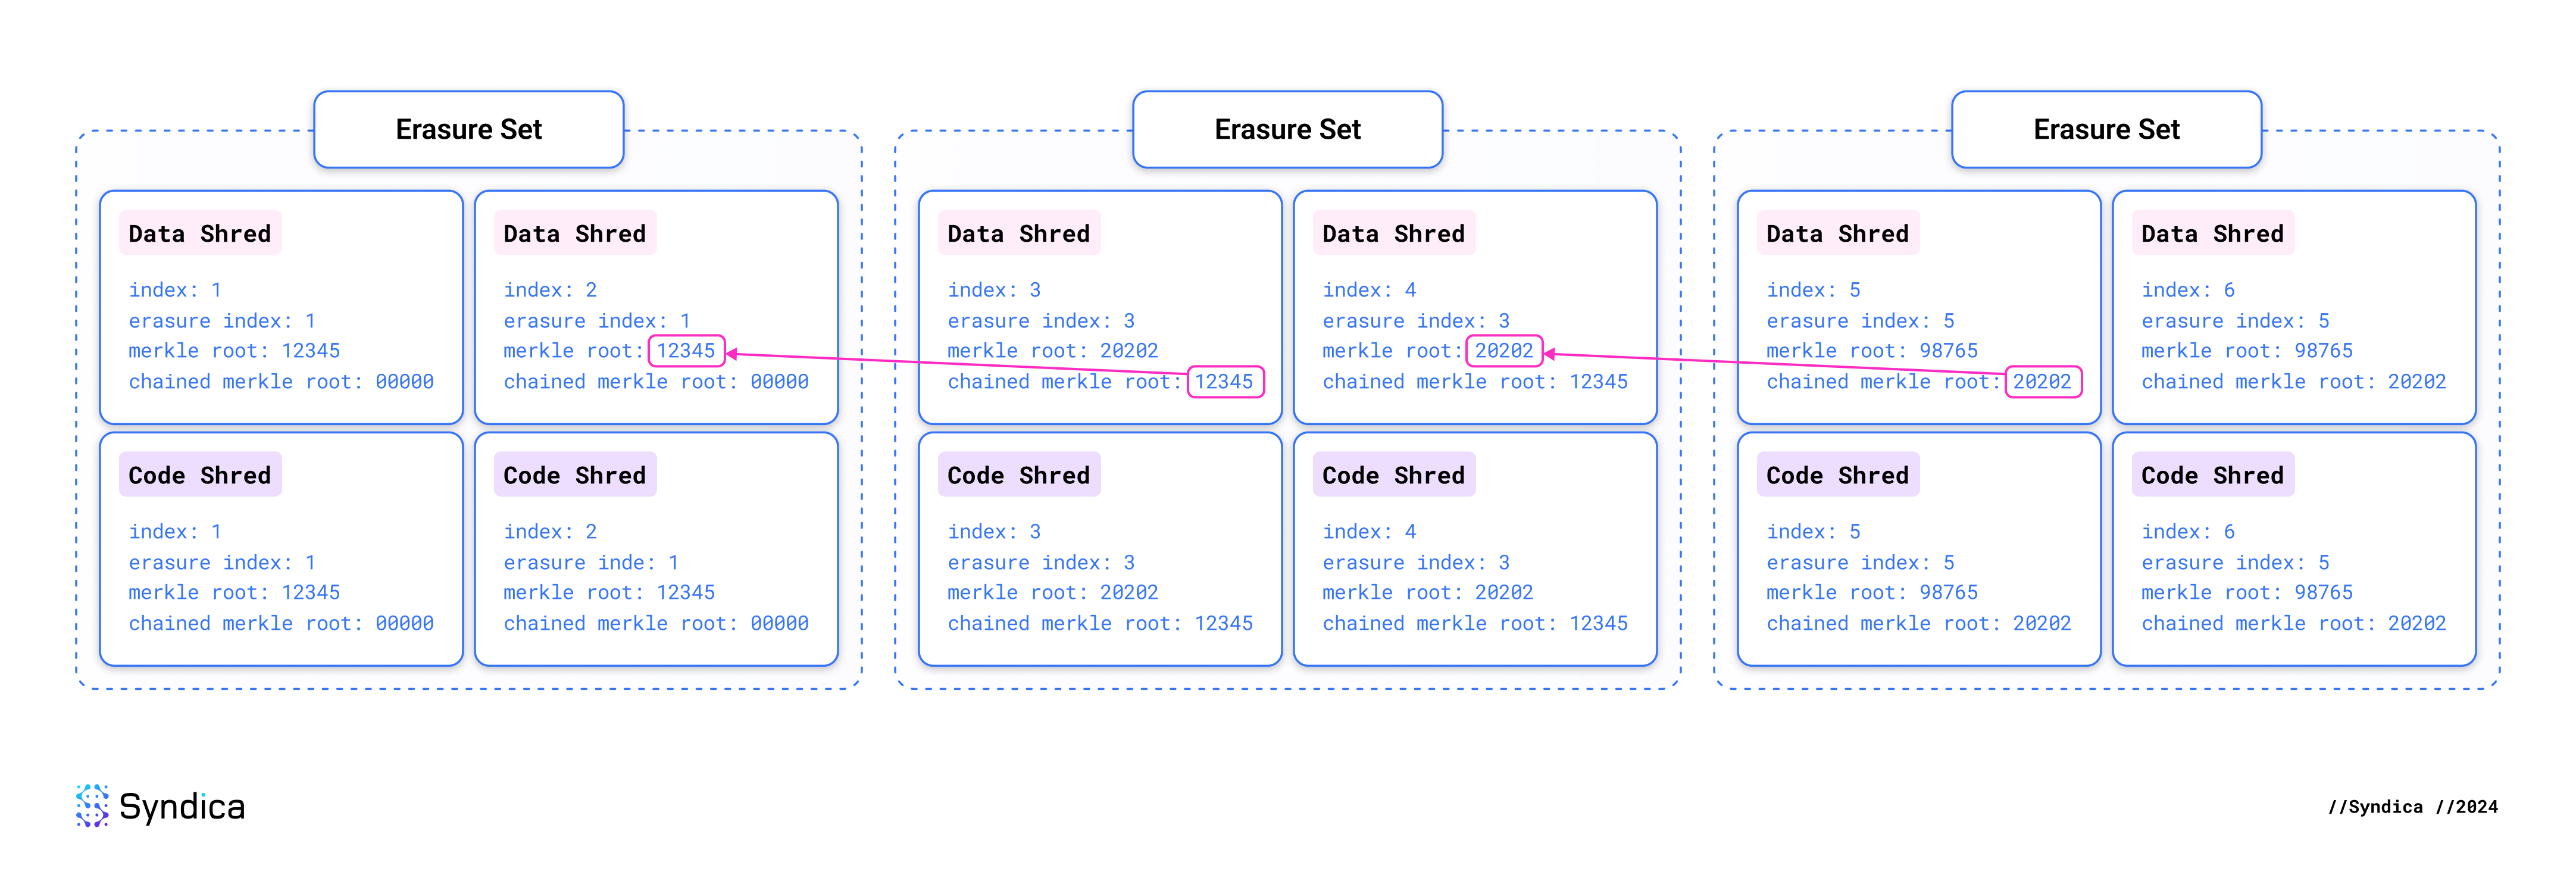
The ledger should be composed of a continuous sequence of erasure sets. A leader may violate this by creating two distinct erasure sets with the same index. We require the leader to “chain” the erasure sets together to detect issues like this as quickly as possible.
Each erasure set must specify the Merkle root of the erasure set that came before it, called its chained Merkle root. If the leader produces any discontinuities in the chain, we will detect it as soon as we get a pair of contradictory shreds. There is no need to process the entire erasure set. This also enables validators to easily prove to each other that a leader has misbehaved. All you need to do is show someone those two contradictory shreds, and the violation is proven.
Through this mechanism, the cluster can quickly and efficiently reach consensus about a misbehaving leader and drop their invalid blocks.
We do two checks for each erasure set touched during this round of shred insertions:
- Forward Chaining: See if any shreds have ever been received from the next erasure set. If so, ensure that its chained Merkle root is the same as the Merkle root from the current erasure set.
- Backward Chaining: See if any shreds have been received from the prior erasure set. If so, ensure its Merkle root is the same as the “chained Merkle root” from the current erasure set.
This is implemented in ledger/shred_inserter/merkle_root_checks.zig.
Commit Insertion
The final step in insertShreds is to store all the pending state in the Blockstore with a single atomic action.
To do this, the state in the PendingInsertShredsState struct is checked for any modified data. Each modified item is inserted into a write batch using the put operation. The write batch is then atomically committed to the database.
Ledger Result Writer
LedgerResultWriter is responsible for writing transaction statuses and other block results, both of which are not in shreds. This data is typically produced during the replay stage when executing the transactions found in shreds.
Ledger Result Schema
After replaying transactions or reaching consensus, we’ll have new information about each transaction, block, and slot. This metadata is stored in the following column families:
Transaction Metadata:
transaction_status: Metadata about executed transactions, such as whether they succeeded or failed, what data was returned, and other effects of the transaction.address_signatures: Associates each account with the transactions that interacted with this account.transaction_memos: Optional user-provided messages that describe a transaction.
Block & Slot Metadata:
bank_hash: The combined hash of all accounts that were changed by the block.blocktime: Time a block was produced.block_height: Total number of blocks produced throughout history prior to a particular slot.rooted_slots: Indicates which slots are rooted. A slot is "rooted" when consensus is finalized for that slot. This means that the block from that slot is permanently included onchain.optimistic_slots: Tracks which slots have been optimistically confirmed by consensus, along with the hash and the time that it was recognized as confirmed by this validator.rewards: Block rewards to the leader for the block.perf_samples: The rate at which the ledger progresses through slots and transactions.
Transaction Status
Updating the transaction status is implemented in the writeTransactionStatus function. The primary role of this function is to insert the transaction status directly into the transaction_status column family. It also modifies the address_signatures column family to identify which accounts may have been modified by the transaction.
The transaction_status column family contains the TransactionStatusMeta data structure, which contains the transaction itself, plus all the output data from the transaction, including any state changes:
pub const TransactionStatusMeta = struct {
    /// Whether the transaction succeeded, or exactly what error caused it to fail
    status: ?TransactionError,

    /// Transaction fee that was paid by the fee payer.
    fee: u64,

    /// Lamport balances of every account in this transaction before it was executed.
    pre_balances: []const u64,

    /// Lamport balances of every account in this transaction after it was executed.
    post_balances: []const u64,

    /// Instructions that were executed as part of this transaction.
    inner_instructions: ?[]const InnerInstructions,

    /// Messages that were printed by the programs as they executed the instructions.
    log_messages: ?[]const []const u8,

    /// Token account balances of every token account in this transaction before it was executed.
    pre_token_balances: ?[]const TransactionTokenBalance,

    /// Token account balances of every token account in this transaction after it was executed.
    post_token_balances: ?[]const TransactionTokenBalance,

    /// Block rewards issued to the leader for executing this transaction.
    rewards: ?[]const Reward,

    /// Addresses for any accounts that were used in the transaction.
    loaded_addresses: LoadedAddresses,

    /// Value that was provided by the last instruction to have a return value.
    return_data: ?TransactionReturnData,

    /// Number of BPF instructions that were executed to complete this transaction.
    compute_units_consumed: ?u64,
};
Blockstore Reader
BlockstoreReader is the struct responsible for reading data from the ledger. It provides access to blocks, transactions, entries, and transaction statuses to validator components like RPC and Replay. It reads from most of the column families in the database.
To read any data from a block, the Blockstore Reader must construct the block’s entries from their constituent shreds. The core function that implements this is called getSlotEntriesInBlock, which extracts shreds and converts them into entries.
To use this function, you specify what range of shreds you expect to contain complete entries, and it will provide those entries by following these steps:
- Iterate through every shred index in the specified range and retrieve that shred from the database.
- After collecting a list of all these shreds, execute
deshred, which concatenates the data from each shred into a single array of bytes. - Deserialize the array of bytes into a list of
Entrystructs using bincode. Bincode is a serialization format designed for Rust. We implemented abincodelibrary in Zig for compatibility.
This is the essence of reconstructing blocks from shreds, but it doesn’t end there.
To make the entries useful for other components of a Solana validator, BlockstoreReader needs to support all of the following:
- Read entries (as described).
- Read an entire block.
- Read transactions.
Reading Entries
Some components–like RPC or the Ledger Tool–need to read the entries directly out of the Blockstore. To support this, BlockstoreReader exposes three public functions that allow other components to read entries from the database. These functions work by invoking getSlotEntriesInBlock, plus a bit of extra logic to cater to their specific needs.
Each of these functions is supported in Sig to ensure feature parity with Agave’s Blockstore. Agave's analogous functions are used for the following:
get_entries_in_data_blockis used to notify RPC subscribers about new transactions.get_slot_entriesis used by the ledger tool to list roots.get_slot_entries_with_shred_infois used by the ledger tool to compute a slot’s cost and to get the latest optimistic slots.
This is how the analogous functions are implemented in Sig:
getEntriesInDataBlock: This is the public version ofgetSlotEntriesInBlock. It’s essentially the same function but with easier-to-use input parameters.getSlotEntries: This is similar togetSlotEntriesInBlock, except it automatically figures out which erasure sets are complete rather than requiring you to provide that as an input. This function is used to read transactions out of the Blockstore. It is implemented as follows:- 1. Call
getCompletedRangesto identify which erasure sets we have all the shreds for. This function inspects the index to determine which complete erasure sets are available for conversion into entries. - 2. Call
getSlotEntriesInBlockto get all the entries for the completed ranges. - 3. Return all the provided entries, and indicate whether we have every shred from the slot.
- 1. Call
getSlotEntriesWithShredInfo: This does the same thing asgetSlotEntries, except it provides more context, such as whether we’ve received all shreds for the slot.
Reading the Entire Block
Just reading a few entries is not always sufficient. Often, validators need to inspect entire blocks, which contain much more metadata and a convenient list of parsed transactions. This is implemented by getCompleteBlockWithEntries with these steps:
- Call
getSlotEntriesWithShredInfoto get all the entries from the desired slot. - Identify the blockhash by extracting the Proof-of-History hash from the last entry created for the block.
- Extract the transactions from each entry and populate a single list of transactions.
- Extract the status of each transaction from the database.
- Extract a summary of each entry and create a list of these summaries.
- Extract data from each of these column families from the database.
transaction_status: for every transaction in the blockrewards: for the slotblocktime: for the slotblock_height: for the slot
- Iterate through all the entries and extract some metadata about them in the form of
EntrySummary, which can be used alongside the transactions to reconstruct the original entries. - All the data collected during steps 3-7 are returned as the function’s output.
VersionedConfirmedBlockWithEntries is the data returned by getCompleteBlockWithEntries:
/// Confirmed block with type guarantees that transaction metadata is always
/// present, as well as a list of the entry data needed to cryptographically
/// verify the block.
const VersionedConfirmedBlockWithEntries = struct {
    block: VersionedConfirmedBlock,
    entries: ArrayList(EntrySummary),
};

/// Confirmed block with type guarantees that transaction metadata
/// is always present.
pub const VersionedConfirmedBlock = struct {
    allocator: Allocator,
    previous_blockhash: []const u8,
    blockhash: []const u8,
    parent_slot: Slot,
    transactions: []const VersionedTransactionWithStatusMeta,
    rewards: []const ledger.meta.Reward,
    num_partitions: ?u64,
    block_time: ?UnixTimestamp,
    block_height: ?u64,
};

// Data needed to reconstruct an Entry, given an ordered list of transactions in
// a block.
const EntrySummary = struct {
    num_hashes: u64,
    hash: Hash,
    num_transactions: u64,
    starting_transaction_index: usize,
};
getCompleteBlockWithEntries is the backing implementation for all the other Blockstore functions that expose blocks from the Blockstore:
getCompleteBlock: Discards the entry summaries and returns onlyVersionConfirmedBlock. This is needed to support thegetBlockRPC method when confirmed blocks are requested.getRootedBlockWithEntries: This adds a check to ensure the requested block is rooted. If not, it returns an error.
Note: The analogous functionget_rooted_block_with_entriesfrom Agave is used to update confirmed blocks to Google Cloud Bigtable. Uploading to Bigtable enables nodes to store more blocks than they can fit locally, allowing them to serve RPC requests for older data.getRootedBlock: This returnsVersionConfirmedBlockfromgetRootedBlockWithEntries. LikegetCompleteBlock, this is needed to support thegetBlockRPC method when finalized blocks are requested.
Reading Transactions
One essential use case for the Blockstore reader is reading transactions. The getTransaction RPC method needs the Blockstore to provide confirmed or finalized transactions, which will depend on the functions getCompleteTransaction and getRootedTransaction, respectively. These two functions do the same thing, except that getCompleteTransaction also looks for transactions in unrooted slots.
They are implemented by a private function called getTransactionWithStatus, which runs the following steps:
- Get the transaction status from the
transaction_statuscolumn family. This also tells us which slot had the transaction. - Now that we know which slot included the transaction, call
findTransactionInSlotto get the transaction from that slot, which handles steps 3 and 4. - Call
getSlotEntries(explained above), which returns all the entries from the slot. - Iterate through every transaction in every entry until we locate the transaction with the requested signature.
- Return the transaction and its status.
Another function used for reading transaction data is called getConfirmedSignaturesForAddress. It allows you to get a list of all the transactions that an address has been involved in, and it is used by the getSignaturesForAddress RPC method. It reads transaction data from the address_signatures column family, which is sorted first by address and then by slot. This sorting enables easy retrieval of all transactions for a specific address.
There could be millions of transactions for a particular address, making it prohibitively expensive to extract all of them. To solve this, getConfirmedSignaturesForAddress allows you to specify a limited range of transactions for which you’d like to receive information. This is configured by optionally specifying the oldest and newest transaction signatures you’re interested in. This is implemented by using getTransactionStatus to identify which slot the transaction is from, allowing us to narrow down the search to only look at signatures from the range of slots we care about. Most of the code complexity in this function exists to support this sophisticated filtering mechanism.
Benchmarks
We recorded benchmark data from Sig's initial ledger implementation to compare its performance to Agave.
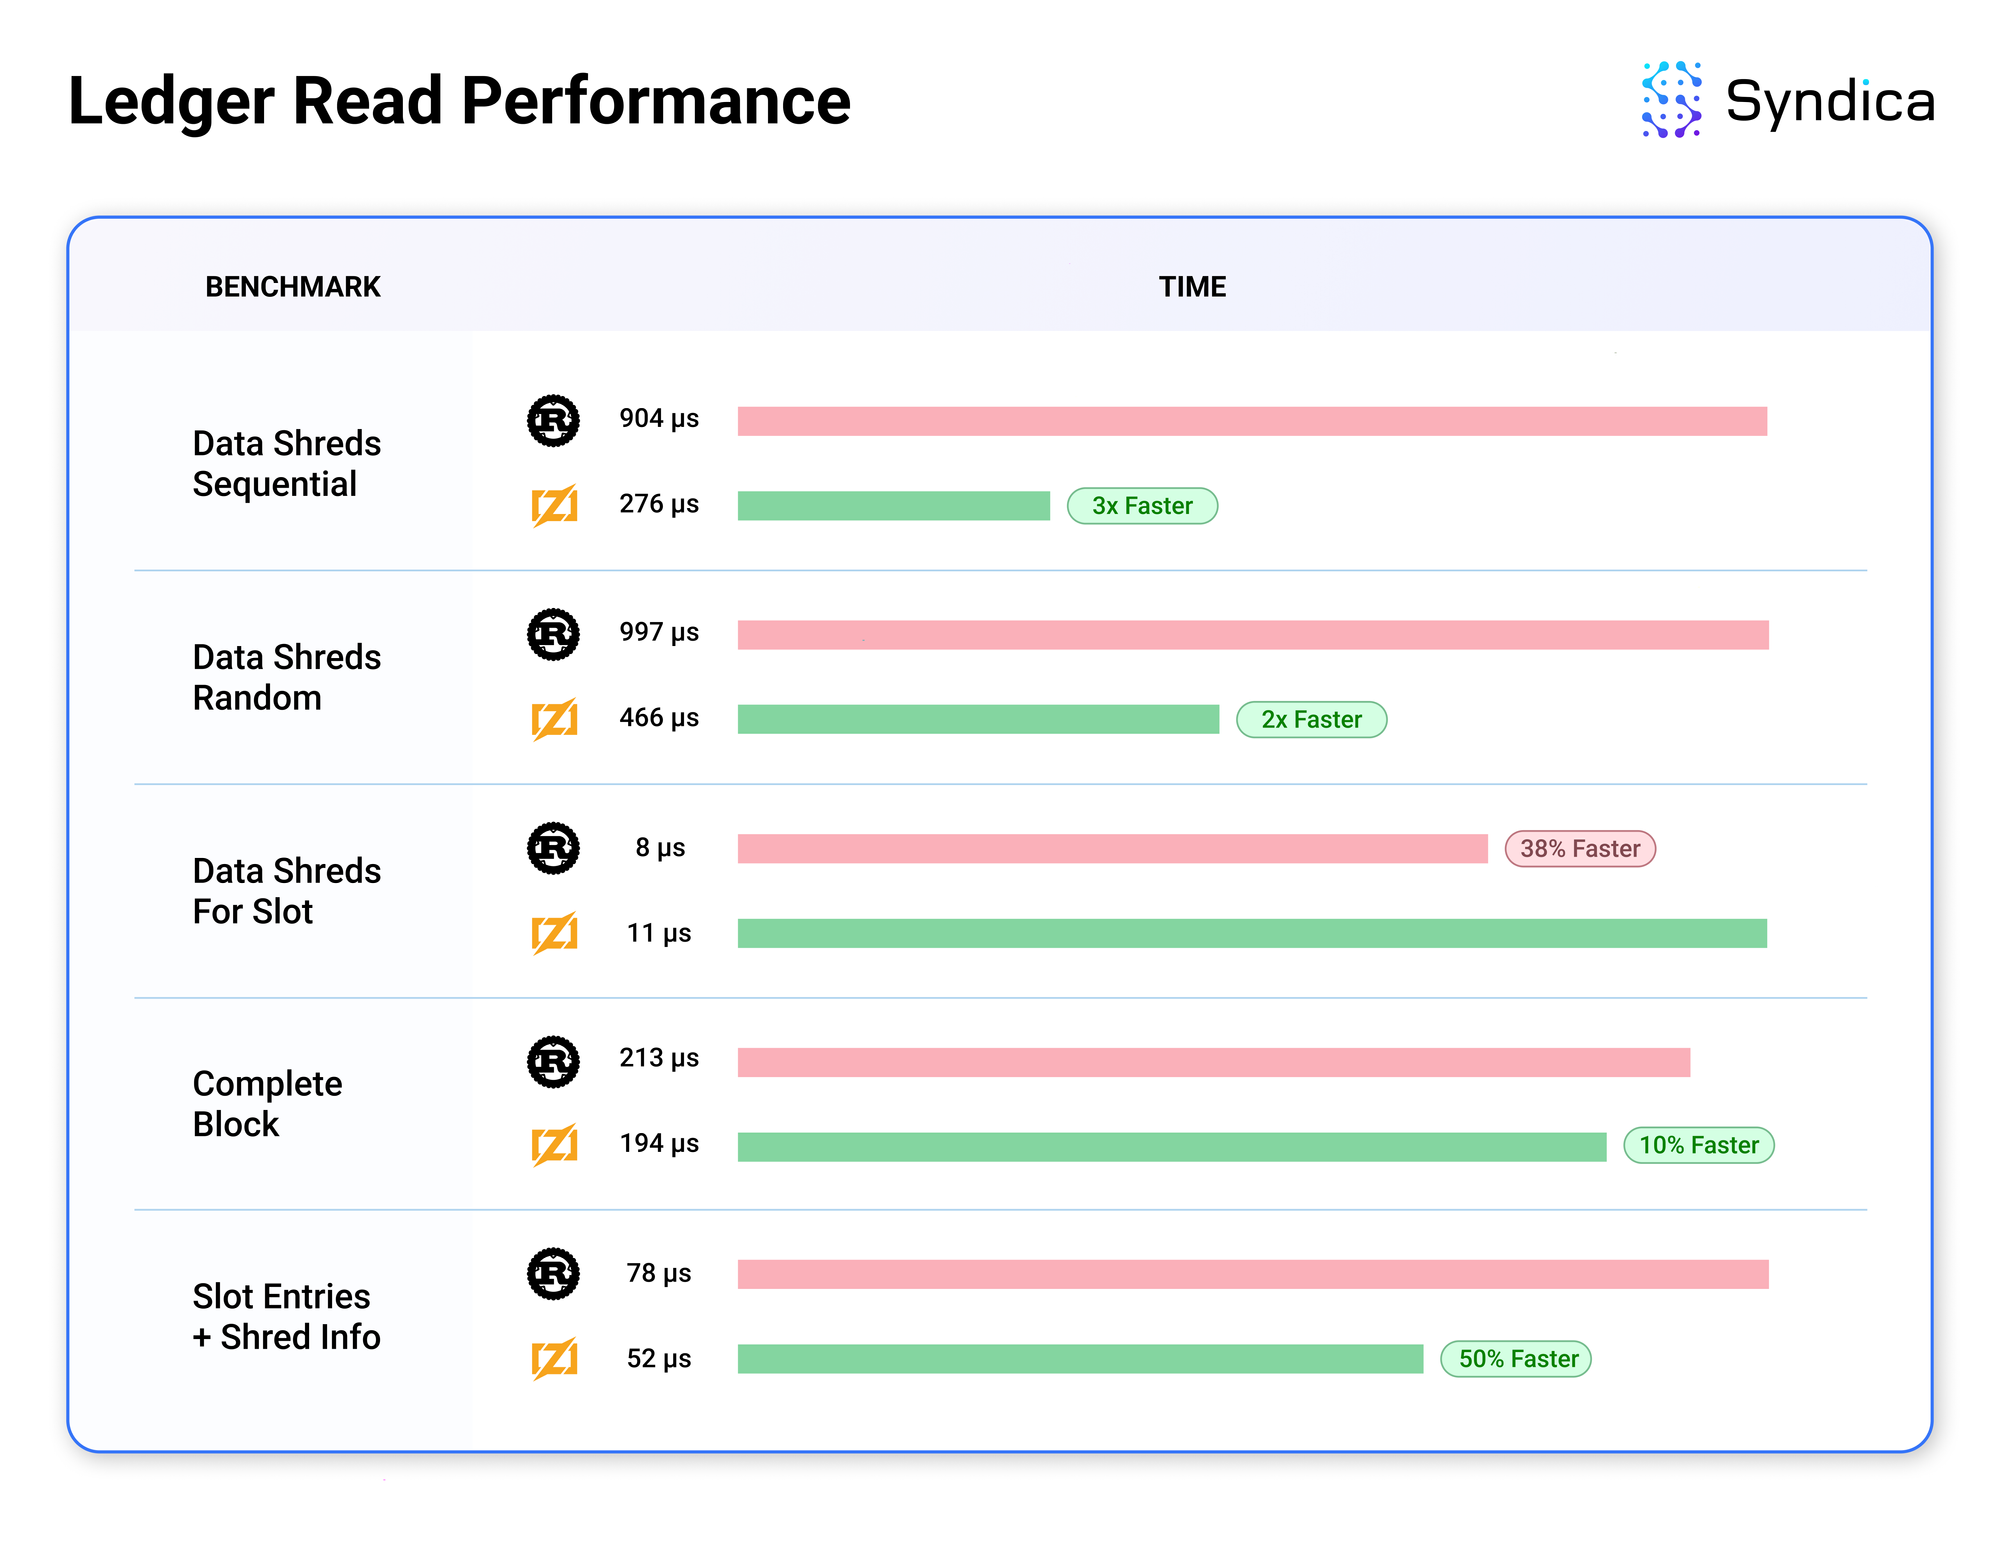
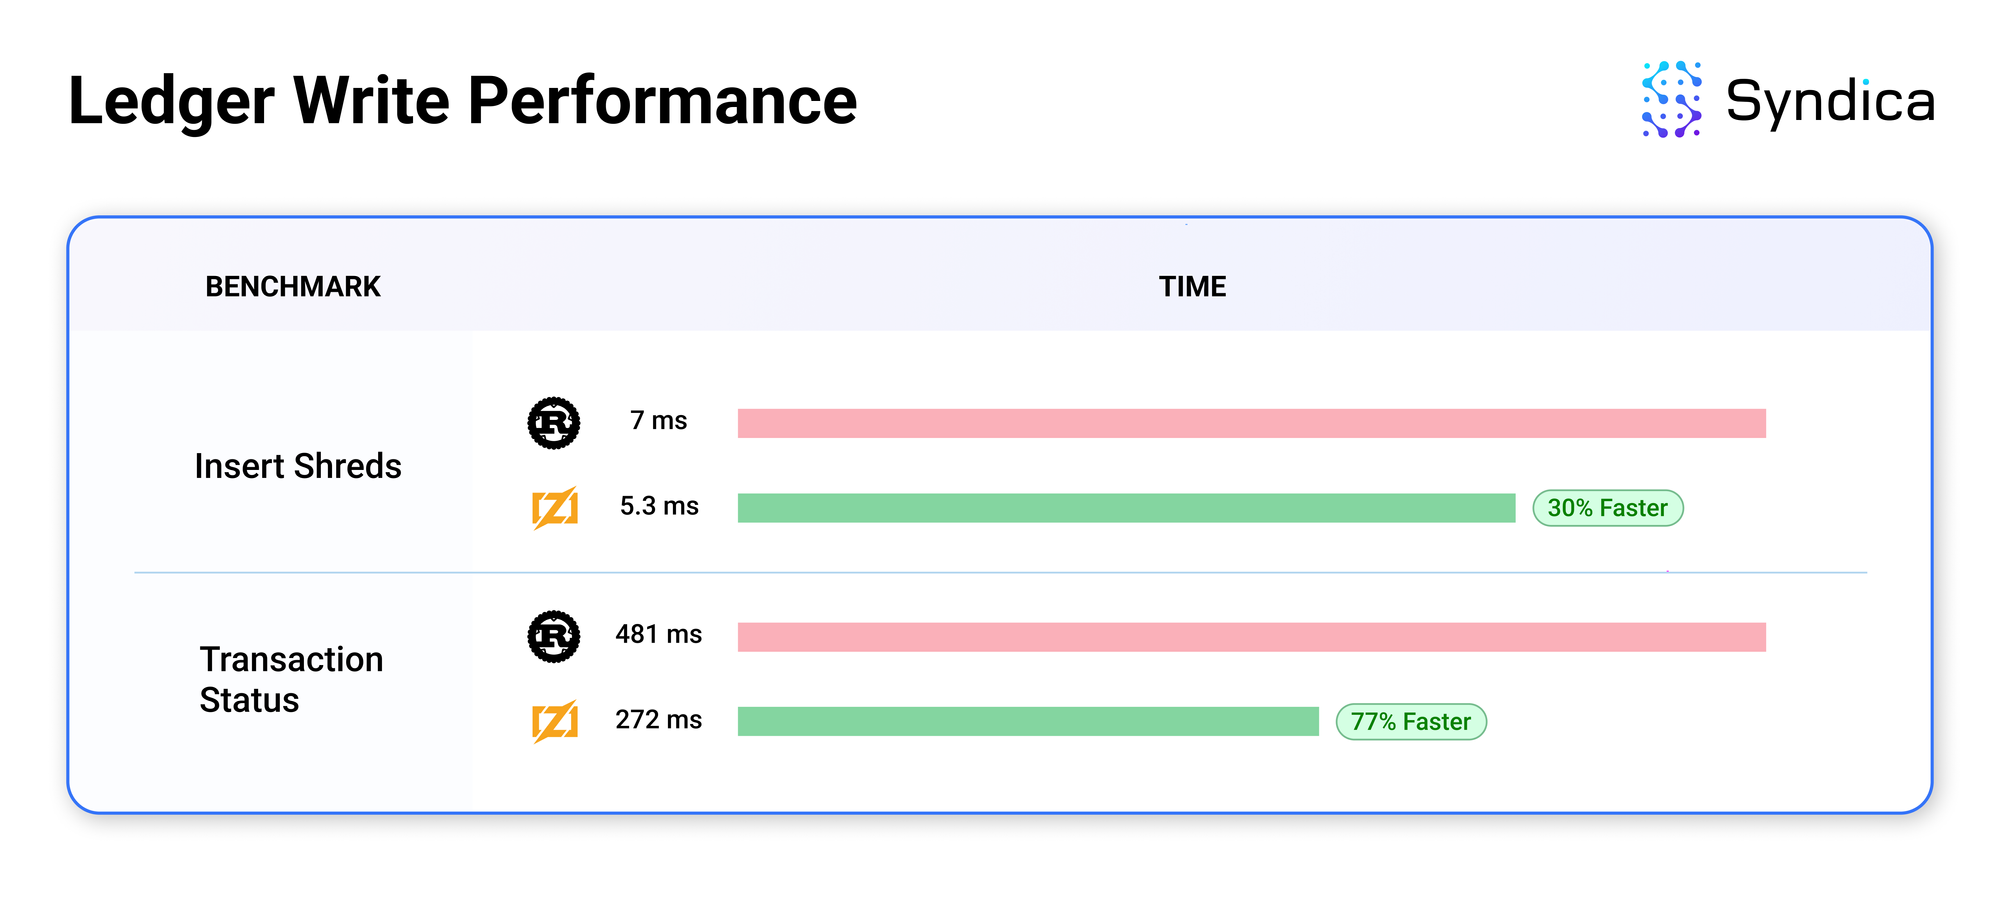
The results are promising, as Sig's ledger typically exceeds Agave's performance. The performance gains are likely due to low-level improvements that Zig makes easy, like reducing the number of memory allocations. We’re just starting to work on optimizations to improve performance further. The modular architecture of Sig's ledger makes the code adaptable and easy to improve, which means these optimizations will be straightforward to implement.
We encourage developers to contribute to Sig's development. We are open to pull requests on GitHub. We’re also expanding our team. Check out our careers page to explore open roles. If you have any questions, reach out to us via email, Discord, or Twitter.

