
Sig Engineering - Part 3 - Solana’s AccountsDB
AccountsDB is Solana’s custom accounts database. This post contains a high-level overview of core concepts and explains the Sig implementation details.
This post is Part 3 of a multi-part blog post series we will periodically release to outline Sig's engineering updates. You can find Part 1, covering Sig’s Gossip Protocol, here, and Part 2, covering prior progress on AccountsDB and more, here.
AccountsDB is Solana’s custom accounts database. This post contains a high-level overview of core concepts and explains the Sig implementation details.
Snapshots
When a validator starts, it must first catch up to the current state of the chain. Because Solana’s historical data is in the hundreds of terabytes, validator nodes only keep the most recent blocks and transactions on disk. It wouldn’t be practical to start a validator node and force it to catch up and verify every single block from genesis (the first block).
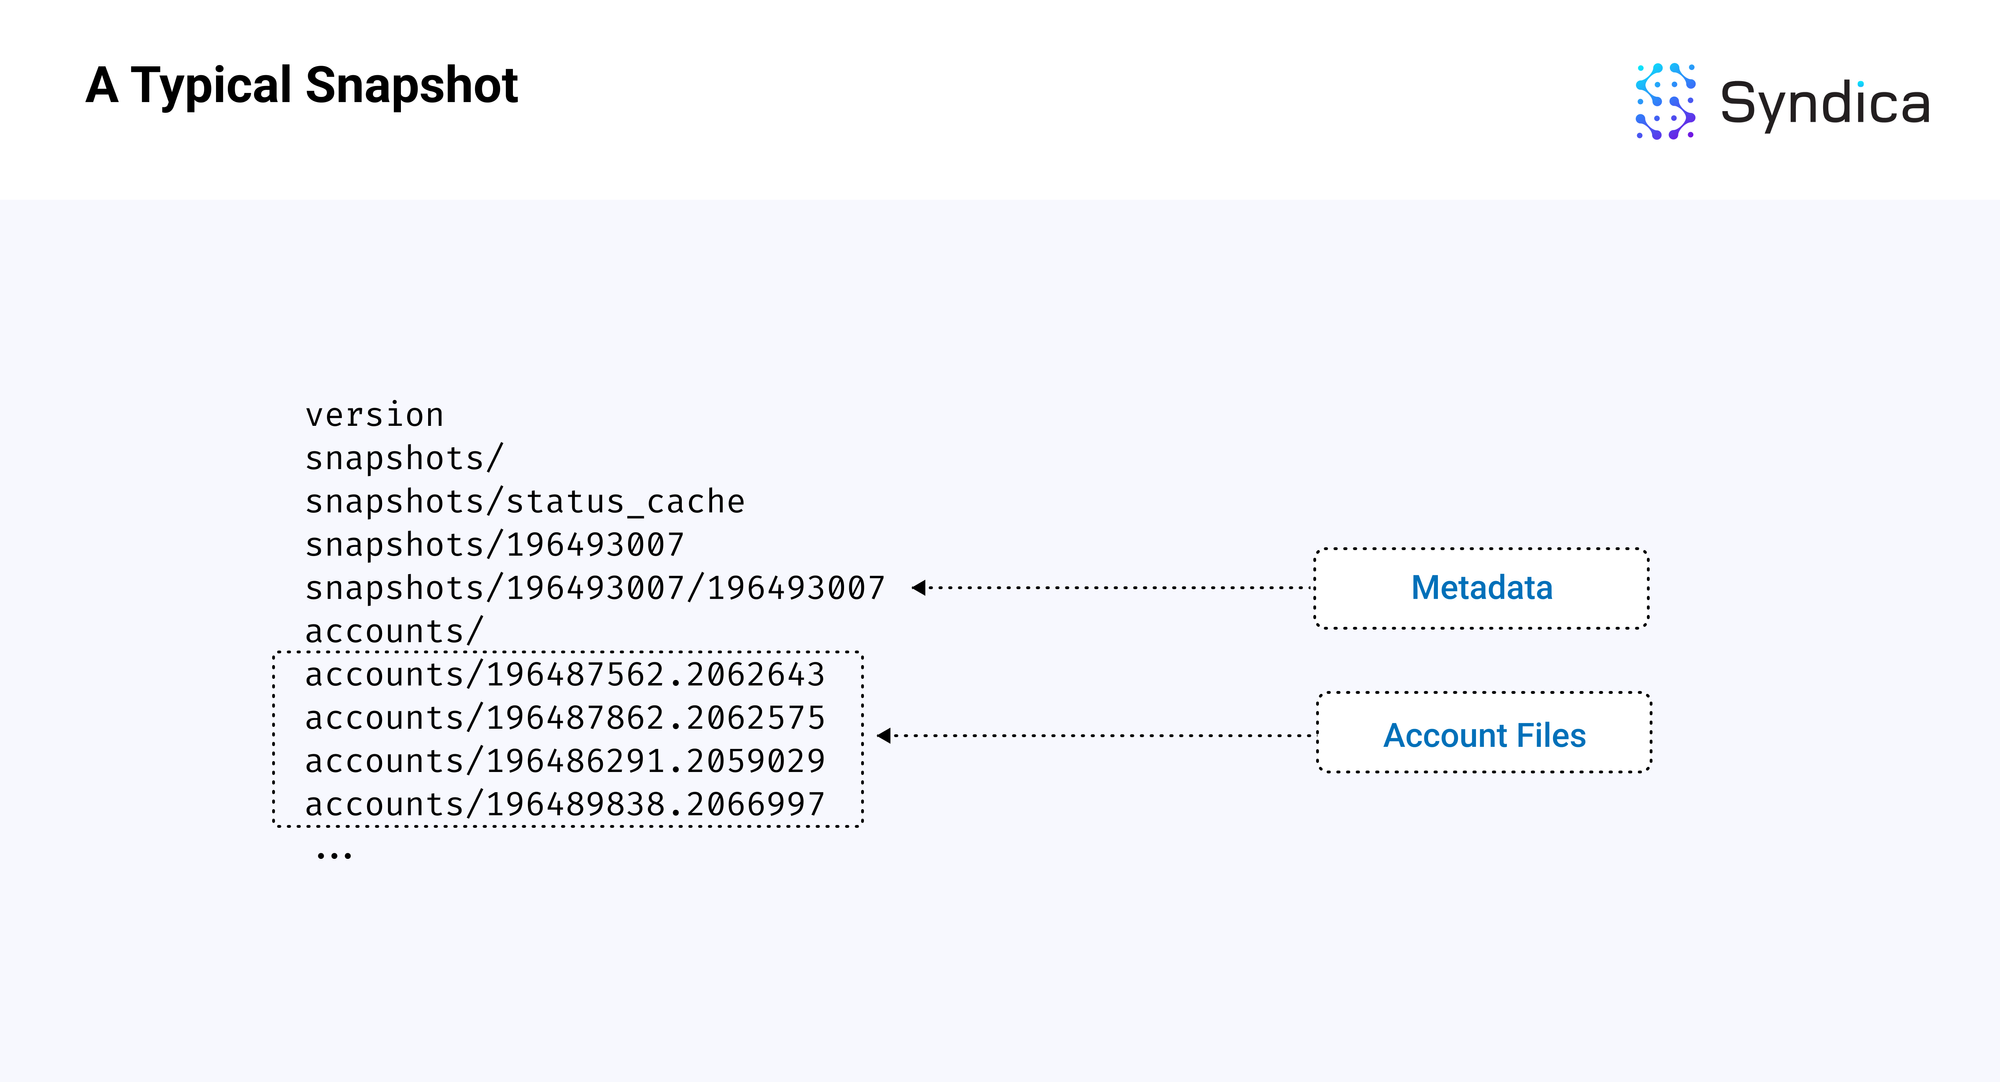
Instead, a Solana validator starts by downloading a snapshot from another validator node. A snapshot contains the state of every account as it existed at a specific point in time, indicated in the snapshot by a slot number, which identifies a specific block. After downloading the snapshot, a validator node starts up from that slot (usually within the past 24 hours) and validates only the most recent blocks (those created after the snapshot).
A snapshot contains two main components:
- a metadata file, which includes information on the latest block and the state of the database
- an accounts folder, which contains files that hold the account data at different slots
Below is a diagram of a standard Solana snapshot at slot 196493007, with the two components highlighted.

Note: snapshots are built and downloaded as a tar archive compressed with the zstandard format, so the file extension is usually .tar.zst. The first step whenever loading from a snapshot is to uncompress and unarchive it into the directory layout, as shown above.
Account Files
One of the main components in a snapshot is the collection of account files, which contain all the account data for a specific slot. Each file is organized as a list of the accounts as bytes.
Note: in the Agave implementation, the files containing the accounts are referred to as AppendVecs. This name, however, is outdated since appending is no longer used in the codebase, so we will refer to them as ‘account files’ in this post. In Sig, these are equivalent to the AccountFile struct.
Reading the accounts out of the files involves:
- decompressing and unarchiving the snapshot into separate account files
- individually loading each account file into memory
- reading the entire length of each file and organizing it into structures that can be used by AccountsDB code
The account file format appears as follows:
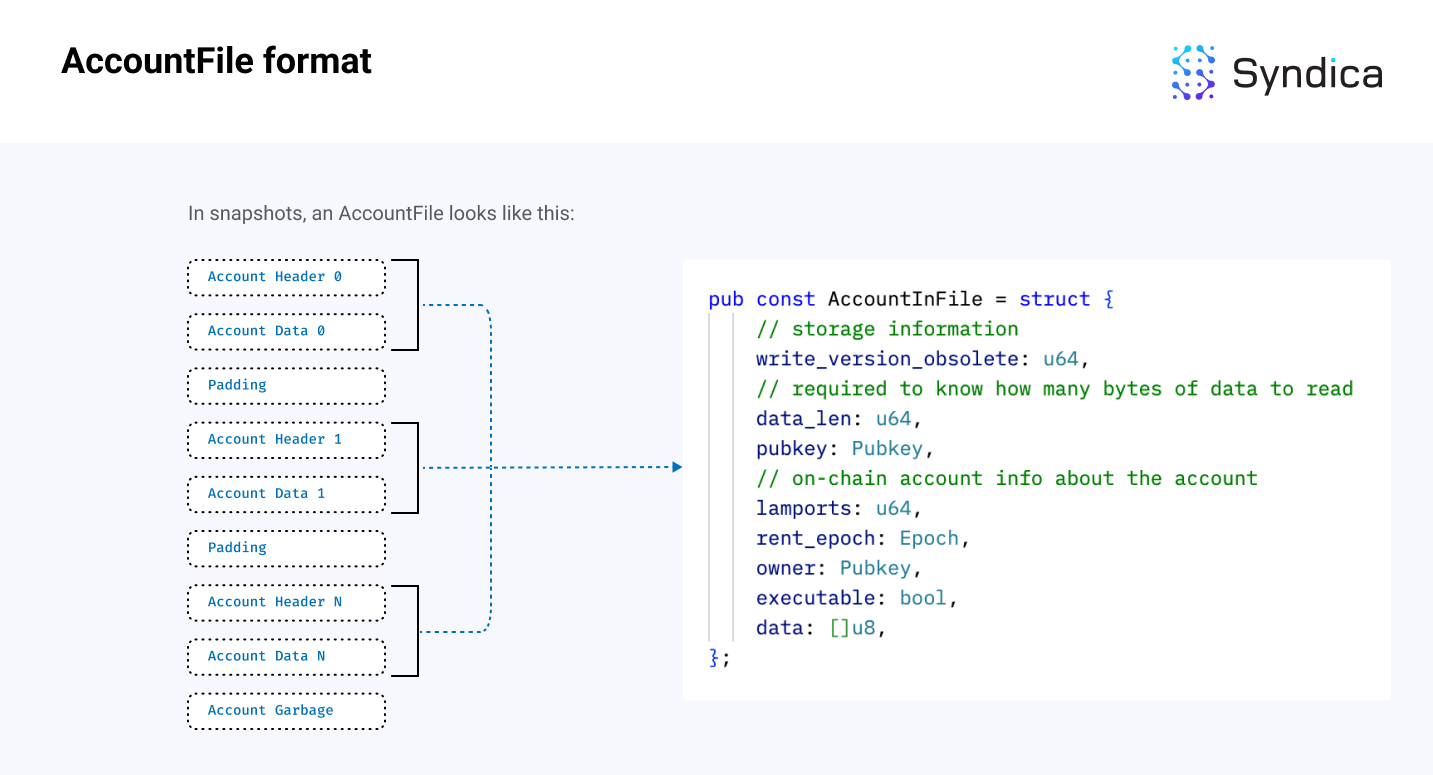
Note: since an account’s data is a variable-length array, we first need to read the data_len variable to determine how many bytes to read into the data field. In the diagram, the Account Header stores valuable metadata about the account (including data_len), and the data field contains the actual data bytes. The AccountInFile struct can be found here.
Pseudocode, which parses all the accounts from a file, is included below:
# mmap file is just a bunch of bytes
mmap_file: []u8 = ...
offset = 0

const StaticValues = struct {
  write_version_obsolete: u64,
  data_len: u64,
  pubkey: Pubkey,
  lamports: u64,
  rent_epoch: Epoch,
  owner: Pubkey,
  executable: bool,
}

accounts = []
while (true) {

  // read the static values
  size_of_static = @sizeOf(StaticValues)
  static_values: StaticValues = @cast(mmap_file[offset..offset+size_of_static])
  offset += size_of_static

  // read the dynamic account data
  data_len = static_values.data_len
  account_data: []u8 = mmap_file[offset..offset+data_len]
  offset += data_len

  // record the account
  accounts.append(
    Account {
      static_values,
      data,
    }
  )
}
The Account Index
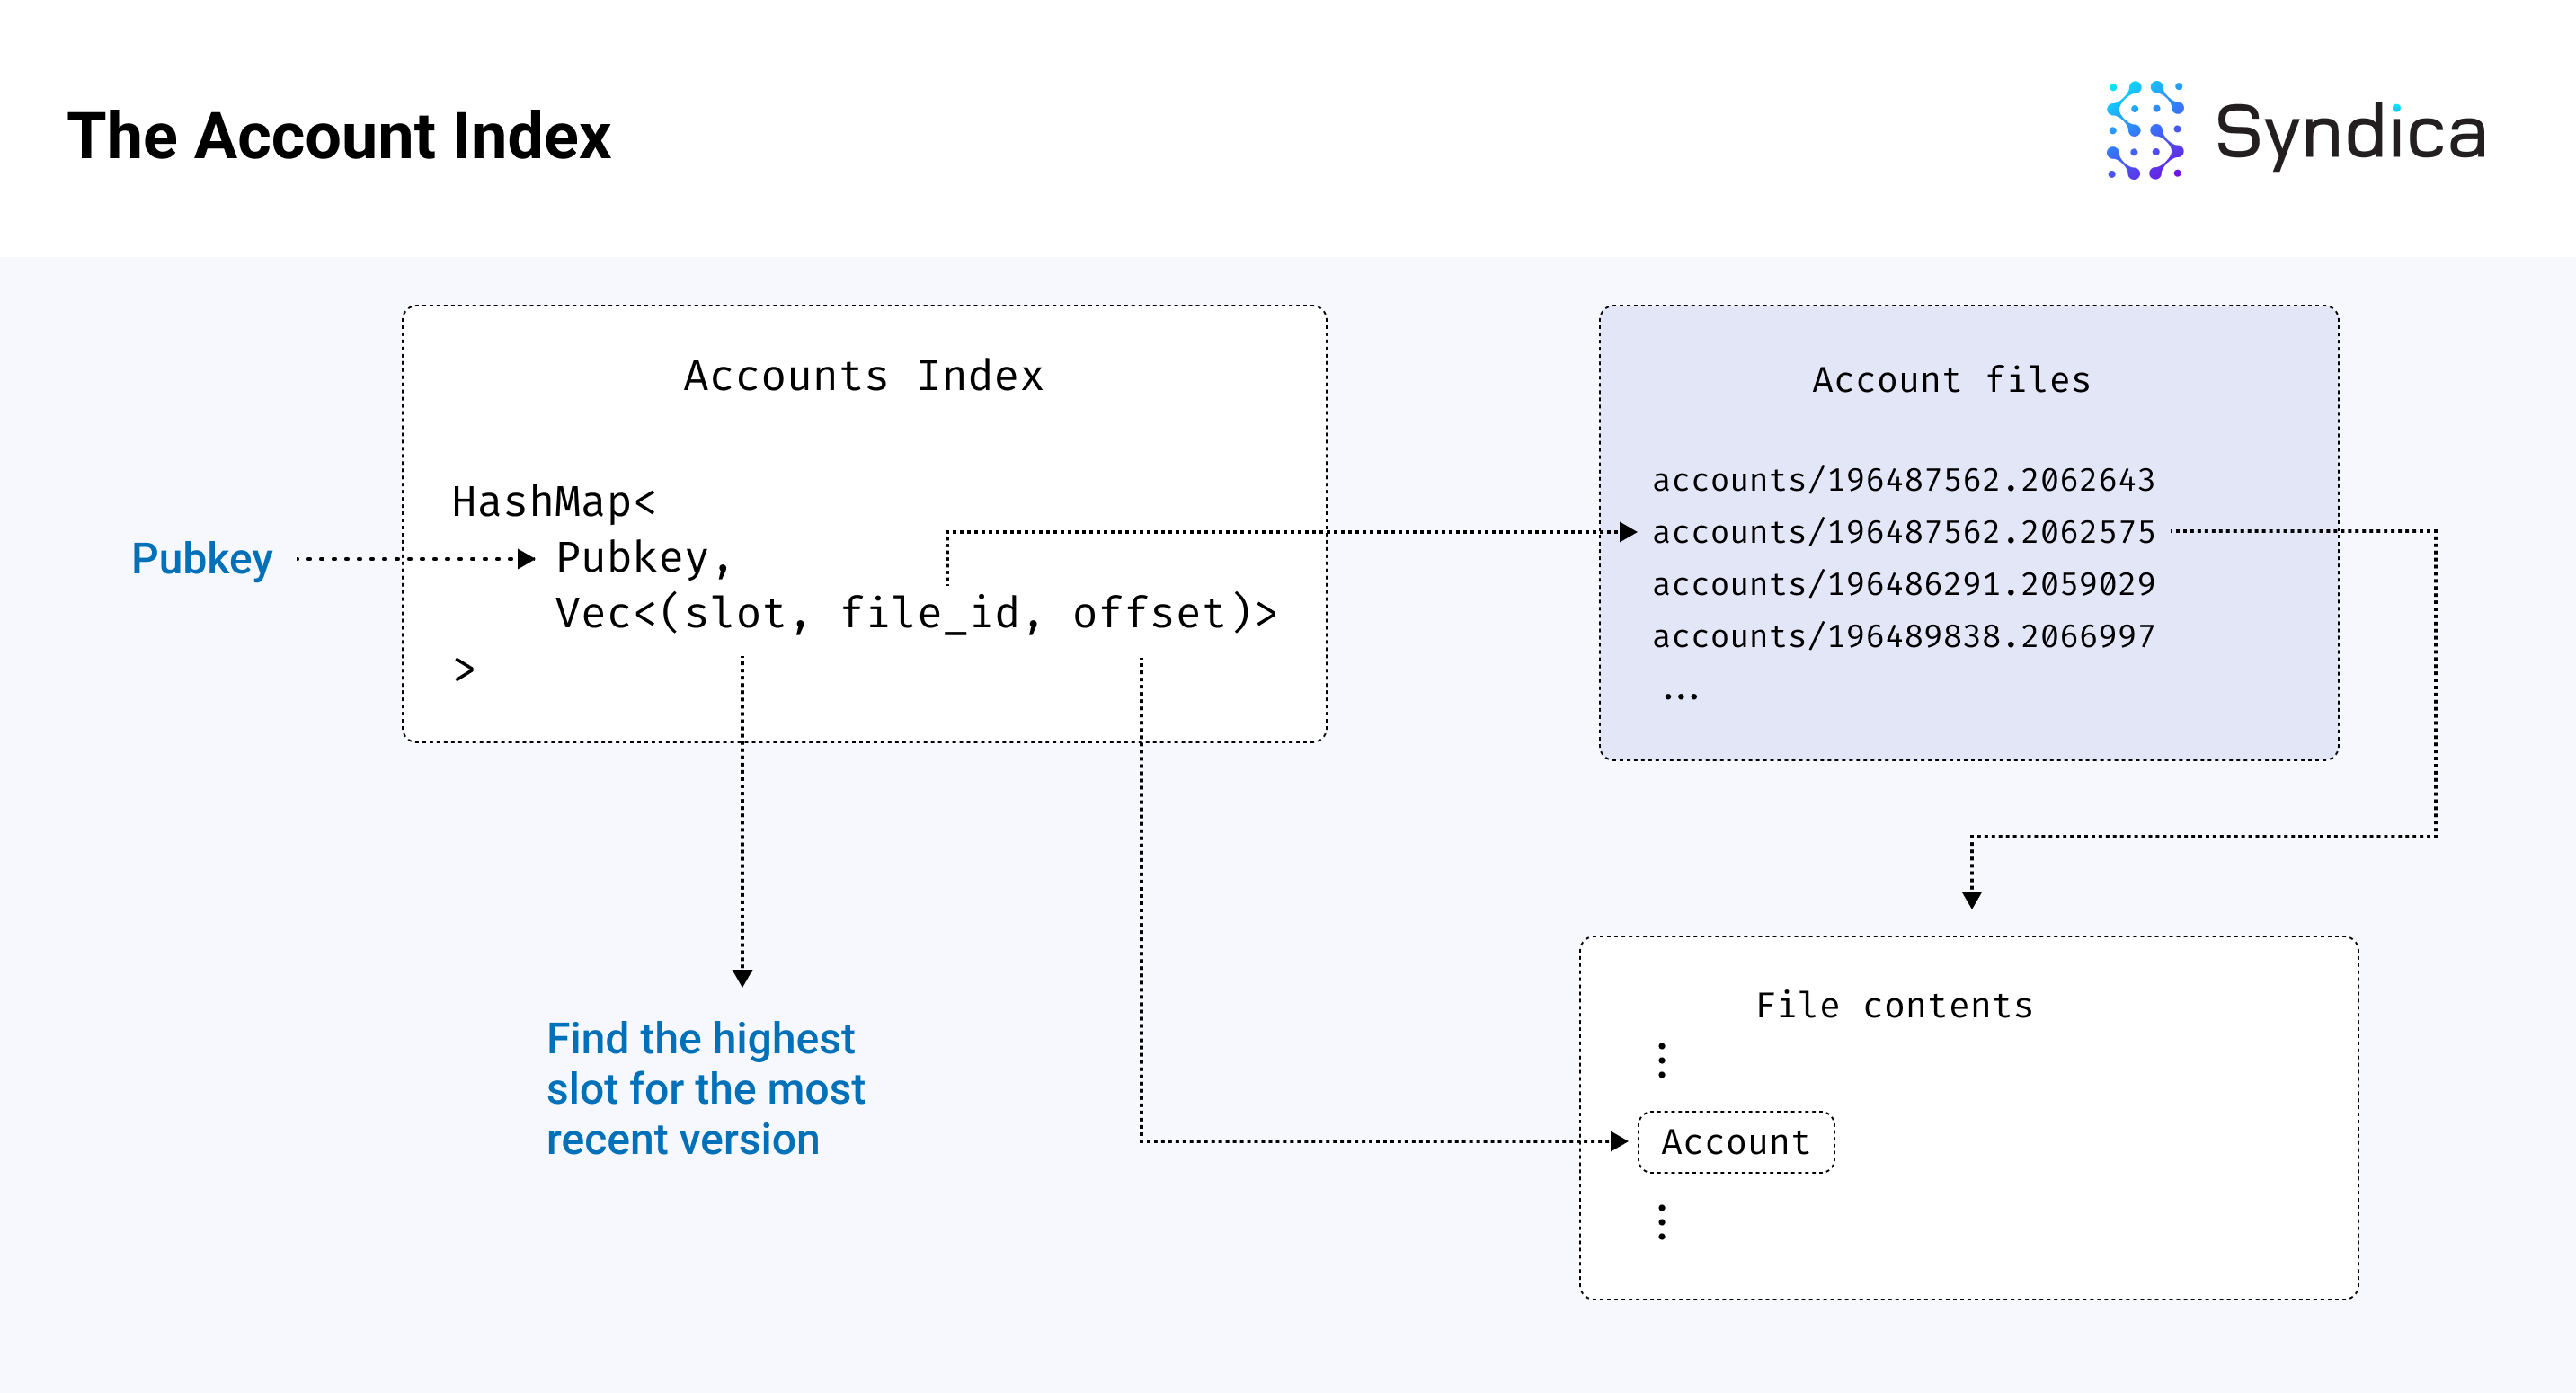
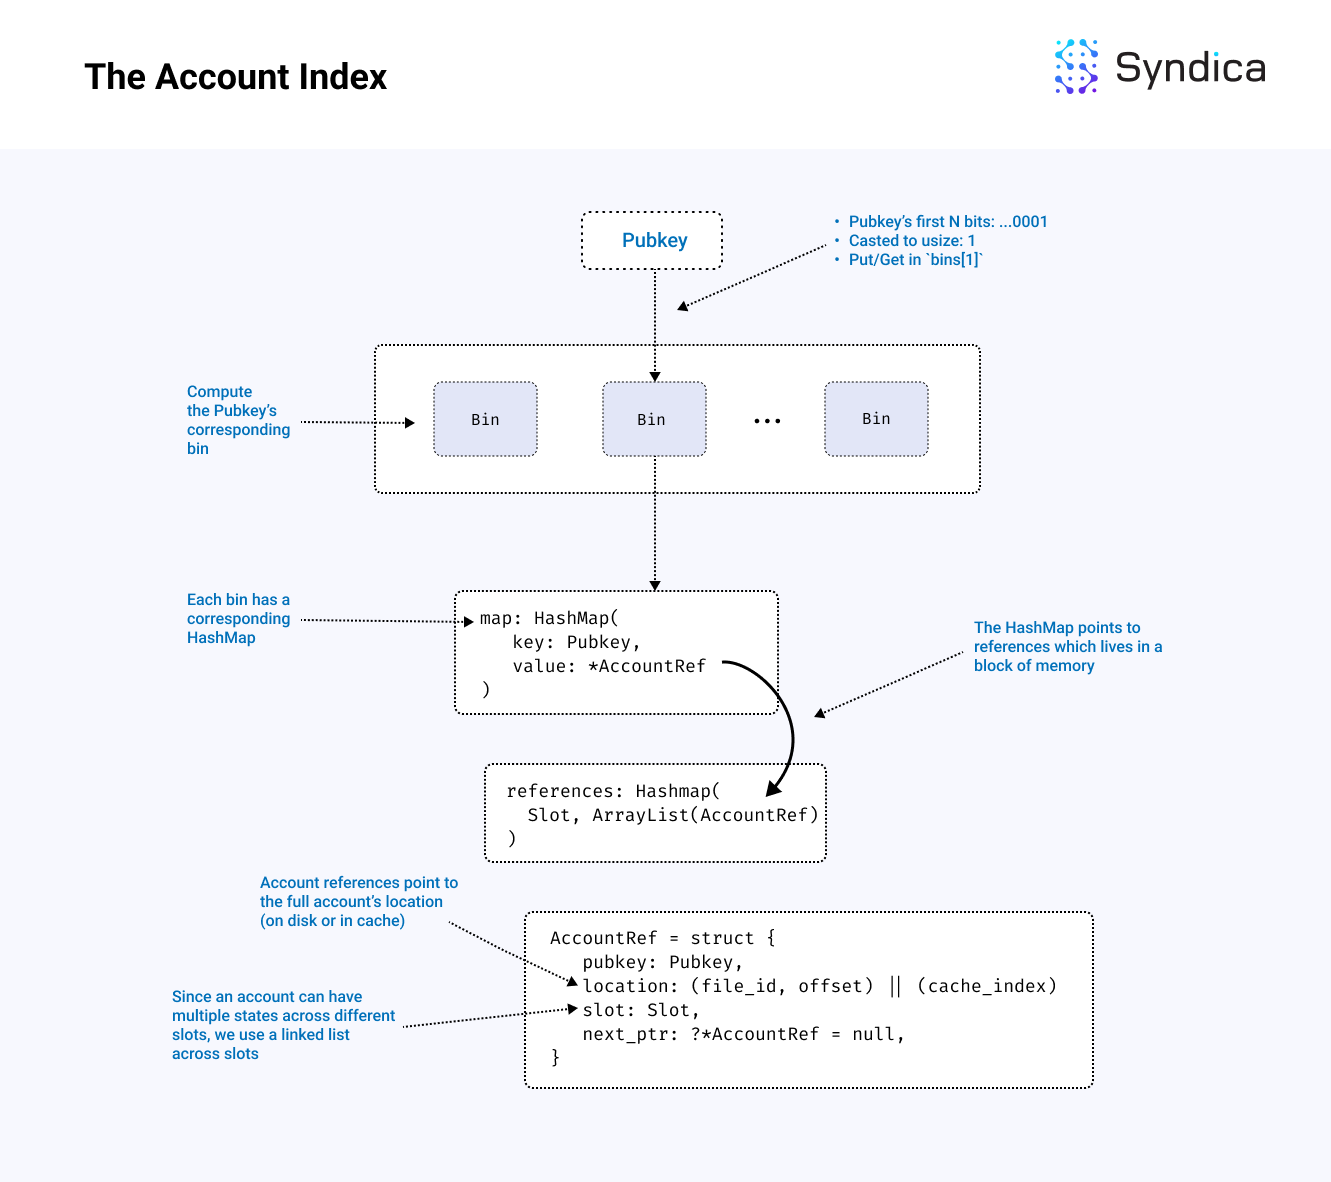
Now that we understand how account files store account data, we also need to organize the accounts by their public keys (i.e., we need to build a mapping from a given pubkey to the location of the corresponding account in the file). This mapping is also referred to as the AccountIndex.
More specifically, we need a mapping from a pubkey to a tuple of (file_id, offset) where file_id is the name of an accounts file to read, and offset is the index of the account bytes in the file. With this mapping, we can access the associated account of a pubkey by opening the file associated with the file_id and reading the bytes starting at offset.
An account can also change across slots (e.g., a snapshot might include multiple versions of the same account across different slots). To associate each account's Pubkey with a collection (or "Vec") of multiple file locations, the map must also include the corresponding slot version of the account. For this, we use the tuple (slot, file_id, offset), which we’ll refer to as an "account reference" (or equivalently, the AccountRef struct in Sig) in the rest of this post. The Account Index is then structured as Map<Pubkey, Vec<(slot, file_id, offset)>>, which maps from a pubkey to a collection of account references.
Because there are so many accounts on Solana, the index can become very large, potentially leading to large RAM requirements. To reduce these requirements, we also use a disk-based hashmap which stores the underlying memory of the hashmap on disk to minimize validator RAM requirements.
Reading Accounts
If we want to read the data from a specific account and know its pubkey, we can look up its pubkey in the account index to find its location. We'll find the reference with the most recent slot and then read the data using the file_id and offset stored in the account reference struct. The validator can interpret this data directly as an AccountInFile structure.
Writing Accounts
Another critical component of AccountsDB is tracking new account states. For example, when a validator processes a new block of transactions, the result is a batch of new account states at a specific slot. These new states then need to be written to the database.
First, the accounts are written to a cache associated with the slot, and the account references are created and indexed to point to the cache location. When the slot is rooted (i.e., confirmed by a supermajority of the cluster, also known as ‘finalized’), the data is written out of the cache and into a new accounts file associated with the slot, and the index is updated to point to the file location of these new accounts.
Note: this means an account can live in two locations: in cache or in a file.
Background Threads
As new account states are written to the database, we perform four key tasks to ensure memory is used efficiently:
- Flushing
- Cleaning
- Shrinking
- Purging
Flushing
Flushing periodically pushes data from RAM to disk. For example, since accounts are first stored in the cache when the associated slot becomes rooted, they are flushed to disk. Only writing accounts that have been rooted reduces the number of (slow) disk writes while also reducing the amount of RAM we use.
Cleaning
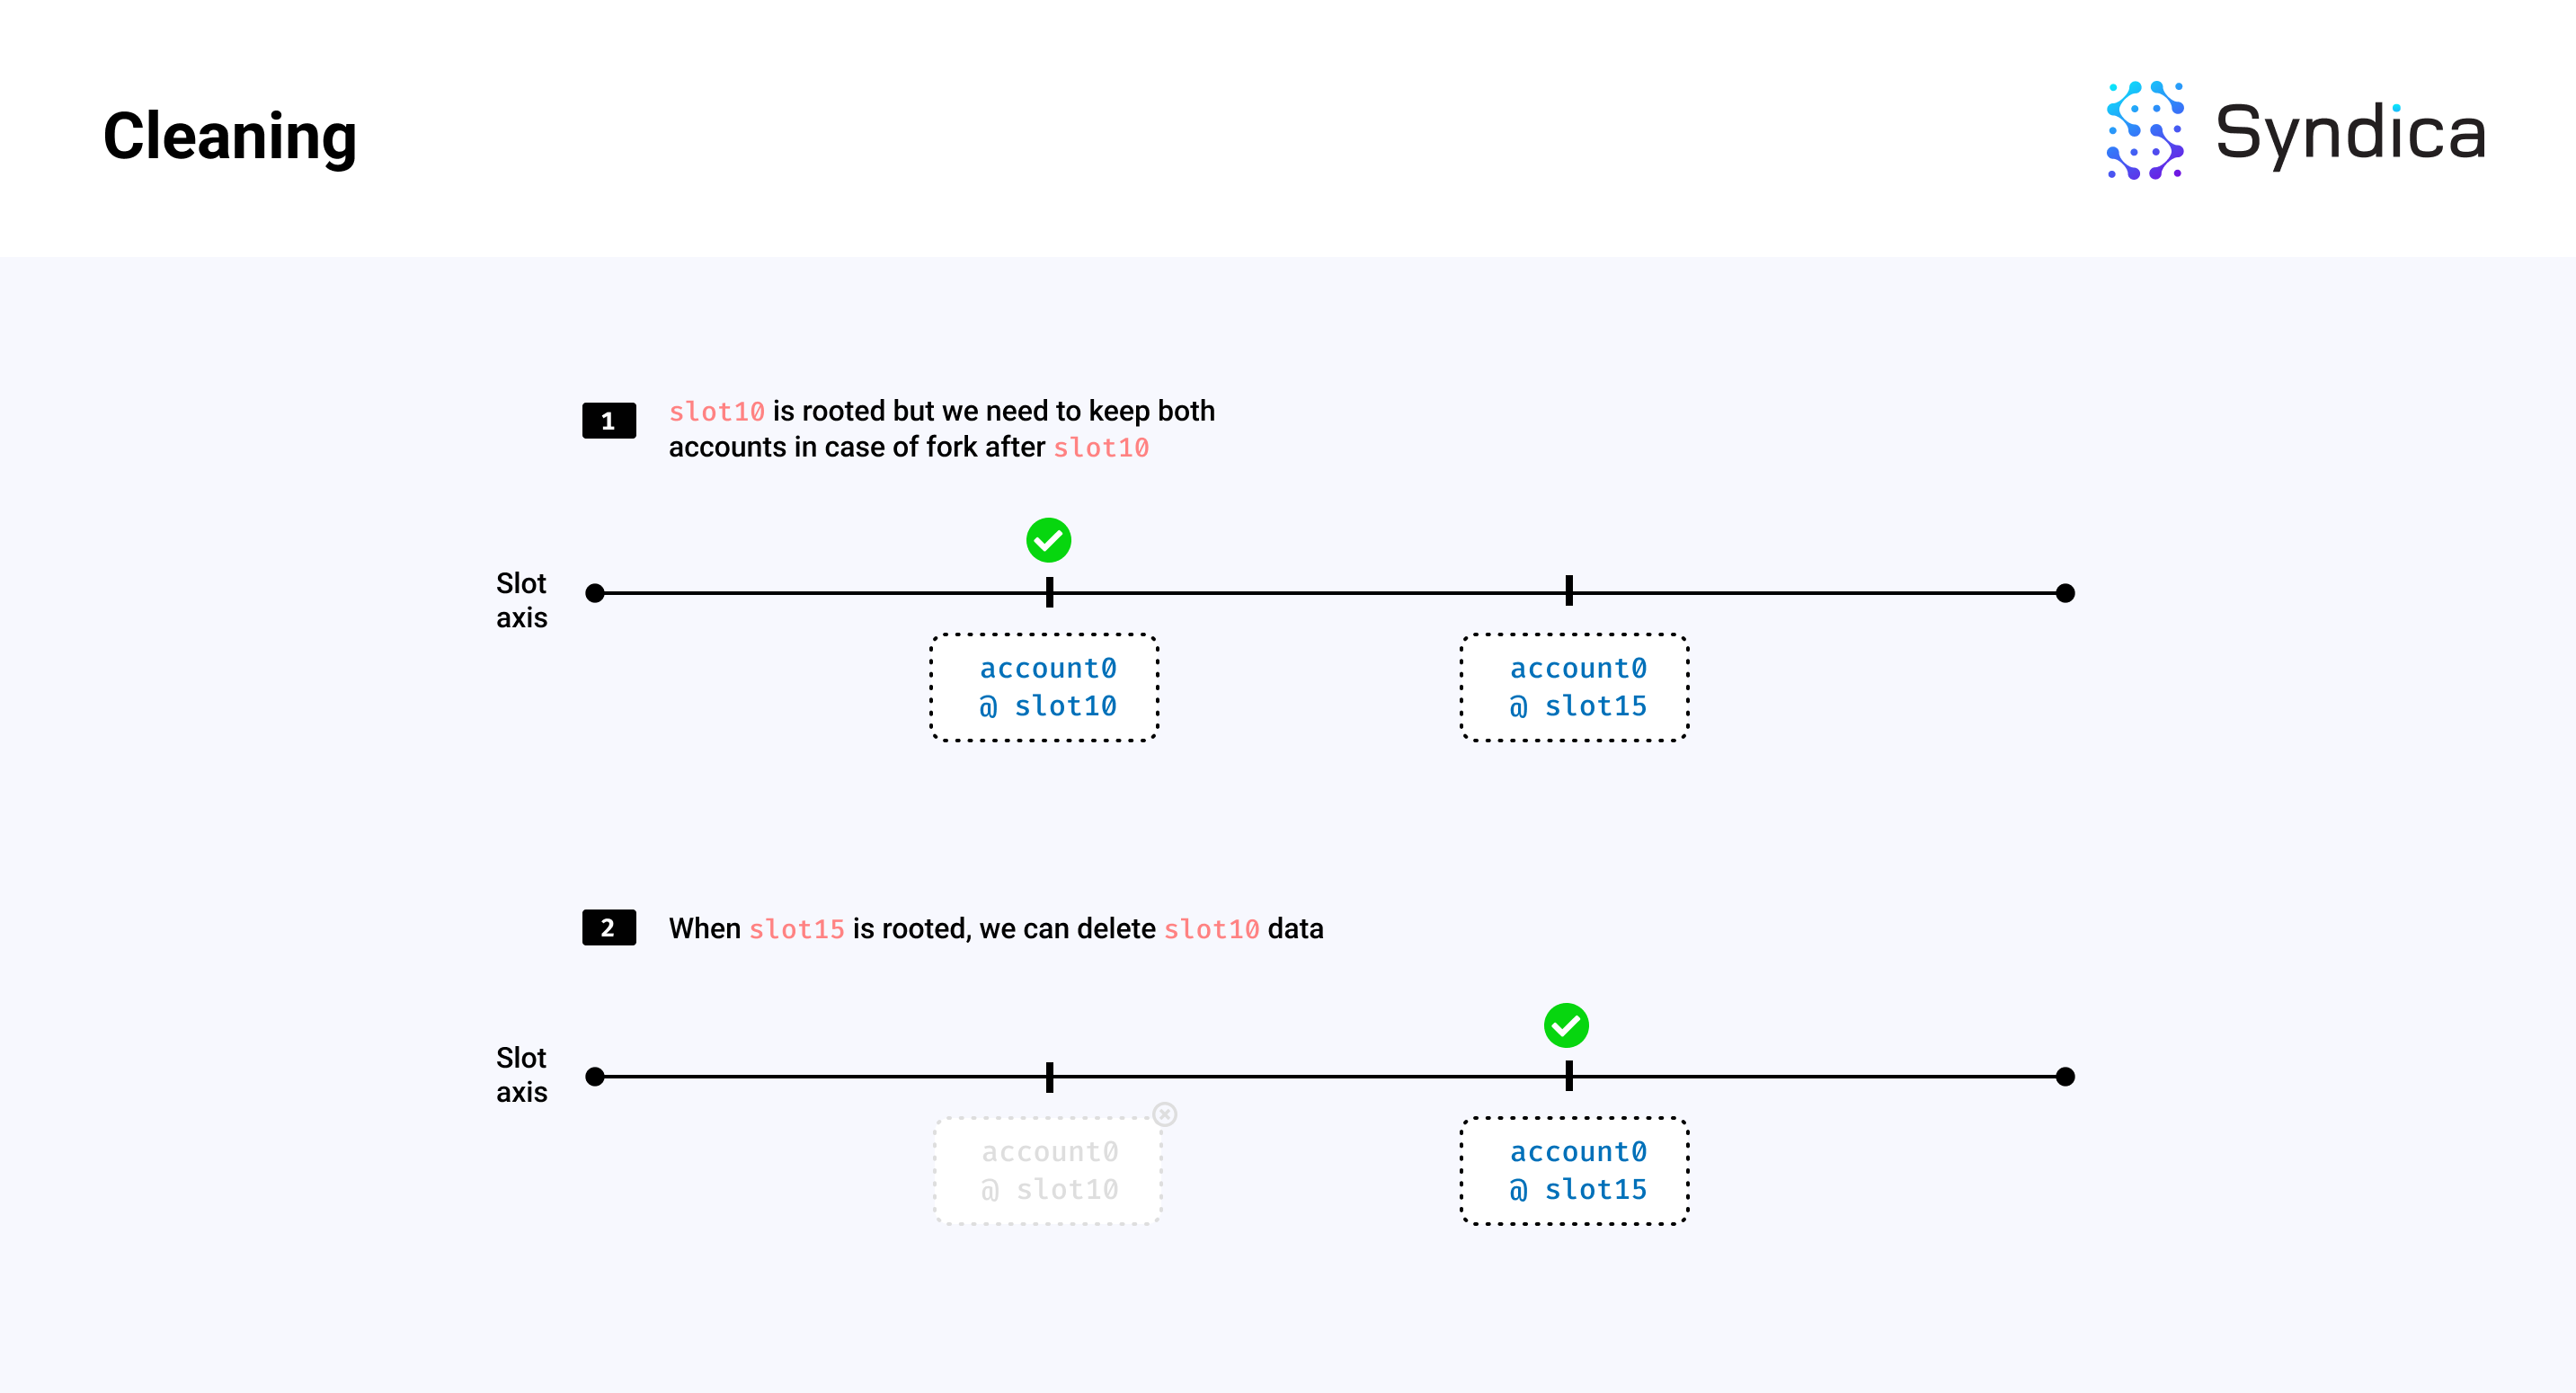
We must also clean stale data to limit memory growth from account file creation. This includes removing old, unneeded account states and rooted accounts with zero lamports.
For example, if we have two versions of an account, one at slot 10 and another at slot 15, and slot 15 is rooted (i.e., will not be rolled back), then we can remove the account and index data corresponding to the account at slot 10. If the account at slot 15 also has zero lamports, then we can delete that account data too.
Note: the cleaning phase removes the entries in the account index, but it does not reclaim the storage region in the account file occupied by the account data. After cleaning, this region is considered garbage data in the account file, which wastes storage space and network bandwidth. This garbage data is removed during shrinking.
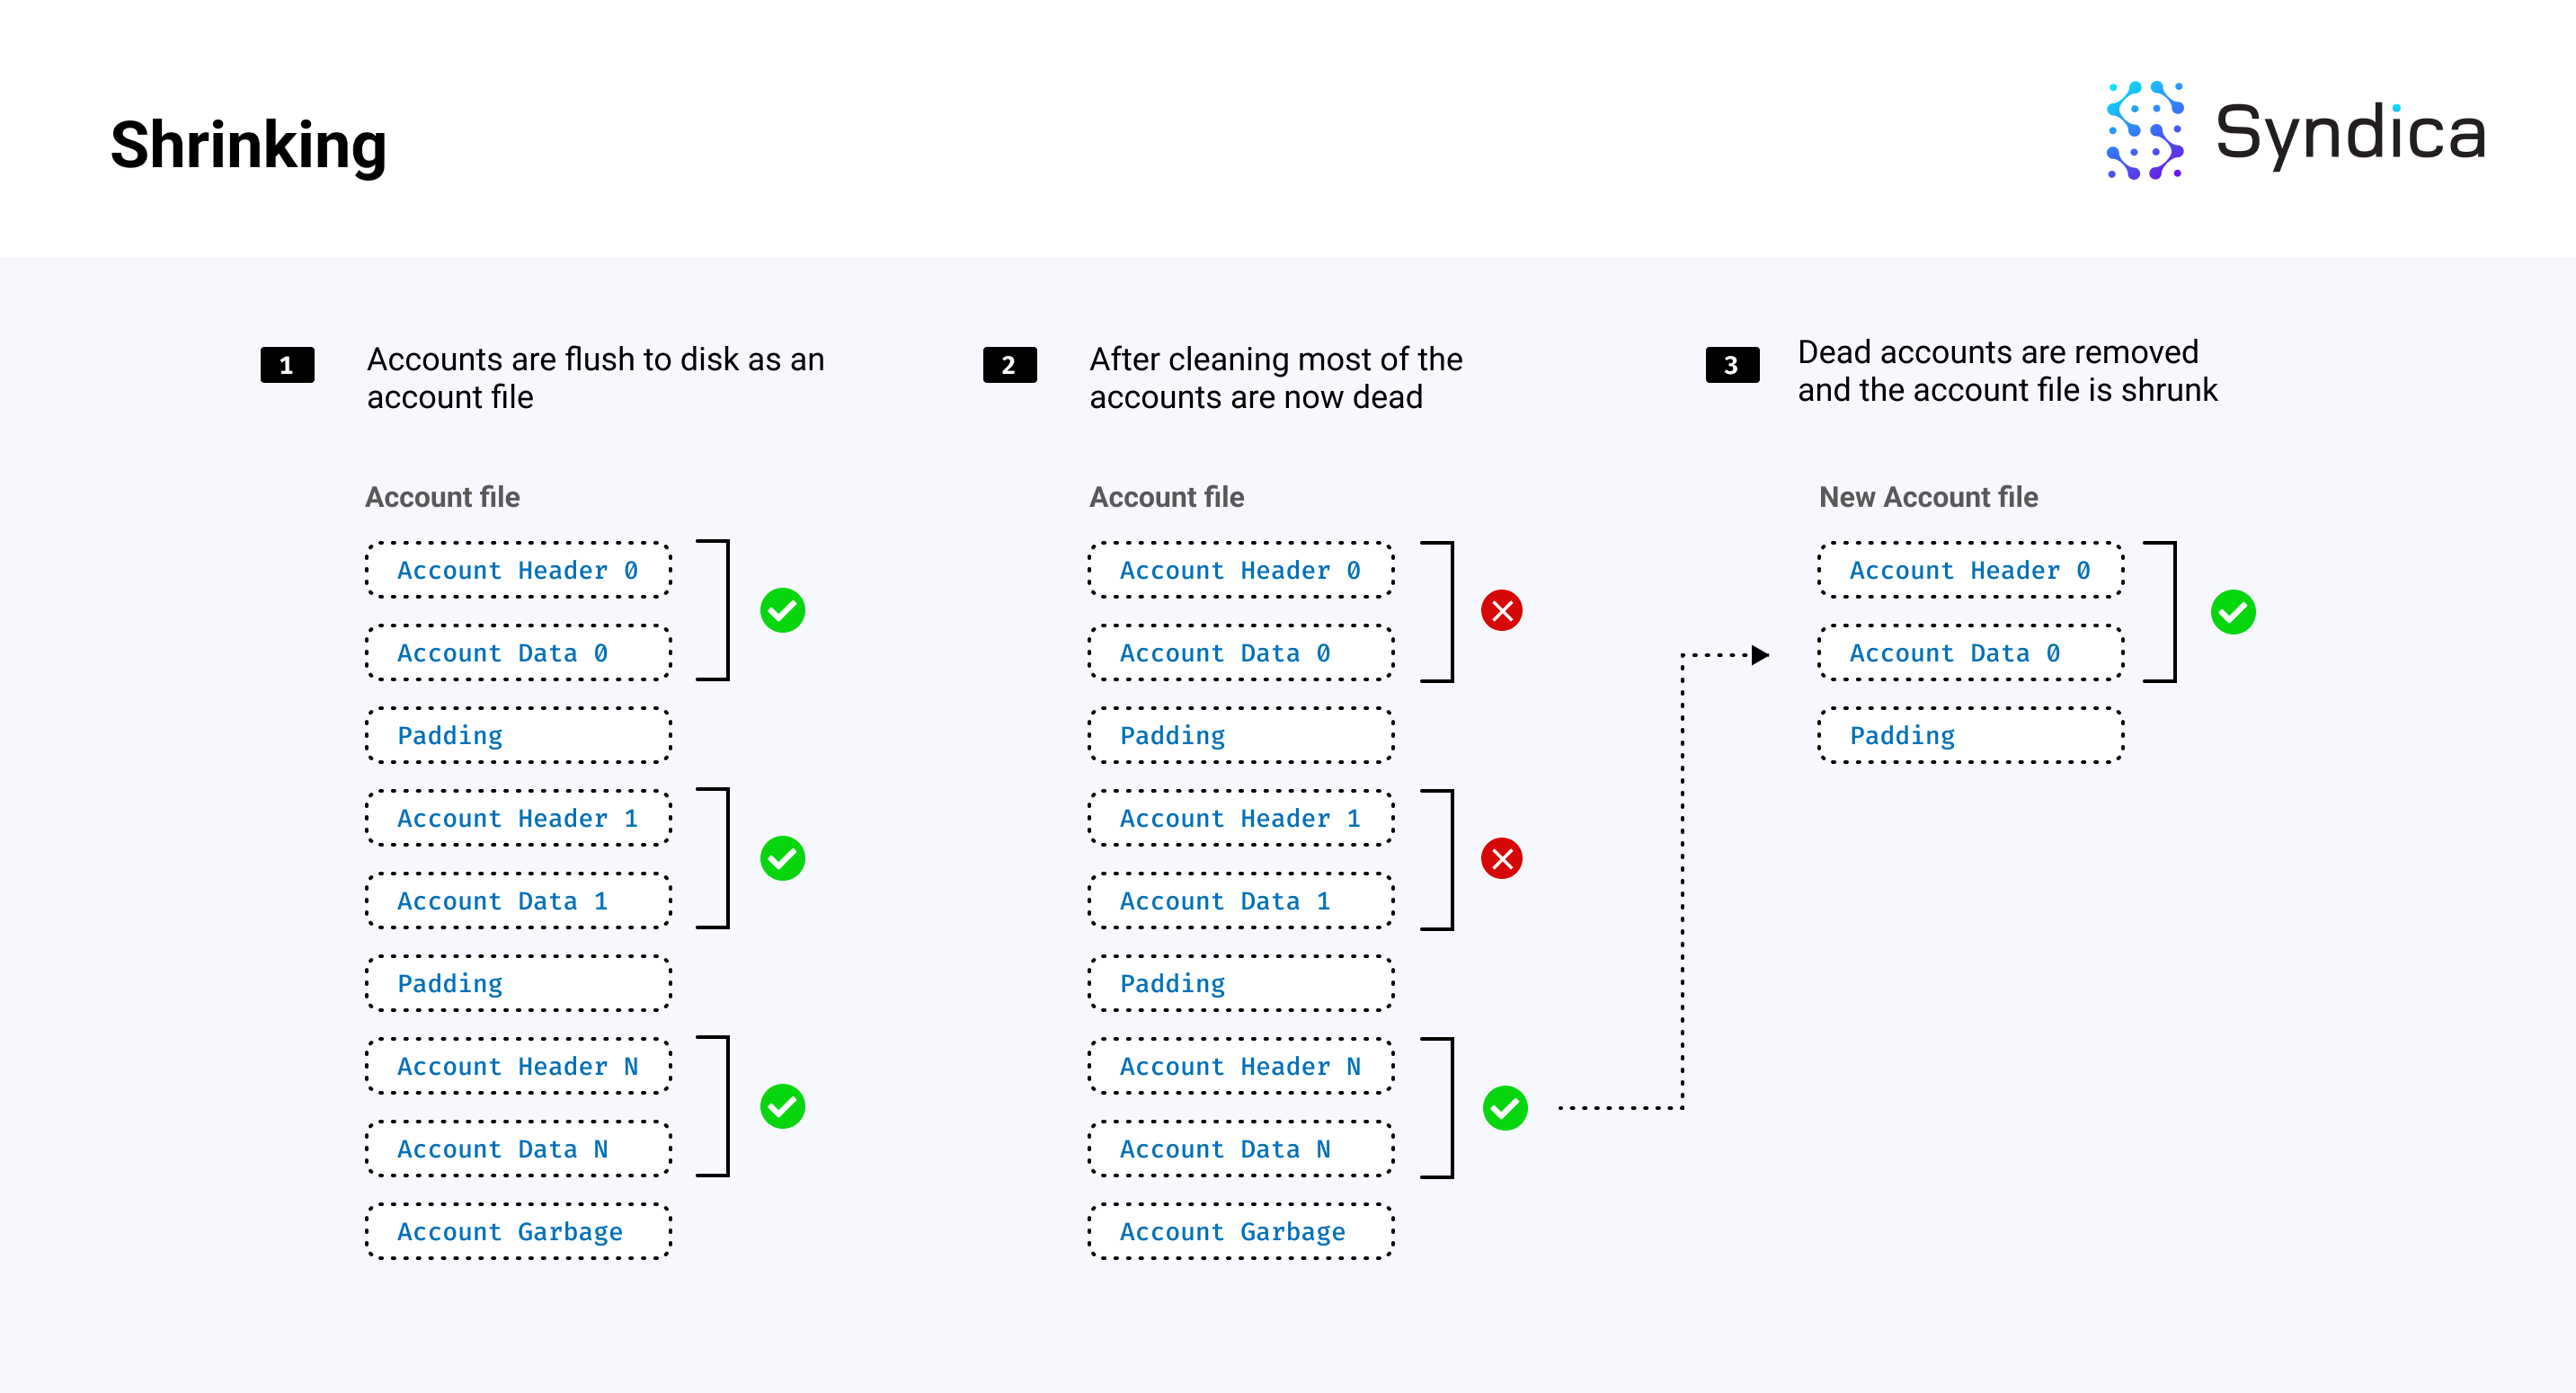
Shrinking
After accounts are cleaned, account files will contain “alive” and “dead” accounts where “dead” accounts have been “cleaned” and therefore are no longer needed. When an account’s file has a small number of alive accounts, these accounts can be copied to a smaller file without the dead accounts, saving disk memory. This is called shrinking.
Note: since cleaning removes the account entries from the account index, to check if an account has been cleaned (or is considered ‘dead’), the (pubkey, slot) tuple is checked if it exists in the account index.
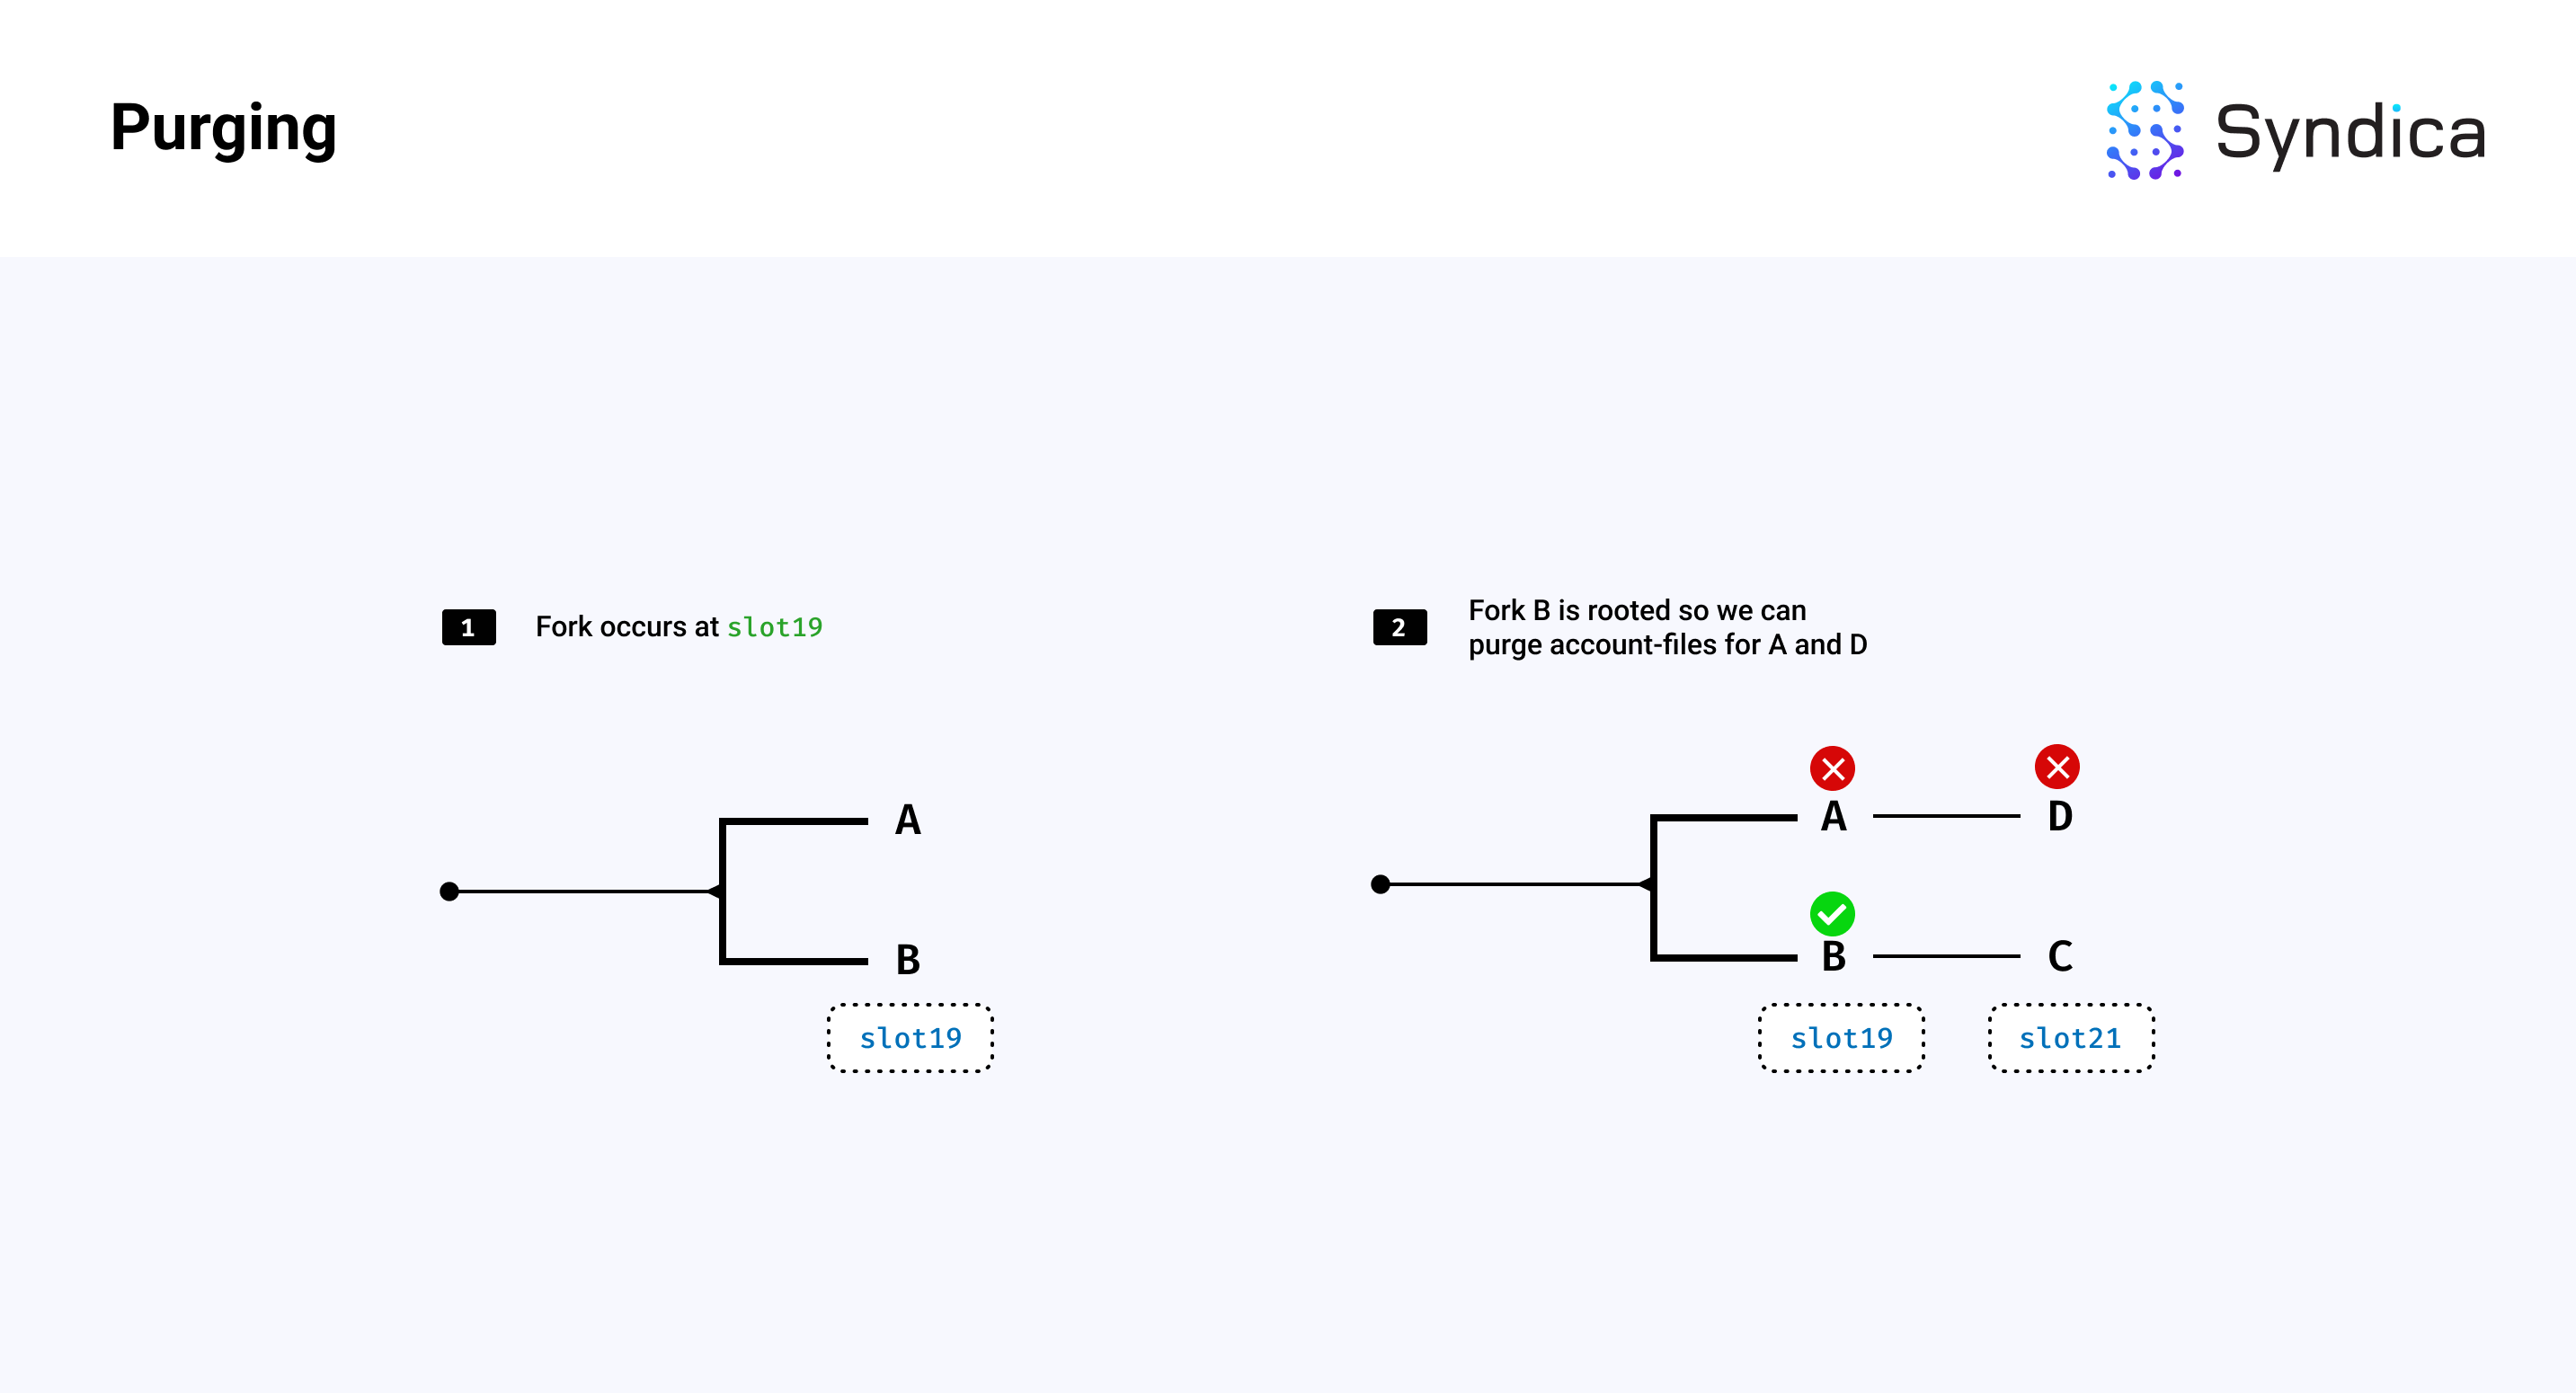
Purging
We can also purge the account data corresponding to slots forked off the rooted chain. For example, if a fork exists and one branch becomes rooted, we can delete all account files associated with the other non-rooted branch.
Implementation Details
Having covered the high-level components of AccountsDB, we’ll dive into a few implementation details next.
Intro to Snapshots
We’ll start with a more detailed outline describing how a validator loads from a snapshot.
There are two types of snapshots on Solana:
- A full snapshot, and
- An incremental snapshot.
Full snapshots include all the accounts on the network at a specific slot. Incremental snapshots are smaller snapshots that only contain the accounts that changed from a full snapshot. For example, if the network is on slot 100, the full snapshot could contain all accounts at slot 75, and a matching incremental snapshot could contain all accounts that changed between slot 75 and slot 100.
Full snapshots can be expensive to create because they contain all accounts on the network, whereas incremental snapshots are relatively cheap to create because they only contain a subset of the network’s accounts. In light of this reality, the typical approach for validators is to create full snapshots occasionally and create/update incremental snapshots more frequently.
Full snapshots adhere to the following naming convention format:
snapshot-{FULL-SLOT}-{HASH}.tar.zst
For example, snapshot-10-6ExseAZAVJsAZjhimxHTR7N8p6VGXiDNdsajYh1ipjAD.tar.zst’ is a full snapshot at slot 10 with a hash of ‘6ExseAZAVJsAZjhimxHTR7N8p6VGXiDNdsajYh1ipjAD.
Incremental snapshots follow the naming convention format:
incremental-snapshot-{FULL-SLOT}-{INCREMENTAL-SLOT}-{HASH}.tar.zst
For example, incremental-snapshot-10-25-GXgKvm3NMAPgGdv2verVaNXmKTHQgfy2TAxLVEfAvdCS.tar.zst is an incremental snapshot that builds on a full snapshot from slot 10 and contains the account changes up until slot 25 and has a hash of GXgKvm3NMAPgGdv2verVaNXmKTHQgfy2TAxLVEfAvdCS.
A matching snapshot and incremental snapshot will have the same {FULL-SLOT} value. When the validator is starting up, since it can have multiple snapshots downloaded at once, it will find the latest snapshot and matching incremental snapshot to load and startup from.
Downloading Snapshots
To download a snapshot, the validator starts participating in gossip to join the network and identify other nodes. After a while, potential nodes to download a snapshot from are identified with:
- a matching shred version (i.e., a matching network version/our hard forks match theirs)
- a valid RPC socket (i.e., we can download a snapshot from them)
- a message shared through gossip indicating that they have a snapshot available for download
The snapshot message is called SnapshotHashes (shown below), which is a gossip datatype that contains:
- the slot and hash of the largest available full snapshot
- and a list of slots and hashes of available incremental snapshots
pub const SnapshotHashes = struct {
  from: Pubkey,
  full: struct { Slot, Hash },
  incremental: []struct { Slot, Hash },
  wallclock: u64,
}
The validator sequentially attempts to download a full snapshot from each node in its list of possible peers until the download succeeds, prioritizing nodes that have snapshots with higher slots.
Note: if we have a list of 'trusted' validators (provided through the CLI on startup), we first note the snapshot hashes published by those trusted validators. Then, we can still download a snapshot from any validator, but only if the snapshot's hash matches one of the hashes published by a trusted validator.
To construct the download URL for the snapshot, we use the node’s IP address, RPC port, and the file path (based on the snapshot naming conventions mentioned in the previous section), we construct the download URL and start downloading the snapshots. The download speed is periodically checked to see if it’s fast enough. If it’s not, we try to download from another node.
Once the validator has downloaded a snapshot, it decompresses and unarchives it, leading to a directory layout below.
Note: for a specification of snapshots, see Richard Patel’s Informal Guide to Solana Snapshots.
The Account Index Architecture
Once we have a snapshot, the next step is constructing the Account Index, which maps a pubkey to an account’s location.
While the index can be conceptualized as a single map, the implementation divides it into many separate hashmaps. We'll refer to the individual hashmaps as bins.
The purpose of using many bins is to improve performance by enabling more threads to make use of the database concurrently. If only a single map were used for all pubkeys, a single operation in one thread would lock the entire database, preventing other threads from interacting with the whole index until that operation is finished. With binning, each operation only needs to lock a single bin. This leaves the remaining bins available for use by other threads.
To evenly distribute accounts into separate bins, we need a fast technique to arbitrarily and deterministically assign each account to a bin. Each bin is identified by an integer. Each account is identified by a pubkey. We select the first few bits within the pubkey, turn those bits into an integer, and use that integer to choose which bin the account should be indexed in. Since account pubkeys bits are uniformly distributed (i.e., they appear to be random), this technique results in each bin containing roughly the same number of accounts.
/// stores the mapping from Pubkey to the account location (AccountRef)
pub const AccountIndex = struct {
    allocator: std.mem.Allocator,
    // allocator for references (either RAM or DISK)
    reference_allocator: std.mem.Allocator,
    // sharded hashmaps
    bins: []RwMux(RefMap),
    // calculator to know which bin a pubkey belongs to
    calculator: PubkeyBinCalculator,

    // hashmap/bin type definition
    pub const RefMap = SwissMap(Pubkey, AccountReferenceHead, pubkey_hash, pubkey_eql);
}
Note: the code to compute which bin a pubkey belongs to can be found in the PubkeyBinCalculator structure.
N bits of data can represent a number up to 2^N. For performance, we'd like to have several thousand bins, so we use the first 13 bits of the pubkey to assign bins, which divides the index into 2^13 or 8192 bins.
Note: bin-ing based on the first N bits is similar to the approach used in gossip (as discussed in Part 1 of this series, covering the Gossip Protocol).
Each bin maps from a pubkey to a pointer to an account reference defined as the AccountRef struct below:
/// reference to an account (either in a file or cache)
pub const AccountRef = struct {
  pubkey: Pubkey,
  slot: Slot,
  location: AccountLocation,
  next_ptr: ?*AccountRef = null,

  pub const AccountLocation = union(enum(u8)) {
    File: struct {
      file_id: u32,
      offset: usize,
    },
    Cache: struct {
      index: usize,
    },
  };
}
To reduce memory allocations (which are very expensive in terms of performance), we define the bin datatype as HashMap(Pubkey, *AccountRef). This datatype uses a pointer to an AccountRef, which contains a linked list across slots.
Note: since this hashmap is used in every read-and-write operation, we need it to be fast, so we implemented our own from scratch. For more details, read Part 2 of our blog post series found here.
This allows us to allocate a batch of references in a single syscall and update the hashmap by adding the new pubkeys or updating the existing pubkey’s linked list (without additional allocations).
Note: In the Agave codebase, they use a HashMap(Pubkey, Vec<AccountRef>) for each bin. In this case, adding a new reference for a batch of accounts will require a memory allocation to resize each vector per key updated.
The full architecture is described in the figure below:
Note: the block of memory storing the account references (references in the diagram above) can also be backed by Disk memory to reduce RAM requirements. We discuss how we efficiently use Disk memory in Part 2 of our blog post series, which can be found here.
Generating the Account Index
The Account Index is built after downloading and unpacking a snapshot. In the Sig codebase, the main function which builds the index is AccountsDB.loadFromSnapshot.
First, all account file paths are found and split across multiple threads for processing.
For each account file path, the account file is validated and indexed. Specifically, the file is mapped into memory, and for each account that is read from the file, a corresponding account reference is created and inserted into the index. The account reference includes the account’s pubkey, the slot, the file_id, and the offset of where the account is located. The first few bits of the pubkey are extracted to determine which bin to store it in, and the AccountRef is inserted into that bin's hashmap.
pub fn loadAndVerifyAccountsFiles(
    self: *AccountsDB,
    accounts_dir_path: []const u8,
    file_names: [][]const u8,
    accounts_per_file_est: usize,
) !void {
    // allocate one block of references
    var references = try ArrayList(AccountRef).initCapacity(
        self.account_index.reference_allocator,
        file_names.len * accounts_per_file_est,
    );

    for (file_names, 1..) |file_name, file_count| {
        // parse "{slot}.{id}" from the file_name
        var fiter = std.mem.tokenizeSequence(u8, file_name, ".");
        const slot = try std.fmt.parseInt(Slot, fiter.next().?, 10);
        const file_id_usize = try std.fmt.parseInt(usize, fiter.next().?, 10);

        // open the account file
        const abs_path = try std.fmt.bufPrint(&buf, "{s}/{s}", .{ accounts_dir_path, file_name });
        const accounts_file_file = try std.fs.cwd().openFile(abs_path, .{ .mode = .read_write });
        var accounts_file = try AccountFile.init(accounts_file_file, file_info, slot);

        // read the accounts and populate `references` with the references
        try self.account_index.validateAccountFile(&accounts_file, bin_counts, &references);
    }

    // insert into bin hashmap and build the reference linked-list
    for (reference.items) |*ref| {
        _ = self.account_index.indexRefIfNotDuplicateSlot(ref);
    }
}
Note: while a validator is building a snapshot for a slot and packaging these account files, due to the implementation, the validator will continue to write account data to the account files for more recent slots, and some of this data will be included at the end of the account files within the snapshot. Because this data does not correspond to the snapshot’s slot, this data should be ignored. When reading accounts from the file, we need to read the length from the snapshot metadata file (specifically, the AccountsDB metadata) to know the last index of useful data to read.
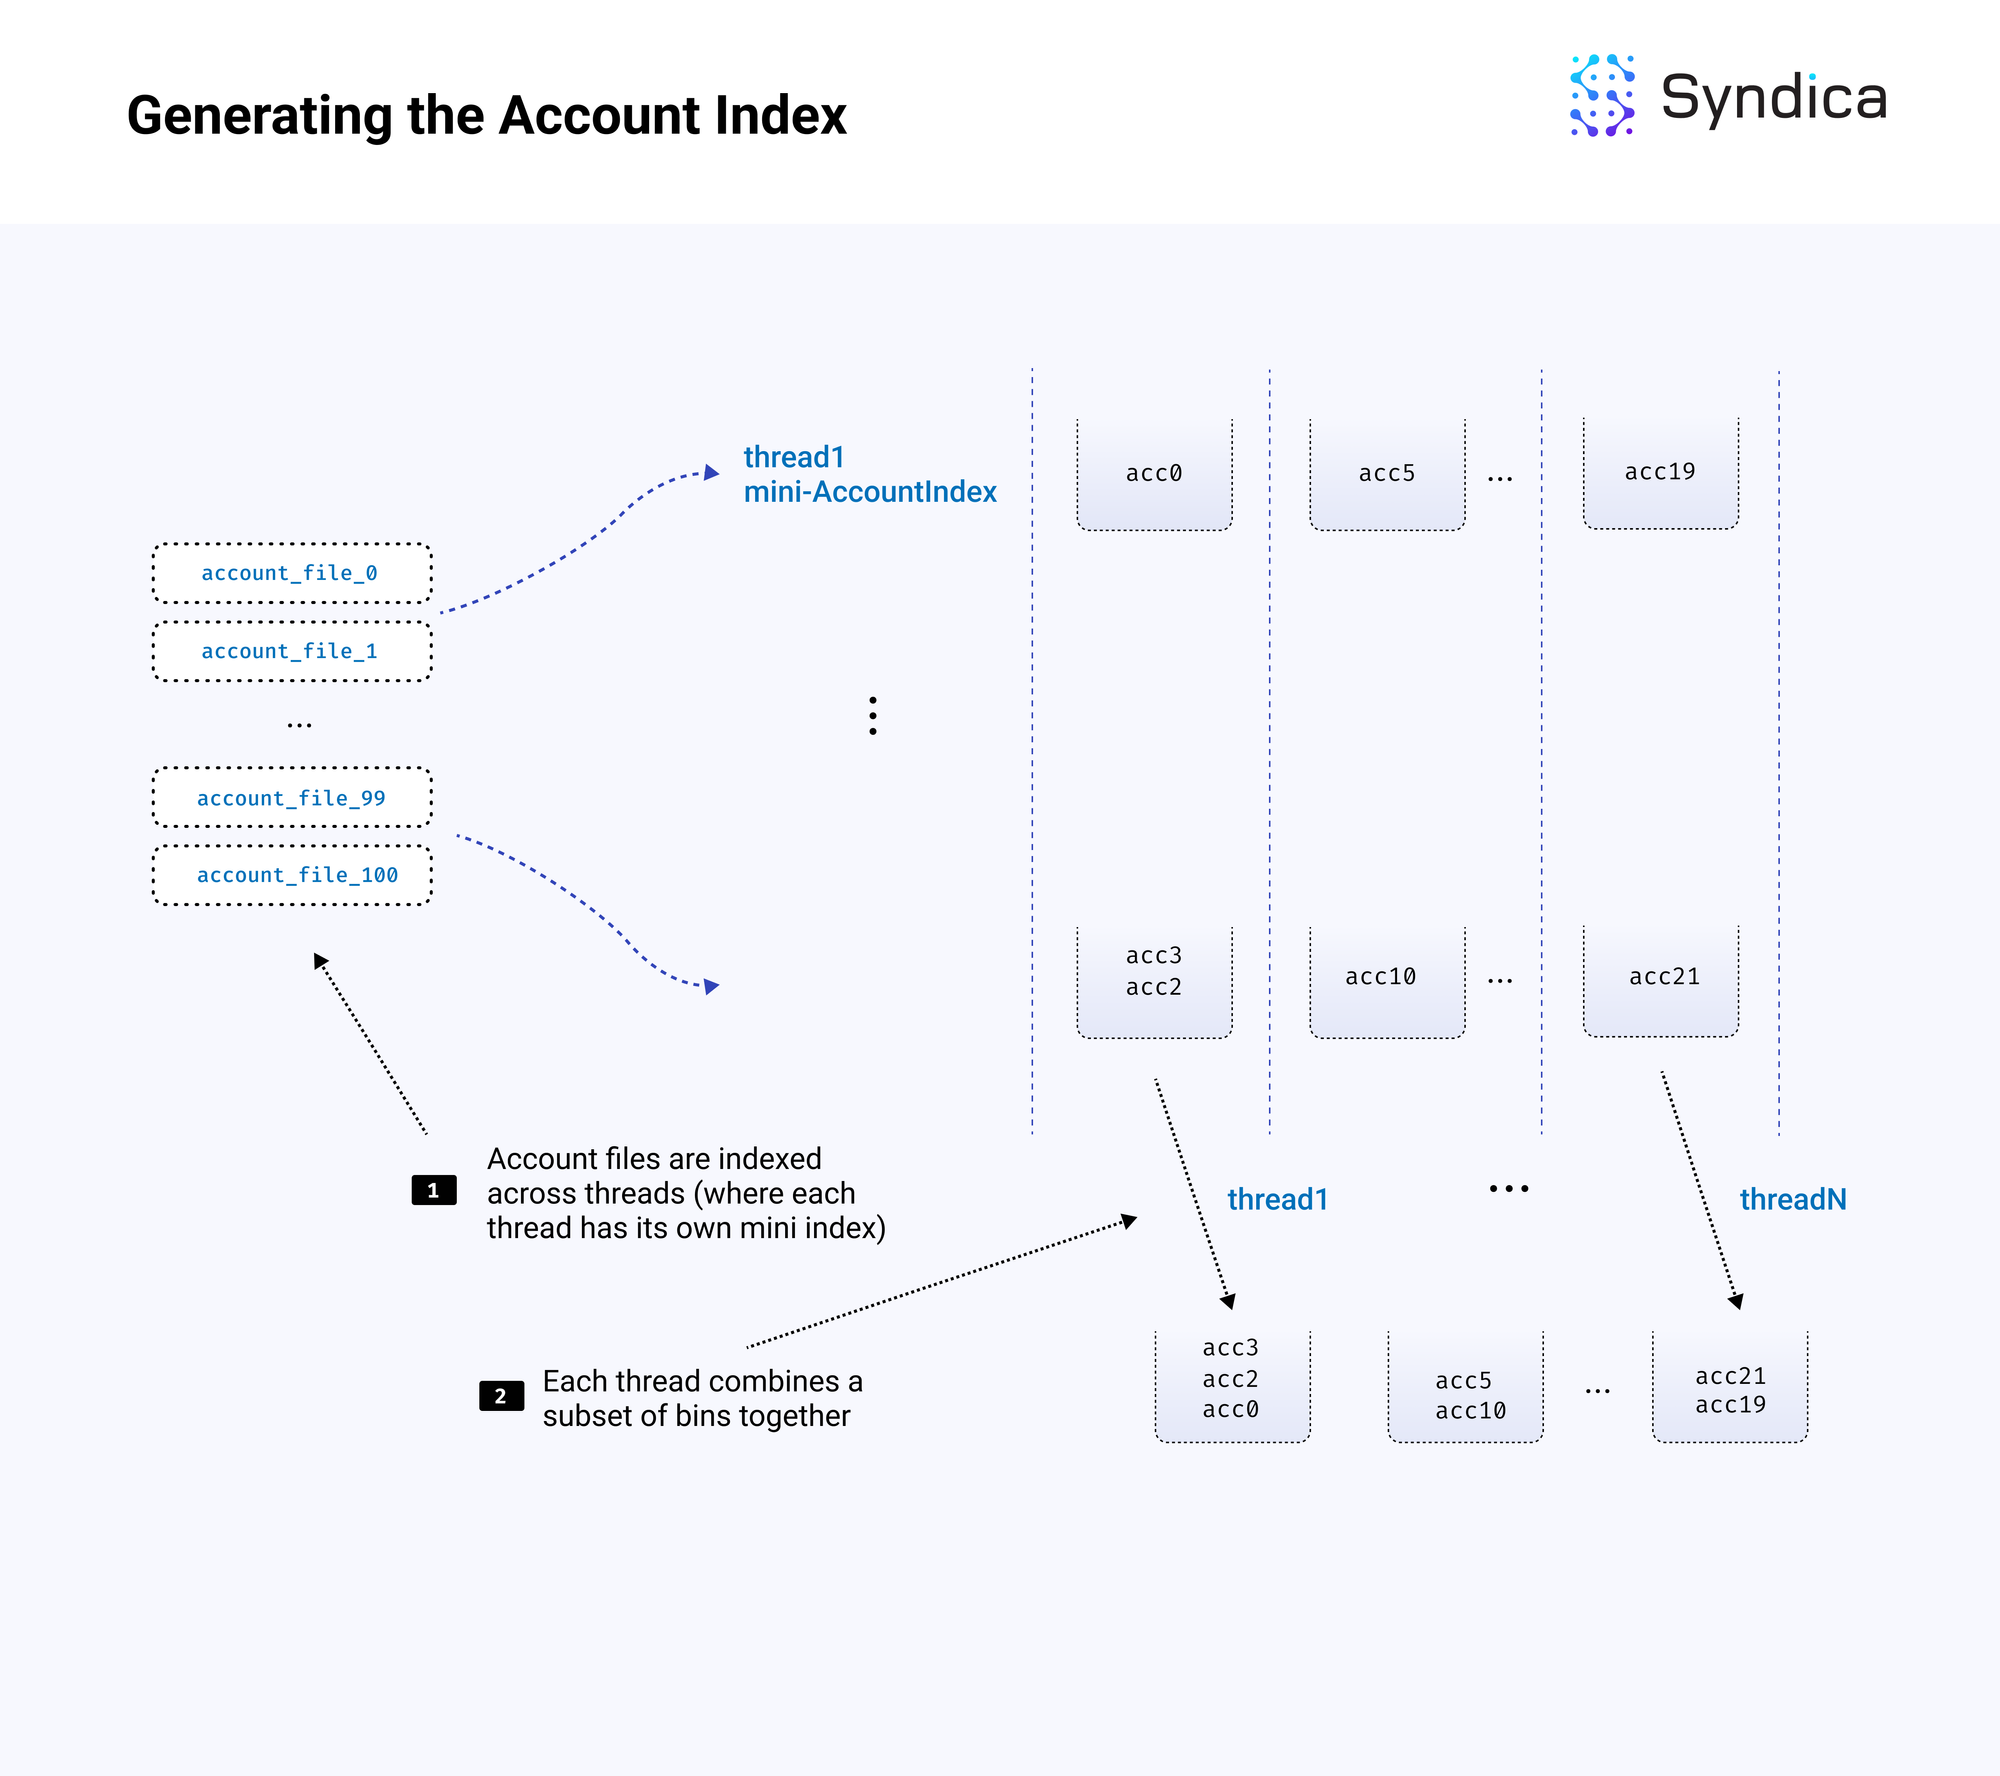
Index generation is done in parallel by splitting the work across multiple threads. Rather than creating one complete account index, each thread creates its own separate mini-index from a subset of the account files. Each mini-index has the same number of bins as the full index but only a fraction of the total accounts. This approach allows each thread to work non-stop without needing to share memory with other threads (which would lead to lock contention and performance degradation).
/// load account files and generate the account index from a snapshot
pub fn loadFromSnapshot(
    self: *AccountsDB,
    // where the account files are
    accounts_path: []const u8,
    n_threads: u32,
) !void {
    // read the account files
    var files = try readDirectory(self.allocator, accounts_dir_iter);
    const filenames = files.filenames;

    // setup the mini-indexes
    var loading_threads = try ArrayList(AccountsDB).initCapacity(
        self.allocator,
        n_threads,
    );
    for (0..n_threads) |_| {
        var thread_db = try AccountsDB.init(
            per_thread_allocator,
            self.logger,
            // same number of bins as main index
            .{ .number_of_index_bins = self.config.number_of_index_bins },
        );
        loading_threads.appendAssumeCapacity(thread_db);
    }

    // spawn the threads to load and index the accounts
    try spawnThreadTasks(
        &handles,
        // main entrypoint
        loadAndVerifyAccountsFilesMultiThread,
        .{
            loading_threads.items,
            // split the filenames across the threads
            filenames.items,
            accounts_path,
        },
        filenames.items.len,
        n_parse_threads,
    );

    // merge thread indexes into main index
    try self.mergeMultipleDBs(loading_threads.items, n_threads);
}
After the mini-indexes are created, they must be merged into a full index. Each mini-index has a mini bin 0. Each of these bin 0s is combined into a single hashmap, and that hashmap becomes bin 0 in the full index. This is repeated for each bin until we have a single index with N bins.
The merging process is also executed using multiple threads. Let's say 10 threads are used for merging. The first thread would be responsible for merging the first 10% of bins from each index into the first 10% of bins of the full index. Each thread produces a chunk of bins, which are included as-is in the full index. Again, we have an approach that avoids contention by giving each thread its own isolated data.
pub fn combineThreadIndexesMultiThread(
    index: *AccountIndex,
    thread_dbs: []AccountsDB,
    // task specific
    bin_start_index: usize,
    bin_end_index: usize,
    thread_id: usize,
) !void {
    const total_bins = bin_end_index - bin_start_index;

    // for each of this thread's assigned bins
    for (bin_start_index..bin_end_index, 1..) |bin_index, iteration_count| {
        const index_bin = index.getBin(bin_index);

        // compute the total number of references across threads
        var bin_n_accounts: usize = 0;
        for (thread_dbs) |*thread_db| {
            var thread_bin = thread_db.account_index.getBin(bin_index);
            bin_n_accounts += thread_bin.count();
        }
        // ensure the main hashmap can contain all the thread's references
        if (bin_n_accounts > 0) {
            try index_bin.ensureTotalCapacity(@intCast(bin_n_accounts));
        }

        // for each thread's bin
        for (thread_dbs) |*thread_db| {
            var thread_bin = thread_db.account_index.getBin(bin_index);

            // insert all of the references into the main index's linked-list
            var ref_iter = thread_bin.iterator();
            while (ref_iter.next()) |thread_ref| {
                index.indexRef(thread_ref);
            }
        }
    }
}
Below is the full loading process:
Writing Accounts
When writing a new batch of accounts associated with a slot, the accounts are first written to the cache (i.e., the accounts_cache field), which is a mapping from a slot to a list of accounts (i.e., HashMap(Slot, ArrayList(Account))).
/// writes a batch of accounts to cache and updates the index
pub fn putAccountSlice(
    self: *Self,
    accounts: []Account,
    pubkeys: []Pubkey,
    slot: Slot,
) !void {
    // write the accounts to cache
    {
        const account_cache, var account_cache_lg = self.account_cache.writeWithLock();
        defer account_cache_lg.unlock();
        try account_cache.putNoClobber(slot, .{ pubkeys, accounts });
    }

    // allocate a block of references
    var references = try ArrayList(AccountRef).initCapacity(
        self.account_index.reference_allocator,
        accounts.len,
    );
    for (0..accounts.len) |i| {
        // create a reference
        const ref_ptr = references.addOneAssumeCapacity();
        ref_ptr.* = AccountRef{
            .pubkey = pubkeys[i],
            .slot = slot,
            .location = .{ .Cache = .{ .index = i } },
        };

        // insert reference into bin and update the linked-list
        _ = self.account_index.indexRefIfNotDuplicateSlot(ref_ptr);
    }
}
When a slot is rooted the corresponding accounts are removed from the cache and written to a new account file.
Reading Accounts
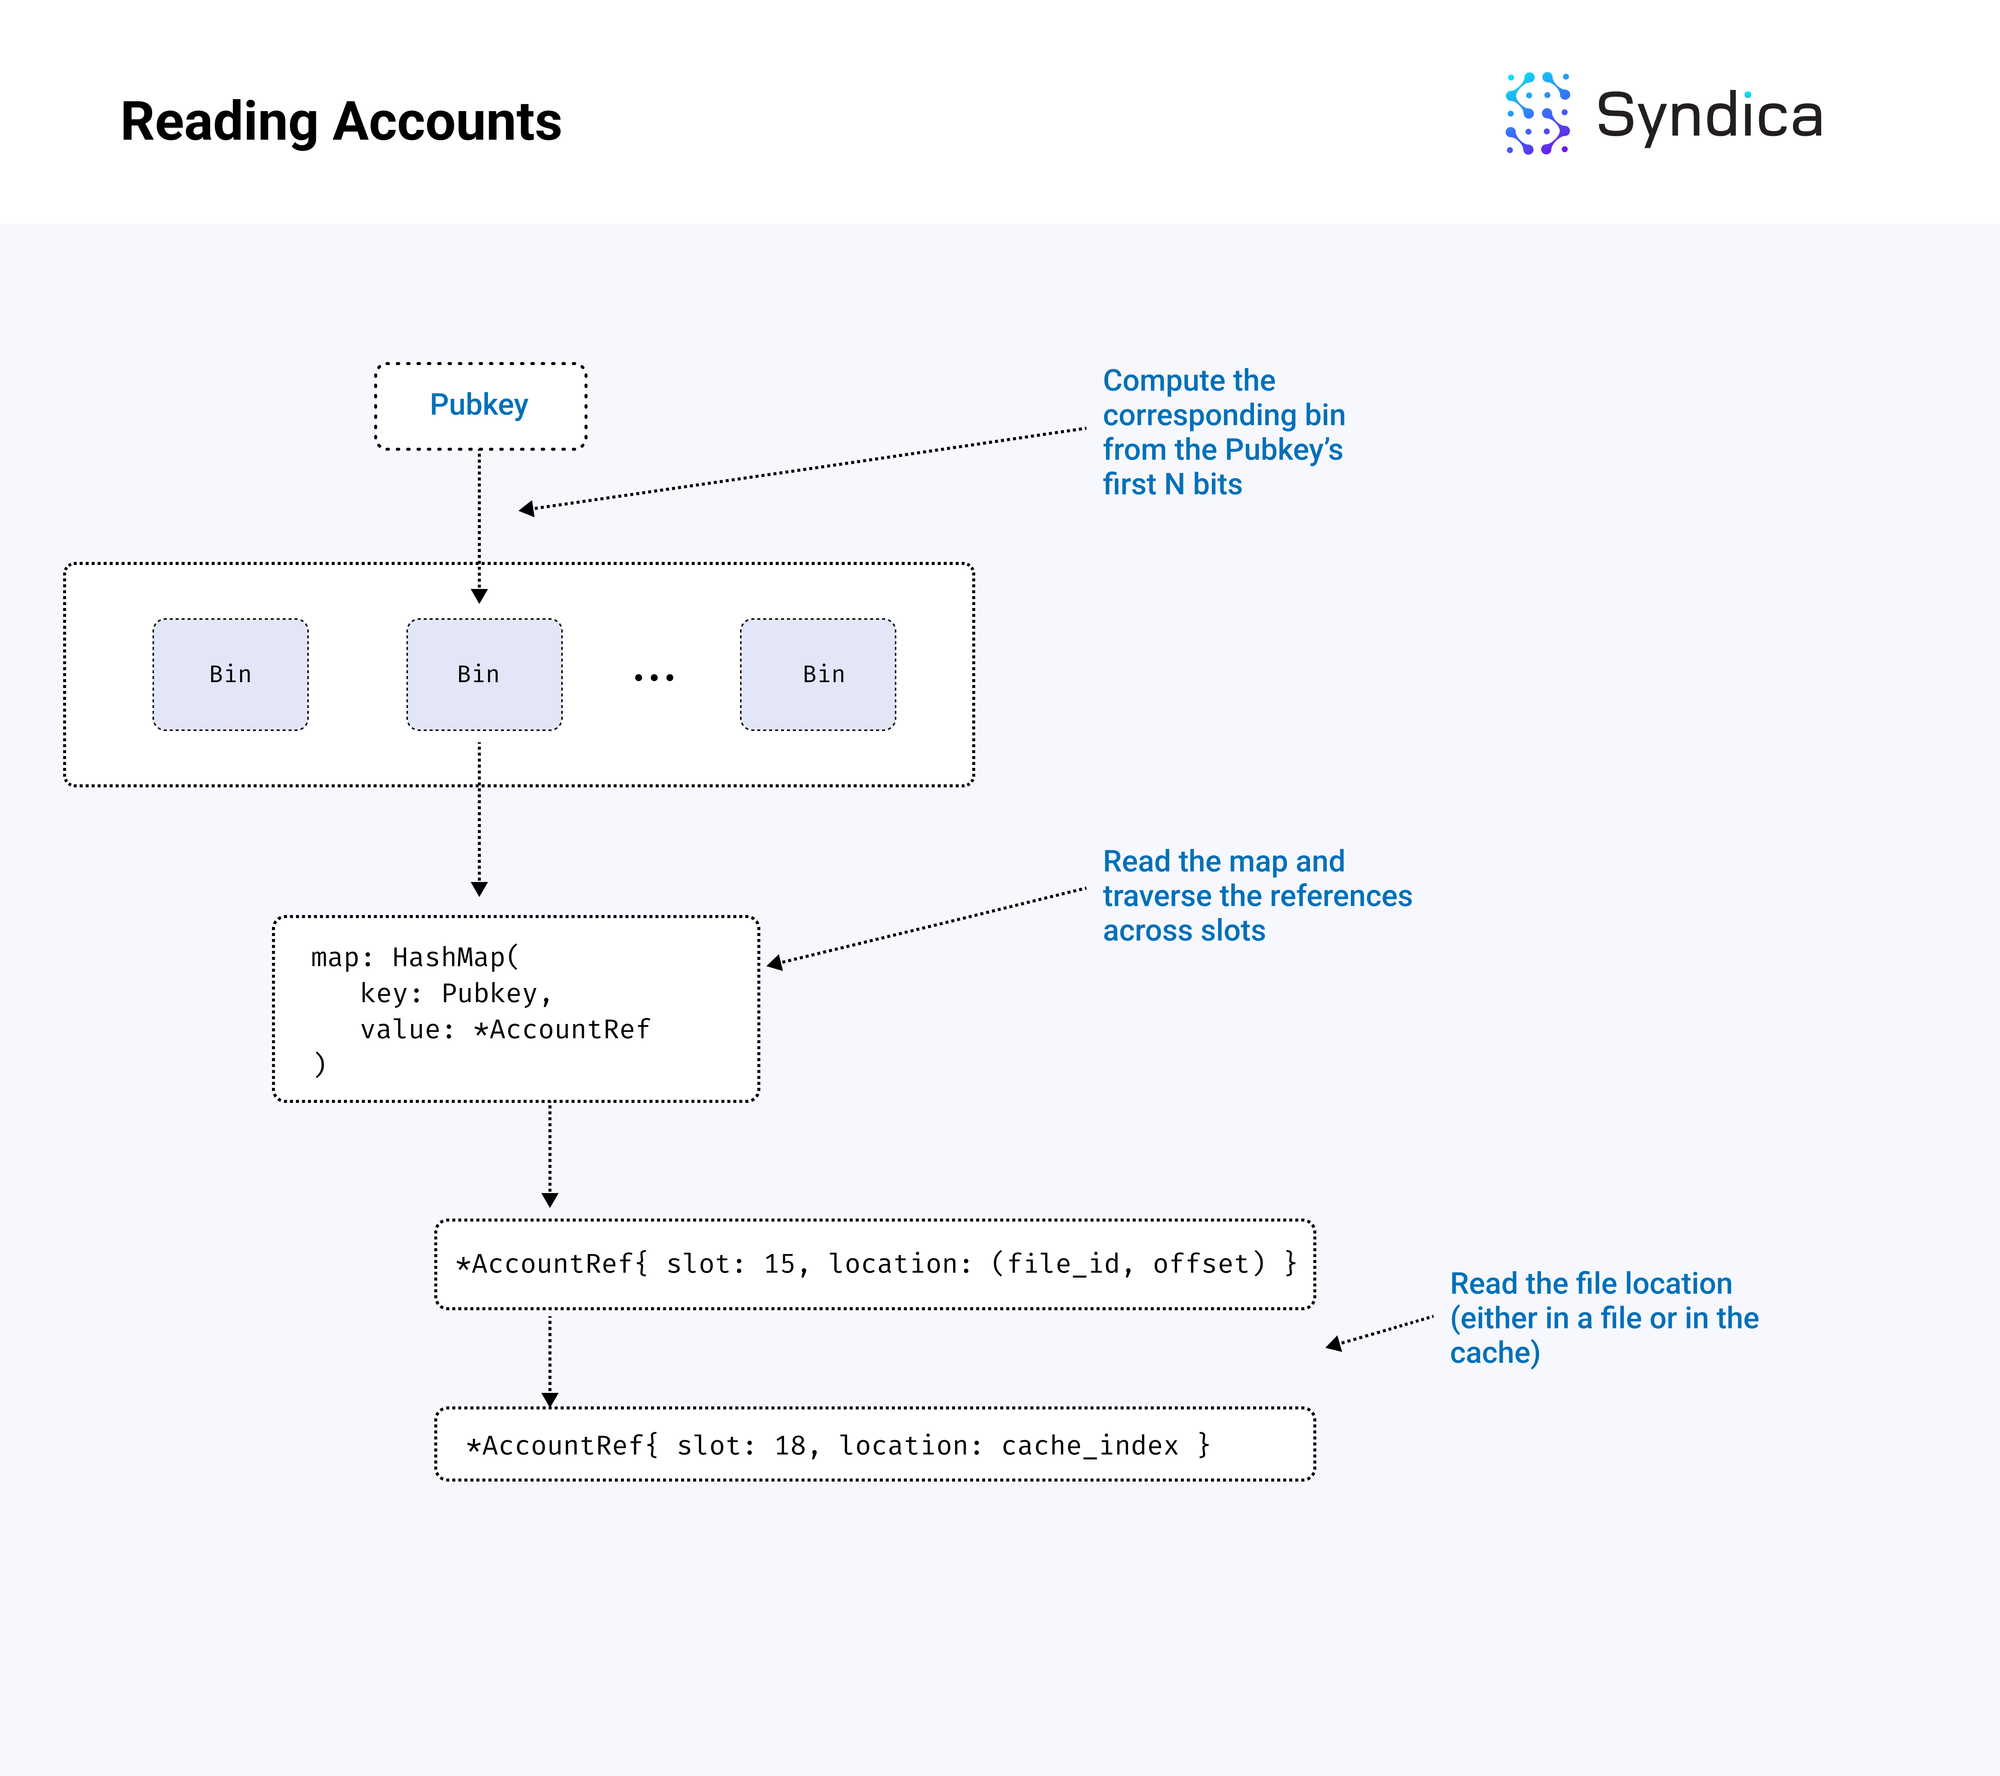
The steps to read an account associated with a pubkey are as follows:
- the pubkey’s bin index is computed using the pubkey’s first N bits
- the pubkey is looked up in the bin’s hashmap
- the account reference linked list is traversed until the specific slot reference is found
- the account is found using the location field of the reference (being in either a file or in the cache)
Background Tasks
We’ve discussed how reads/writes work in AccountsDB; next we’ll discuss how AccountsDB ensures memory is used efficiently.
This includes four tasks that are done in the background:
- Flushing: writing data from RAM to disk
- Cleaning: finding old account data and marking these accounts as ‘dead’
- Shrinking: shrinking account files with a large number of dead accounts
- Purging: delete empty account files and accounts associated with dropped forks
The core logic of the background tasks is:
- get the largest rooted slot
- flush slots less than or equal to that rooted slot
- clean account files that were flushed
- shrink account files which contain a small amount of alive accounts after cleaning
- delete empty account files or accounts corresponding to dropped forks

Flushing
The first background task is Flushing, which reads from the account cache and pushes accounts associated with a rooted slot to disk via a new account file.
Note: this means each rooted slot will have an associated account file containing the accounts changed in that slot.
The main logic involved in flushing is the AccountsDB.flushSlot function which is given a slot and does the following:
- retrieves all the accounts in the cache corresponding to the slot
- computes the total byte size of the accounts
- allocates a new account file of that size
- writes the accounts to the account file
- update the account references to point to the new account file
- remove the accounts from the cache
- queues the account file for cleaning (using the
unclean_account_filesparameter)
/// flushes a slot from the cache to and account file and updates the index
pub fn flushSlot(self: *Self, slot: Slot, unclean_account_files: *ArrayList(FileId)) !void {

    // get the pubkeys + accounts from the cache
    const pubkeys, const accounts: []Account = account_cache.get(slot) orelse return error.SlotNotFound;

    // create an account file to write the accounts to
    var size: usize = 0;
    for (accounts) |*account| size += account.getSizeInFile();
    const file, const file_id, const memory = try self.createAccountFile(size, slot);

    // write the accounts to the file
    var offset: usize = 0;
    for (0..accounts.len) |i| {
        offset += accounts[i].writeToBuf(&pubkeys[i], memory[offset..]);
    }

    // update the references to point to the file
    for (0..accounts.len) |i| {
        // get the linked-list head reference
        var head_reference = self.account_index.getReference(&pubkeys[i]);

        // find the slot in the reference list and update it to point to the file
        var curr_ref: ?*AccountRef = head_reference.ref_ptr;
        while (curr_ref) |ref| : (curr_ref = ref.next_ptr) {
            if (ref.slot == slot) {
                ref.location = .{
                    .File = .{ .file_id = file_id, .offset = offsets[i] }
                };
                break;
            }
        }
    }

    // free old memory
    self.allocator.free(accounts);
    self.allocator.free(pubkeys);

    // queue for cleaning
    try unclean_account_files.append(file_id);
}
Cleaning
Cleaning finds ‘old’ accounts or accounts with zero lamports and deletes them from the index. The main cleaning method is AccountsDB.cleanAccountFiles.
For each account file queued for cleaning, the method iterates over each account stored in the account file, looks them up in the index, and finds any ‘old’ states (e.g., multiple rooted slots) to remove from the index.
To remove old references, we consider only references less than the largest rooted slot (which consequently means we only consider references with rooted slots). We want to keep only the latest reference (and remove all other references from the index). If this reference also has zero lamports, we can remove it from the index.
When deleting references from the index, we also increment the corresponding account file’s dead_accounts counter. If an account file contains all dead bytes at the end of cleaning, we queue the account file for deletion. If the account file contains a majority of dead bytes (based on some threshold), we queue the account file for shrinking.
Shrinking
Shrinking removes the dead accounts from account files to reduce the amount of disk memory used by replacing them with smaller files that do not contain dead accounts. The main function is AccountsDB.shrinkAccountFiles.
For each account file queued for shrinking, the method iterates over the accounts to find the alive accounts. More specifically, for each account in the file, we check if the (pubkey, slot) tuple exists in the index. If it does exist in the index, then the account is still alive (and hasn’t been cleaned), so it’s copied to the new, smaller account file.
The index is then updated to point to the new account file’s location.
Purging
Lastly, when a new slot is rooted, accounts part of a forked slot are purged from the cache, and the index data is deleted. As well, when an account file is fully cleaned, and contains only dead accounts, we delete the full account file.
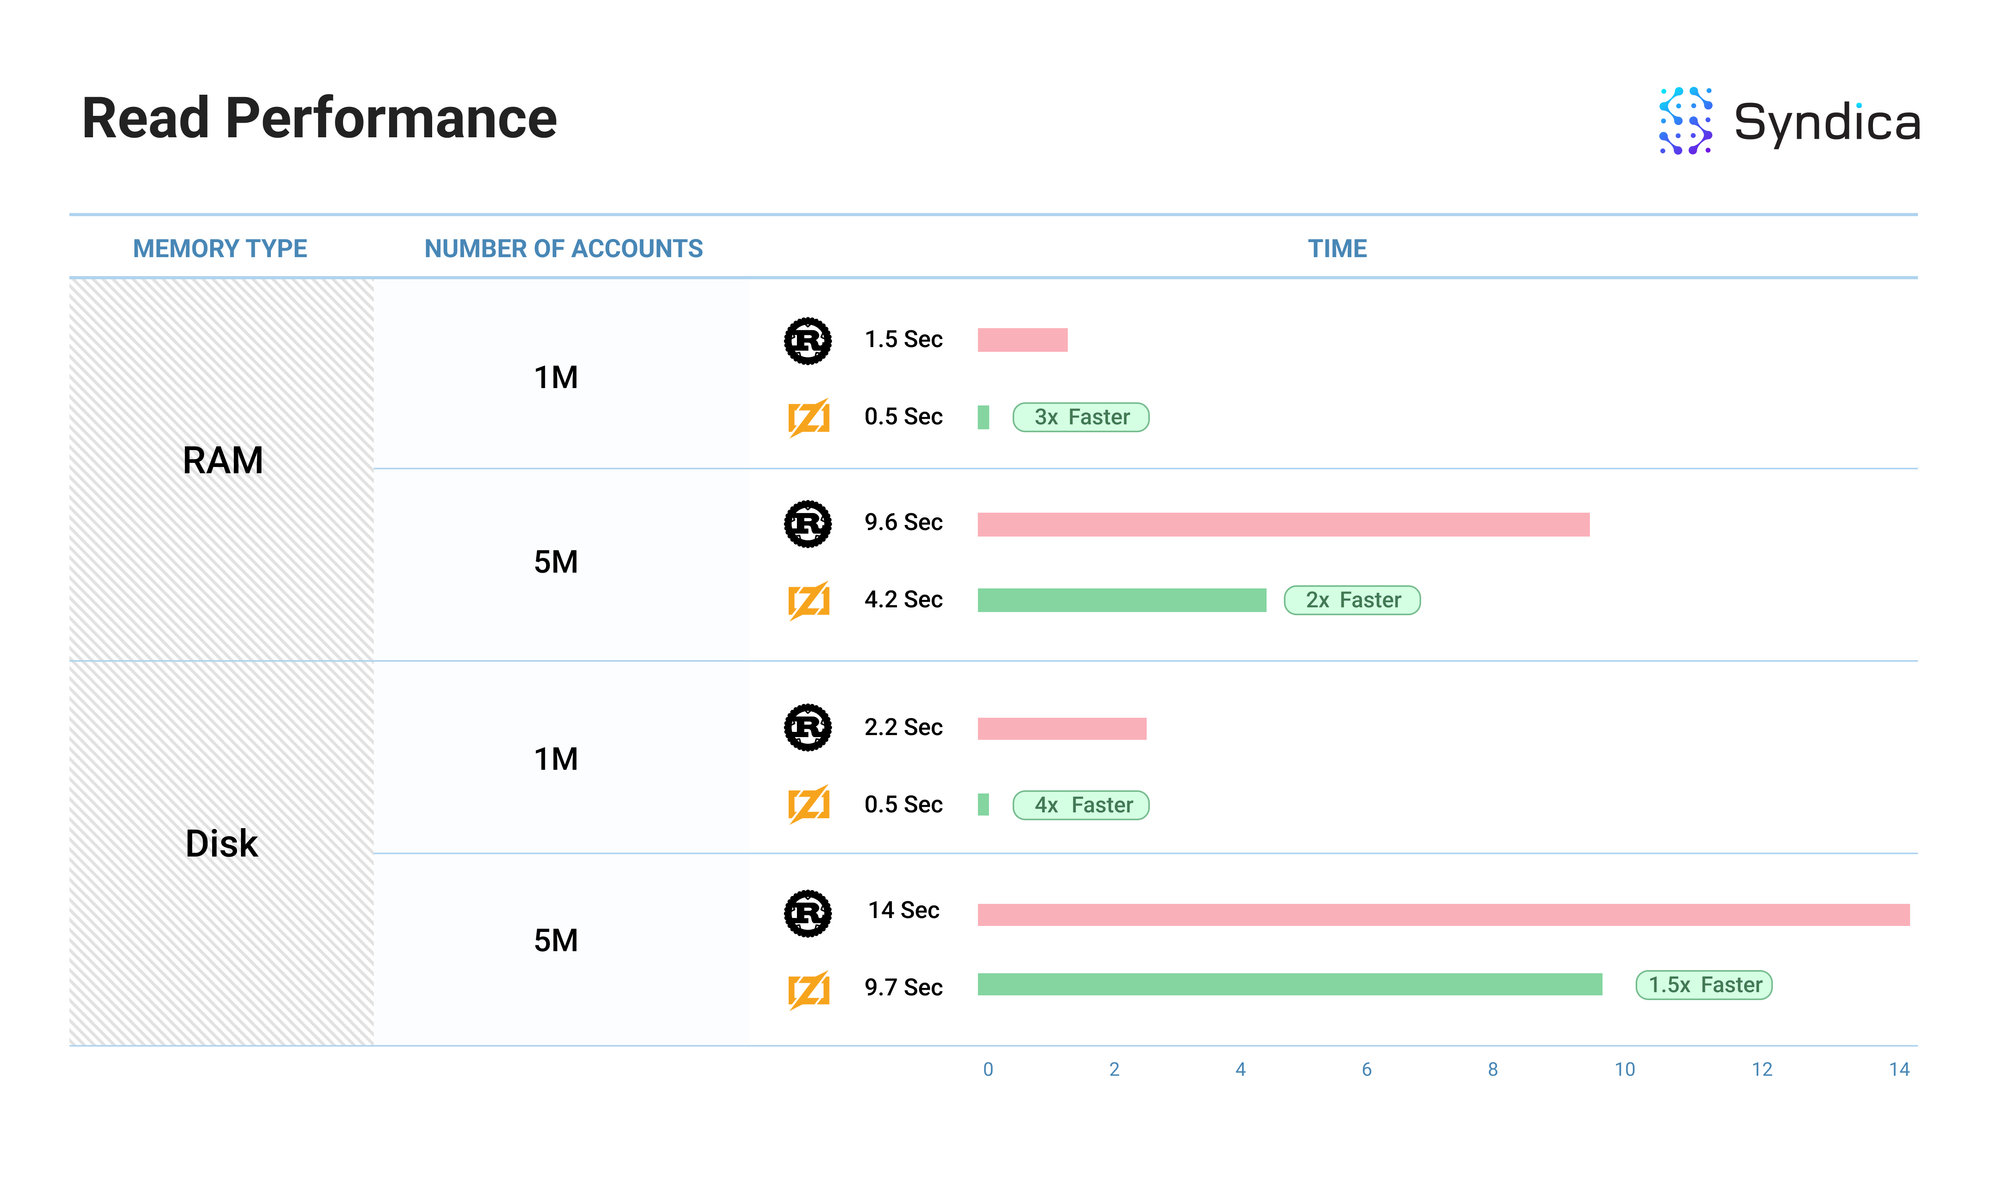
Benchmarks
We benchmarked our account read/write performance against the Agave client.
The benchmark measured the time required to write N accounts to the database (shown in the ‘number of accounts’ column)—where every account is associated with a unique pubkey—and the time required to then read those same accounts from the database. We also benchmarked this operation using RAM and Disk memory for the account index (shown in the ‘Memory Type’ column).
Note: the ‘Performance’ column shows the relative improvement in performance. Rust’s value will always be 1 since it is the baseline performance.
The complete Sig benchmark code can be found here.
Note: these benchmarks show our current initial implementation of AccountsDB and are subject to change as we build out more of the validator client. Additionally, these benchmarks are single-threaded, so performance may vary in a multi-threaded environment.

Conclusion
AccountsDB is an essential component for a Solana node. It manages the state of all accounts, ensuring the accurate execution of transactions and the integrity of the blockchain.
This post covers the key implementation details, including how snapshots are organized, how the account index is designed, how accounts are read and written, and how background tasks manage memory efficiently. We hope this post helps the community gain a deeper understanding of how Solana validators operate.
We’re building Sig open-source; feel free to step into the full AccountsDB code here.
If you are a talented engineer who thrives in a collaborative and fast-paced environment, and you're excited about contributing to the advancement of Solana's ecosystem, we are actively hiring and would love to hear from you:
https://jobs.ashbyhq.com/syndica/15ab4e32-0f32-41a0-b8b0-16b6518158e9


