An Introduction to the Solana Programming Model: Accounts, Data, and Transactions
An Introduction to the Solana Programming Model: Accounts, Data, and Transactions
This article provides an overview of the Solana programming model, focusing on the key structures that underpin applications built on Solana. We will cover:
- The basics of Solana accounts and their role within the blockchain’s architecture
- How data is serialized and stored on Solana, including an example of reading on-chain data using web3.js
- The structure and execution of transactions on Solana, featuring a walkthrough of deploying and interacting with a simple program using Anchor, a widely adopted development framework for Solana.
By the end of this article, we hope developers will have a solid foundation of Solana’s core components and practical next steps for developing their own applications.
The Solana Programming Model
At the most basic level, applications on Solana are based on two fundamental structures:
- Accounts that contain data, which can be either executable data (programs) or non-executable data to hold state.
- Transactions that reference accounts and, through a series of instructions, can modify the state of accounts involved in the transaction.
Solana DApps live within a more extensive network of validator clients, RPC nodes, off-chain oracles, and other components. All of these components interconnect via the Solana Programming Model. To facilitate operations on the blockchain, they use these two fundamental on-chain structures: reading data from accounts and executing transactions that modify those accounts.
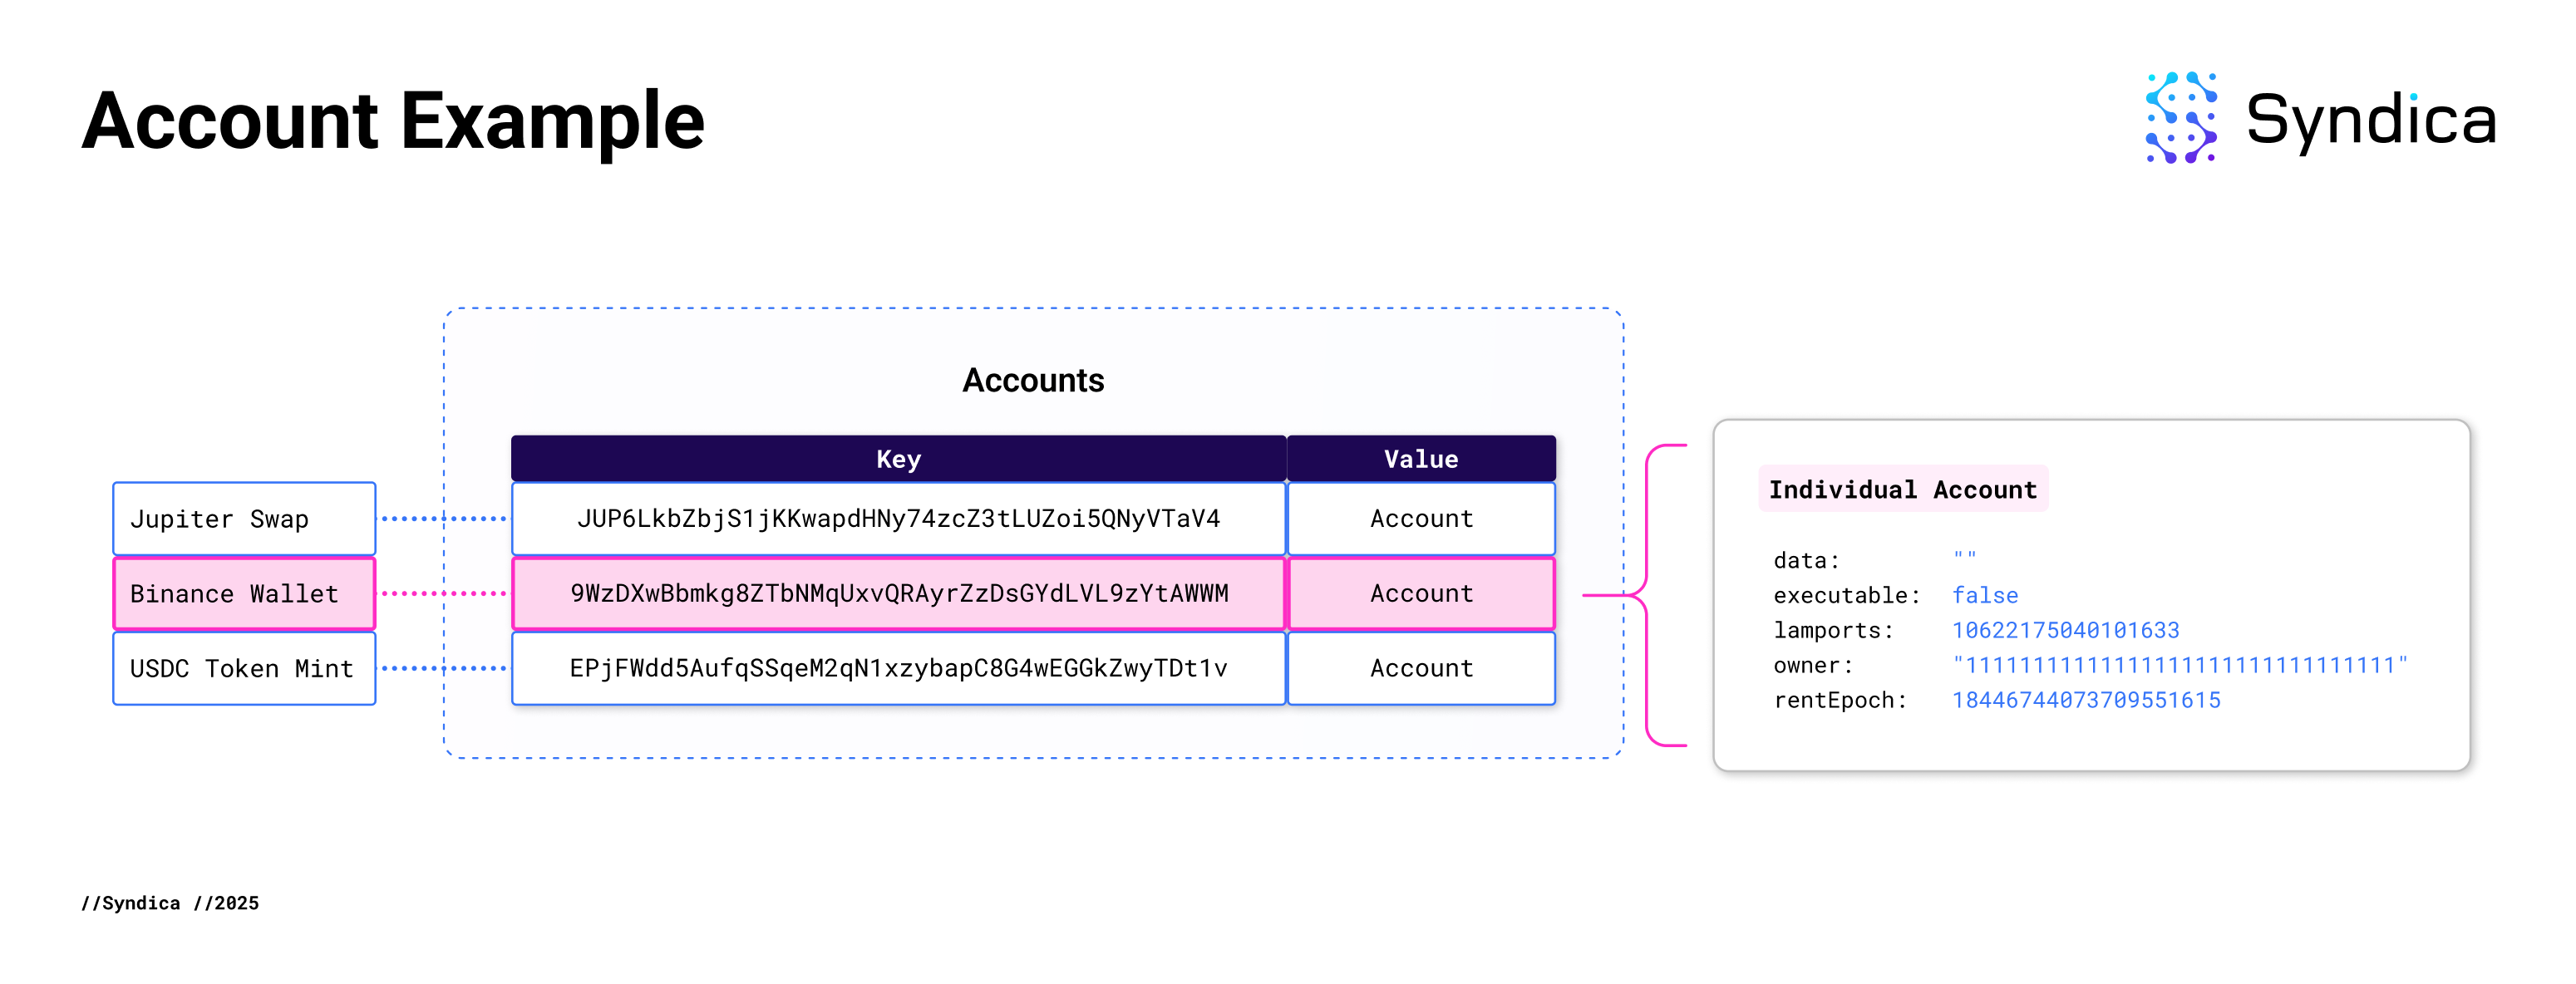
What is a Solana Account?
On Solana, accounts store on-chain data and are identified by a unique 32-byte public key. Accounts can be likened to files on a traditional computer system. Much as files on a computer can store various data types and are accessed via file paths, Solana accounts can store up to 10MB of arbitrary data.
Solana's account architecture is significantly more abstract and flexible than that of other blockchains, such as Ethereum. Every entity holding state in Solana, be it tokens, executable programs, or simple data, is encapsulated within one or more accounts.
Once again, you can think of accounts as similar to files: an account is either executable or non-executable, meaning it contains program code (executable) or holds data/state (non-executable).
Solana Account Data Structure
There are many different types of accounts on Solana, and we cover each in this article. All accounts, regardless of type, share the same general AccountInfo structure. This structure consists of the following elements:
key: the account is uniquely identified by a public key. In most cases this is an Ed25519 public key, which has a corresponding private key used to sign transactions.data: a byte array holding the actual data or state of the account. This could be executable code if the account is a program. Note that all data on Solana must be serialized in order to be transmitted and stored as bytes. Developers can choose any serialization format, the most common being Borsh. Later in this article, we demonstrate how account data is serialized/deserialized with an example.executable: a boolean indicator specifying whether the account is a program that can execute code. If executable, a program's data will consist of distinct functions known as instructions.lamports: the account's balance in lamports, the smallest subunit of the native SOL token (1 lamport = 0.000000001 SOL). This balance determines an account's capability to interact on the network, as transaction fees, staking deposits, and minimum rent deposits require SOL.owner: the program's public key that has ownership over the account. Only the owning program’s instructions can modify the account’s data or subtract its lamports. This restriction, in combination with the concept of authority (approving transactions with signatures), ensures that all accounts are secure.rent_epoch: indicates the epoch at which this account will next owe rent. However, note that regular rent payments have been deprecated in favor of requiring that accounts maintain a minimum balance.
Solana Account Types
Native Programs
Native programs are built-in programs required for core functions within Solana and are included with the Solana runtime. These programs are distinguished from user-deployed programs. Examples of native programs:
- System Program: the System Program is responsible for creating new accounts, allocating account data, assigning accounts to own programs, transferring lamports from accounts owned by the System Program, and managing the payment of transaction fees.
Address: 11111111111111111111111111111111
- Address Lookup Table Program: facilitates the use of address lookup tables (ALTs), which are used to optimize space in transactions by referencing account addresses with fewer bytes
Address: AddressLookupTab1e1111111111111111111111111
- BPF Loader: responsible for deploying, upgrading, and executing other programs on the Solana blockchain
Address: BPFLoaderUpgradeab1e11111111111111111111111
Sysvar Accounts
Sysvar accounts are special accounts at predefined addresses that provide Solana programs with real-time cluster data. These dynamically updated accounts can be accessed directly or through program instructions. Examples of Sysvar accounts:
- Clock Sysvar: contains information about the cluster's time-related data, including the current slot, epoch, and estimated Unix timestamp. It is updated every slot to provide programs with temporal context necessary for operations that depend on time.
Address: SysvarC1ock11111111111111111111111111111111
- Fees Sysvar holds the fee calculator for the current slot. It provides the necessary data to determine the required transaction fees for the fee-rate governor for each slot.
Address: SysvarFees111111111111111111111111111111111
- Instructions Sysvar: holds the serialized instructions of a transaction during its processing. This allows introspection, i.e., programs can reference other instructions from the same transaction.
Address: Sysvar1nstructions1111111111111111111111111
Deployed Program Accounts
On-chain programs consist of multiple related account types, each with a specific role in the deployment process.
- Program Account: The main account representing an on-chain program, which refers to the executable byte code and the update authority. The key for this account is commonly referred to as the "Program ID," as it invokes the program.
- Program Executable Data Account: Contains the compiled byte code, representing the actual executable logic. This account’s data can be updated (i.e., for new program versions)
- Buffer Account: Temporary storage account used during deployment or upgrades, holding byte code until it is transferred to the Program Executable Data Account. Solana’s BPF Loader (a native program) enables program upgrades through an upgrade authority, using buffer accounts to transition executable data on-chain.
Examples of popular deployed programs on Solana mainnet:
- Jupiter Swap: JUP6LkbZbjS1jKKwapdHNy74zcZ3tLUZoi5QNyVTaV4
- Raydium AMM: CPMMoo8L3F4NbTegBCKVNunggL7H1ZpdTHKxQB5qKP1C
- Kamino Lend: KLend2g3cP87fffoy8q1mQqGKjrxjC8boSyAYavgmjD
Data Accounts
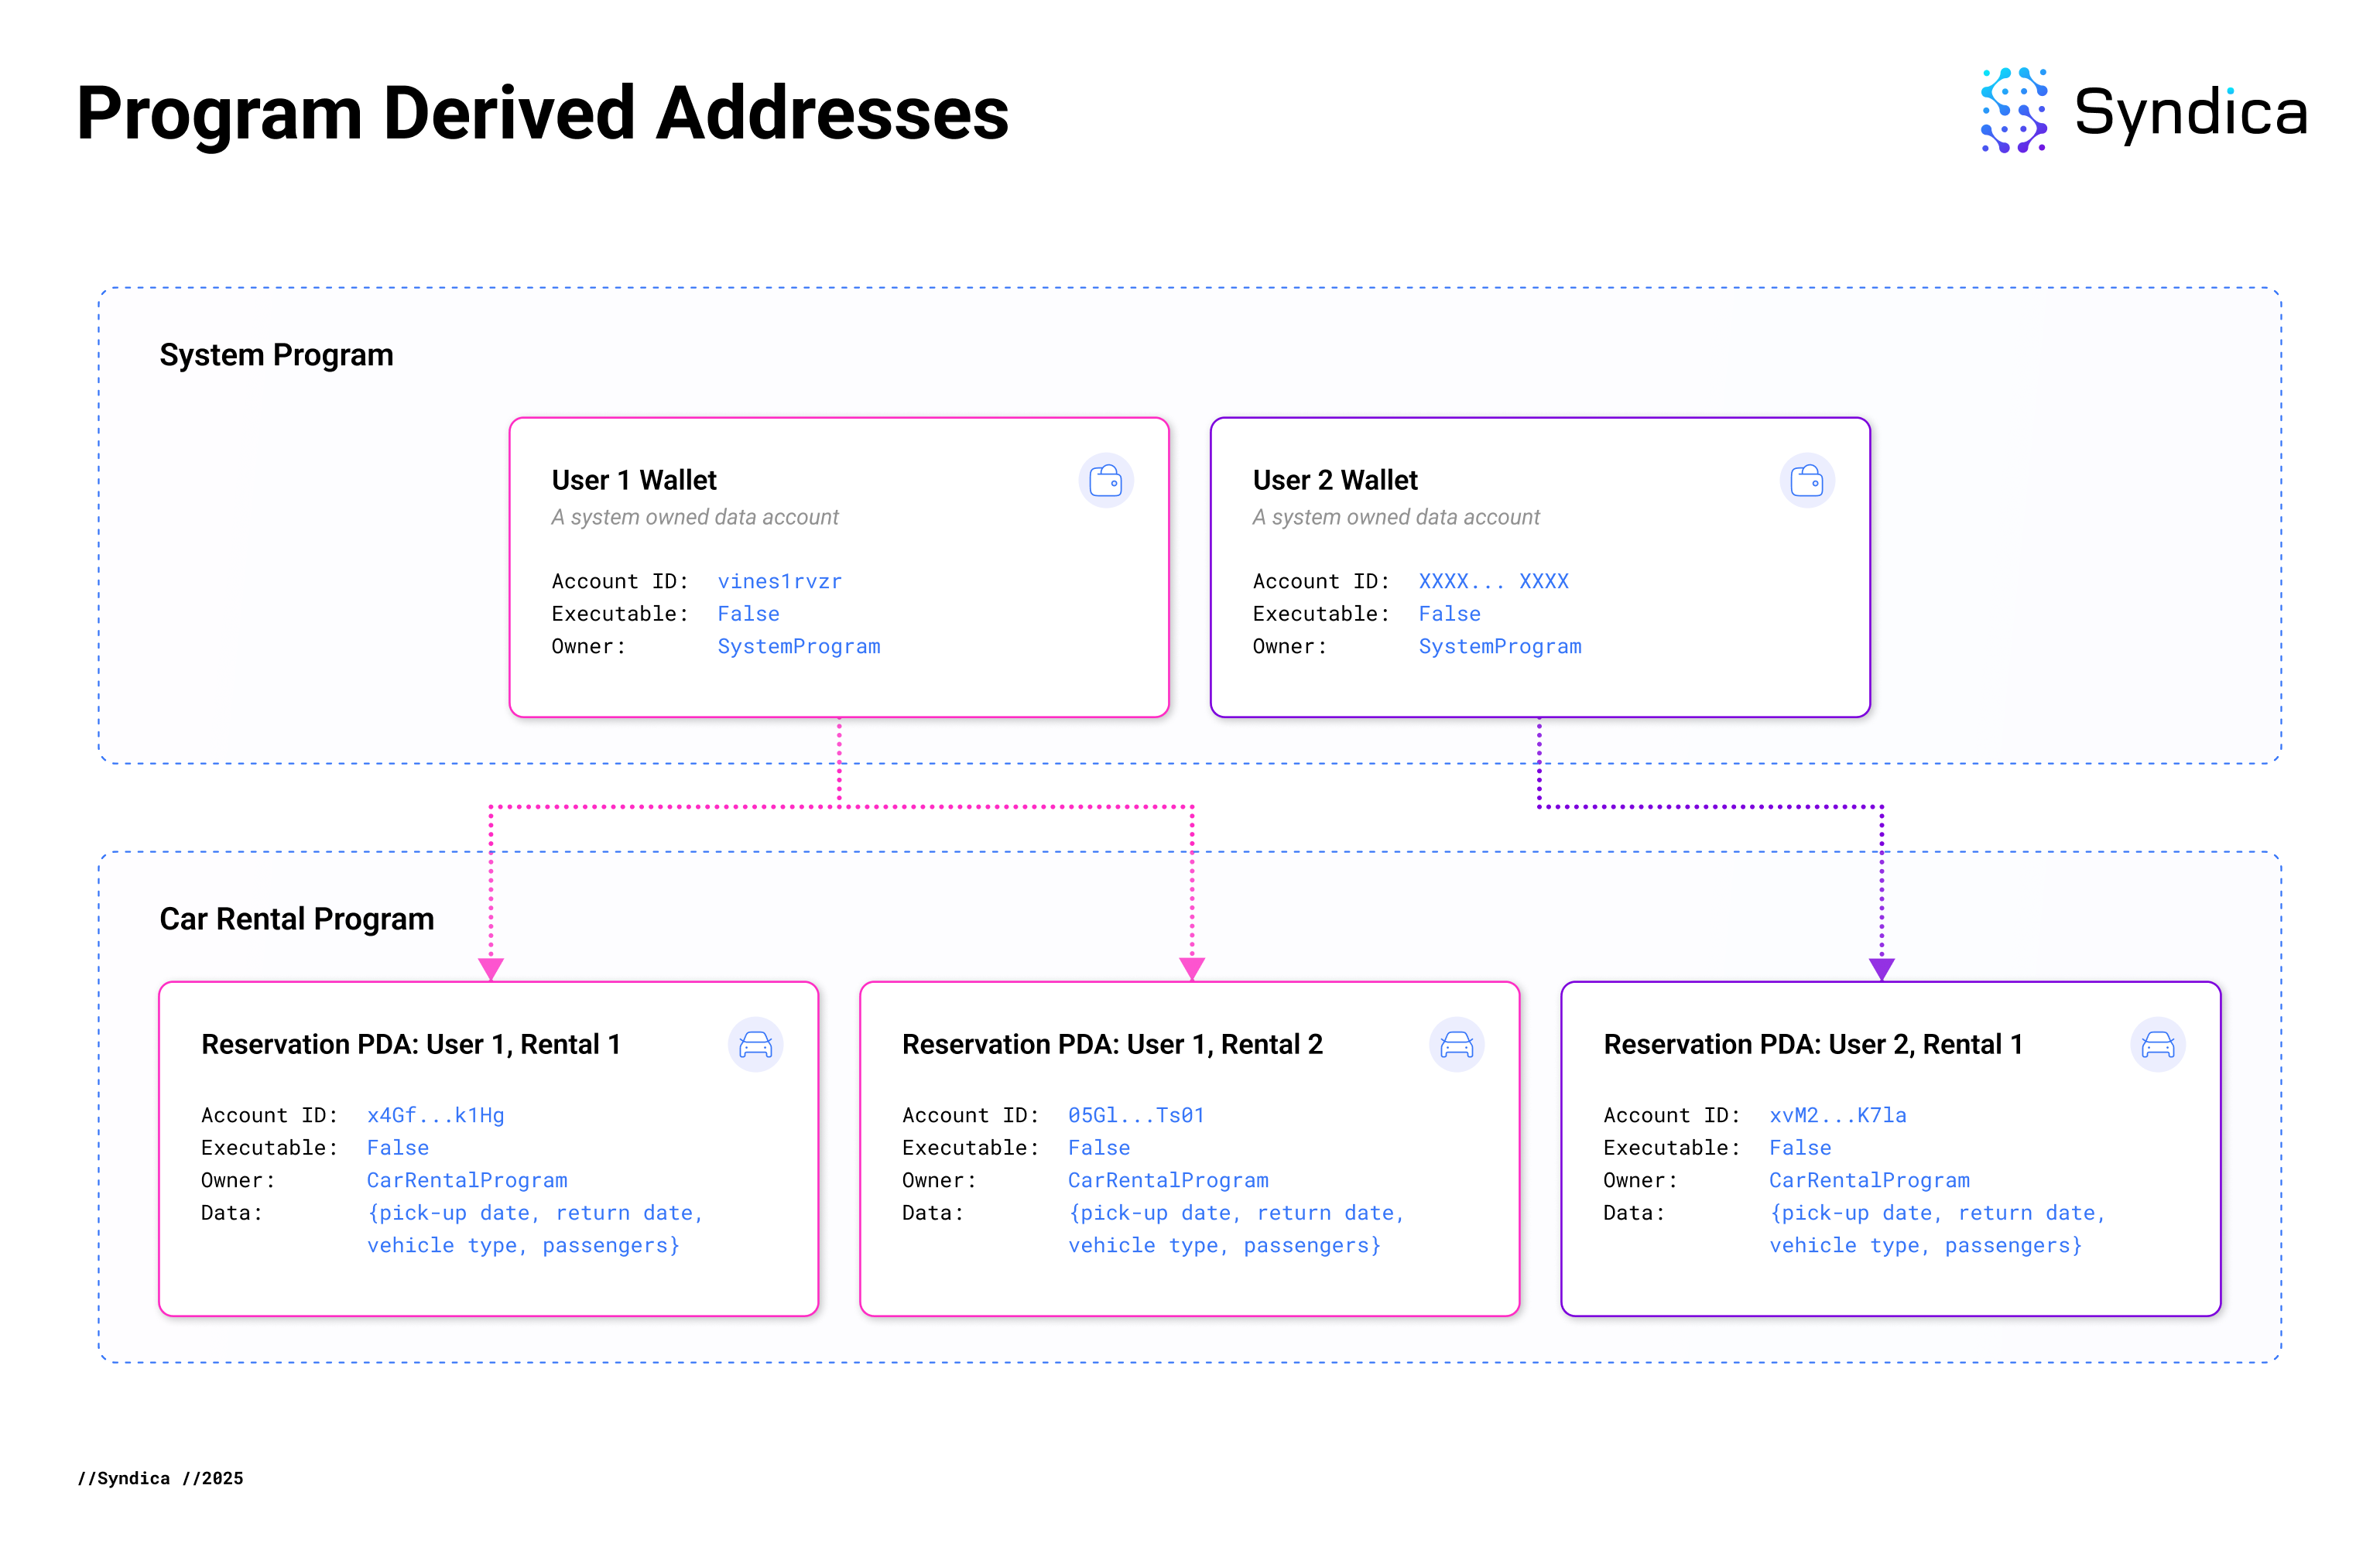
Data accounts store the state and data required by programs. They can hold any information defined by the owning program’s logic, up to 10MB per account. All data accounts are initially created and owned by the System Program, which then transfers ownership to another program that will initialize and manage the data for that account.
In practice, applications will often need to make an arbitrary number of data accounts to enable storage for dynamic entities such as individual user accounts, liquidity pools, financial instruments, etc. To easily manage the state of these entities, applications leverage Program Derived Addresses (PDAs). A PDA has a unique public key with no corresponding private key due to how the keys are generated. They are derived deterministically by combining the owner program ID and custom seeds (e.g., a user wallet, a token trading pair. etc.). The Solana runtime allows programs to sign for the PDAs they generate programmatically.
Data Serialization on Solana
We’ve examined how Solana accounts store on-chain data as executable and non-executable bytes. A key step in handling these bytes is serialization and deserialization:
Serialization turns language-friendly data structures (e.g., Rust structs, enums, vectors) into a standardized byte format for reliable storage and transmission.
Deserialization reverses that process, converting bytes into in-memory data structures for instruction handling or client reads.
Solana developers typically use libraries like Borsh or Bincode for efficient binary serialization. Since account sizes are fixed upon creation, planning your data layout carefully is important. Proper serialization ensures that on-chain programs (often in Rust) and off-chain clients (commonly JavaScript/TypeScript) share a consistent view of the data, providing a complete and identical reconstruction of data structures.
Example: Deserializing Token Account Data
Let’s look at a simple example of serializing account data on-chain. We will deserialize data contained in a Token Account. A Token Account on Solana stores information about a specific token for a specific user’s wallet. For example, a user on Solana who owns USDC will have their own USDC Token Account that stores information such as the Token Mint (USDC) and the user’s balance of USDC.
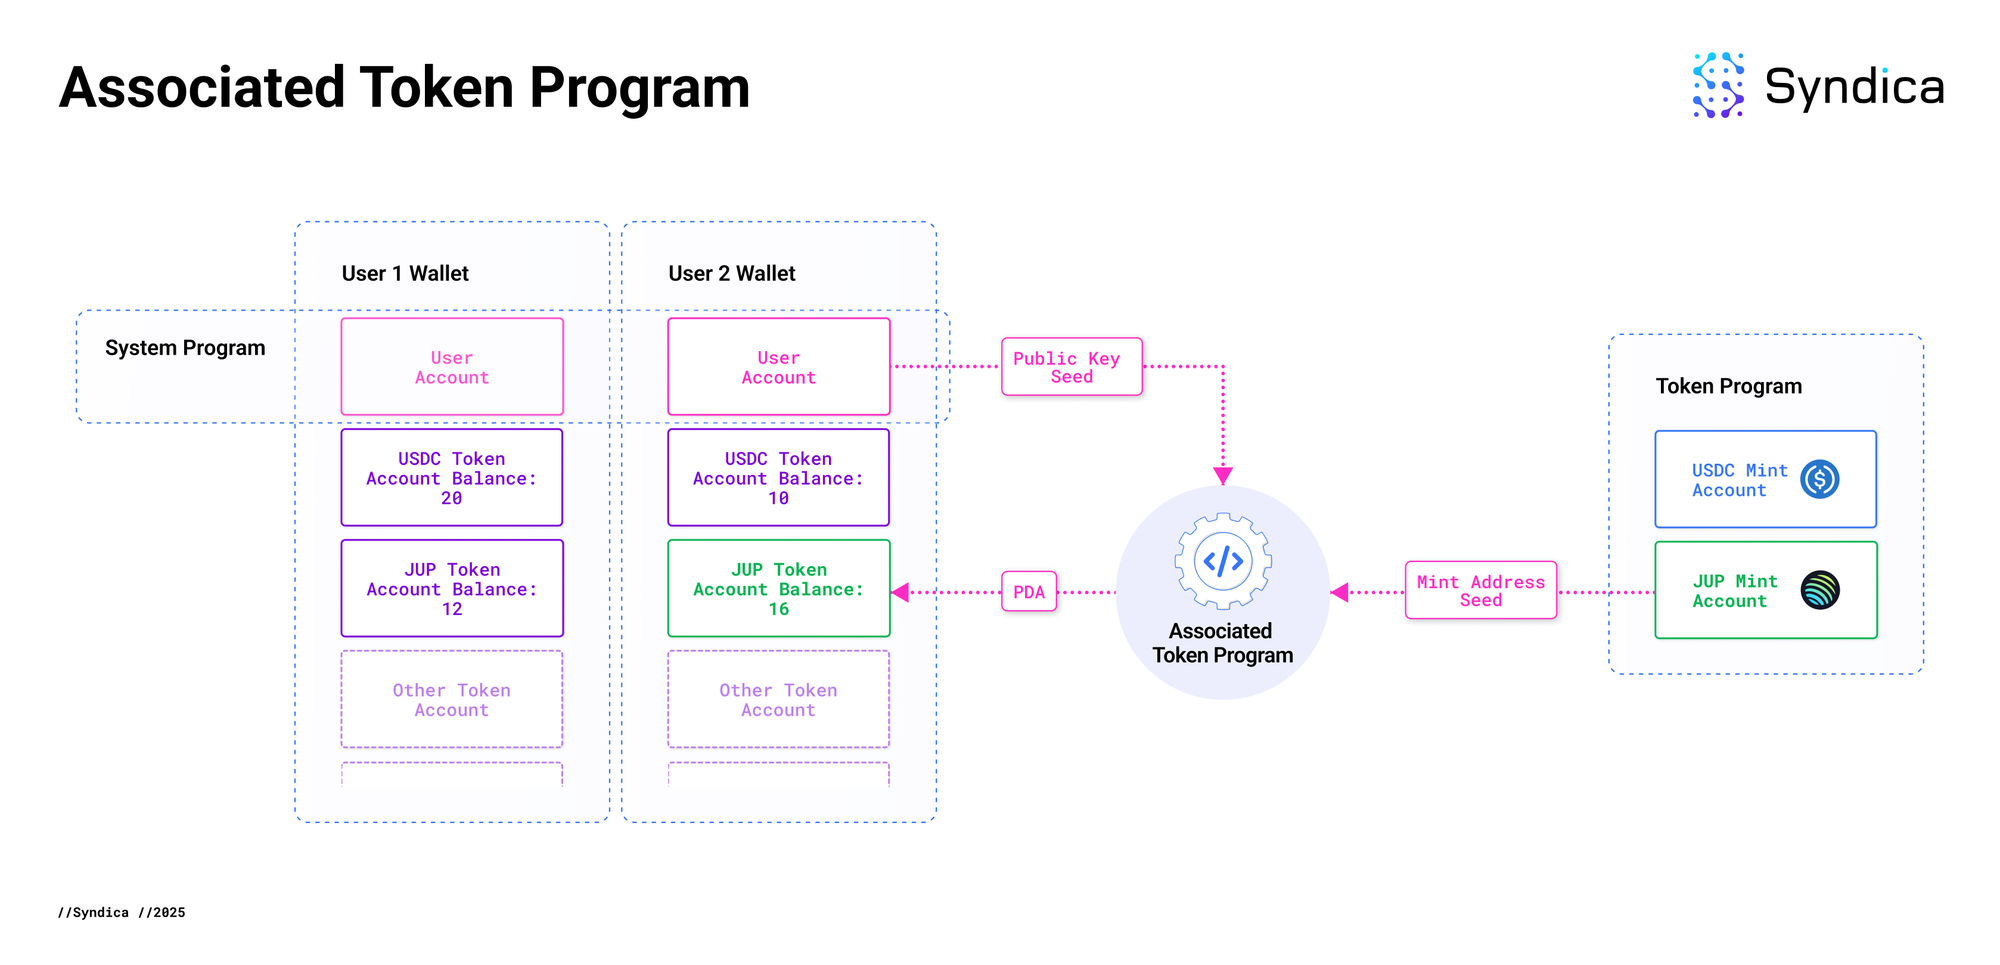
Token Accounts on Solana are generally structured using PDAs. Recall that a PDA is an account created by a program with an address derived from a custom seed and is used to store/organize some of that program’s data. In our example of a Car Rental Program above, individual car reservations are structured as separate accounts.
Similarly in the case of Solana’s SPL Token Program, each token (USDC, JUP, etc.) has a single Token Mint account, and individual users’ token balances are each stored in separate Token Accounts. The address of each Token Account is a PDA derived from the user’s main address and the Token Mint address using the SPL Associated Token Account program. Using PDAs for Token Accounts greatly simplifies token management for applications, as each user has a canonical address for each token.
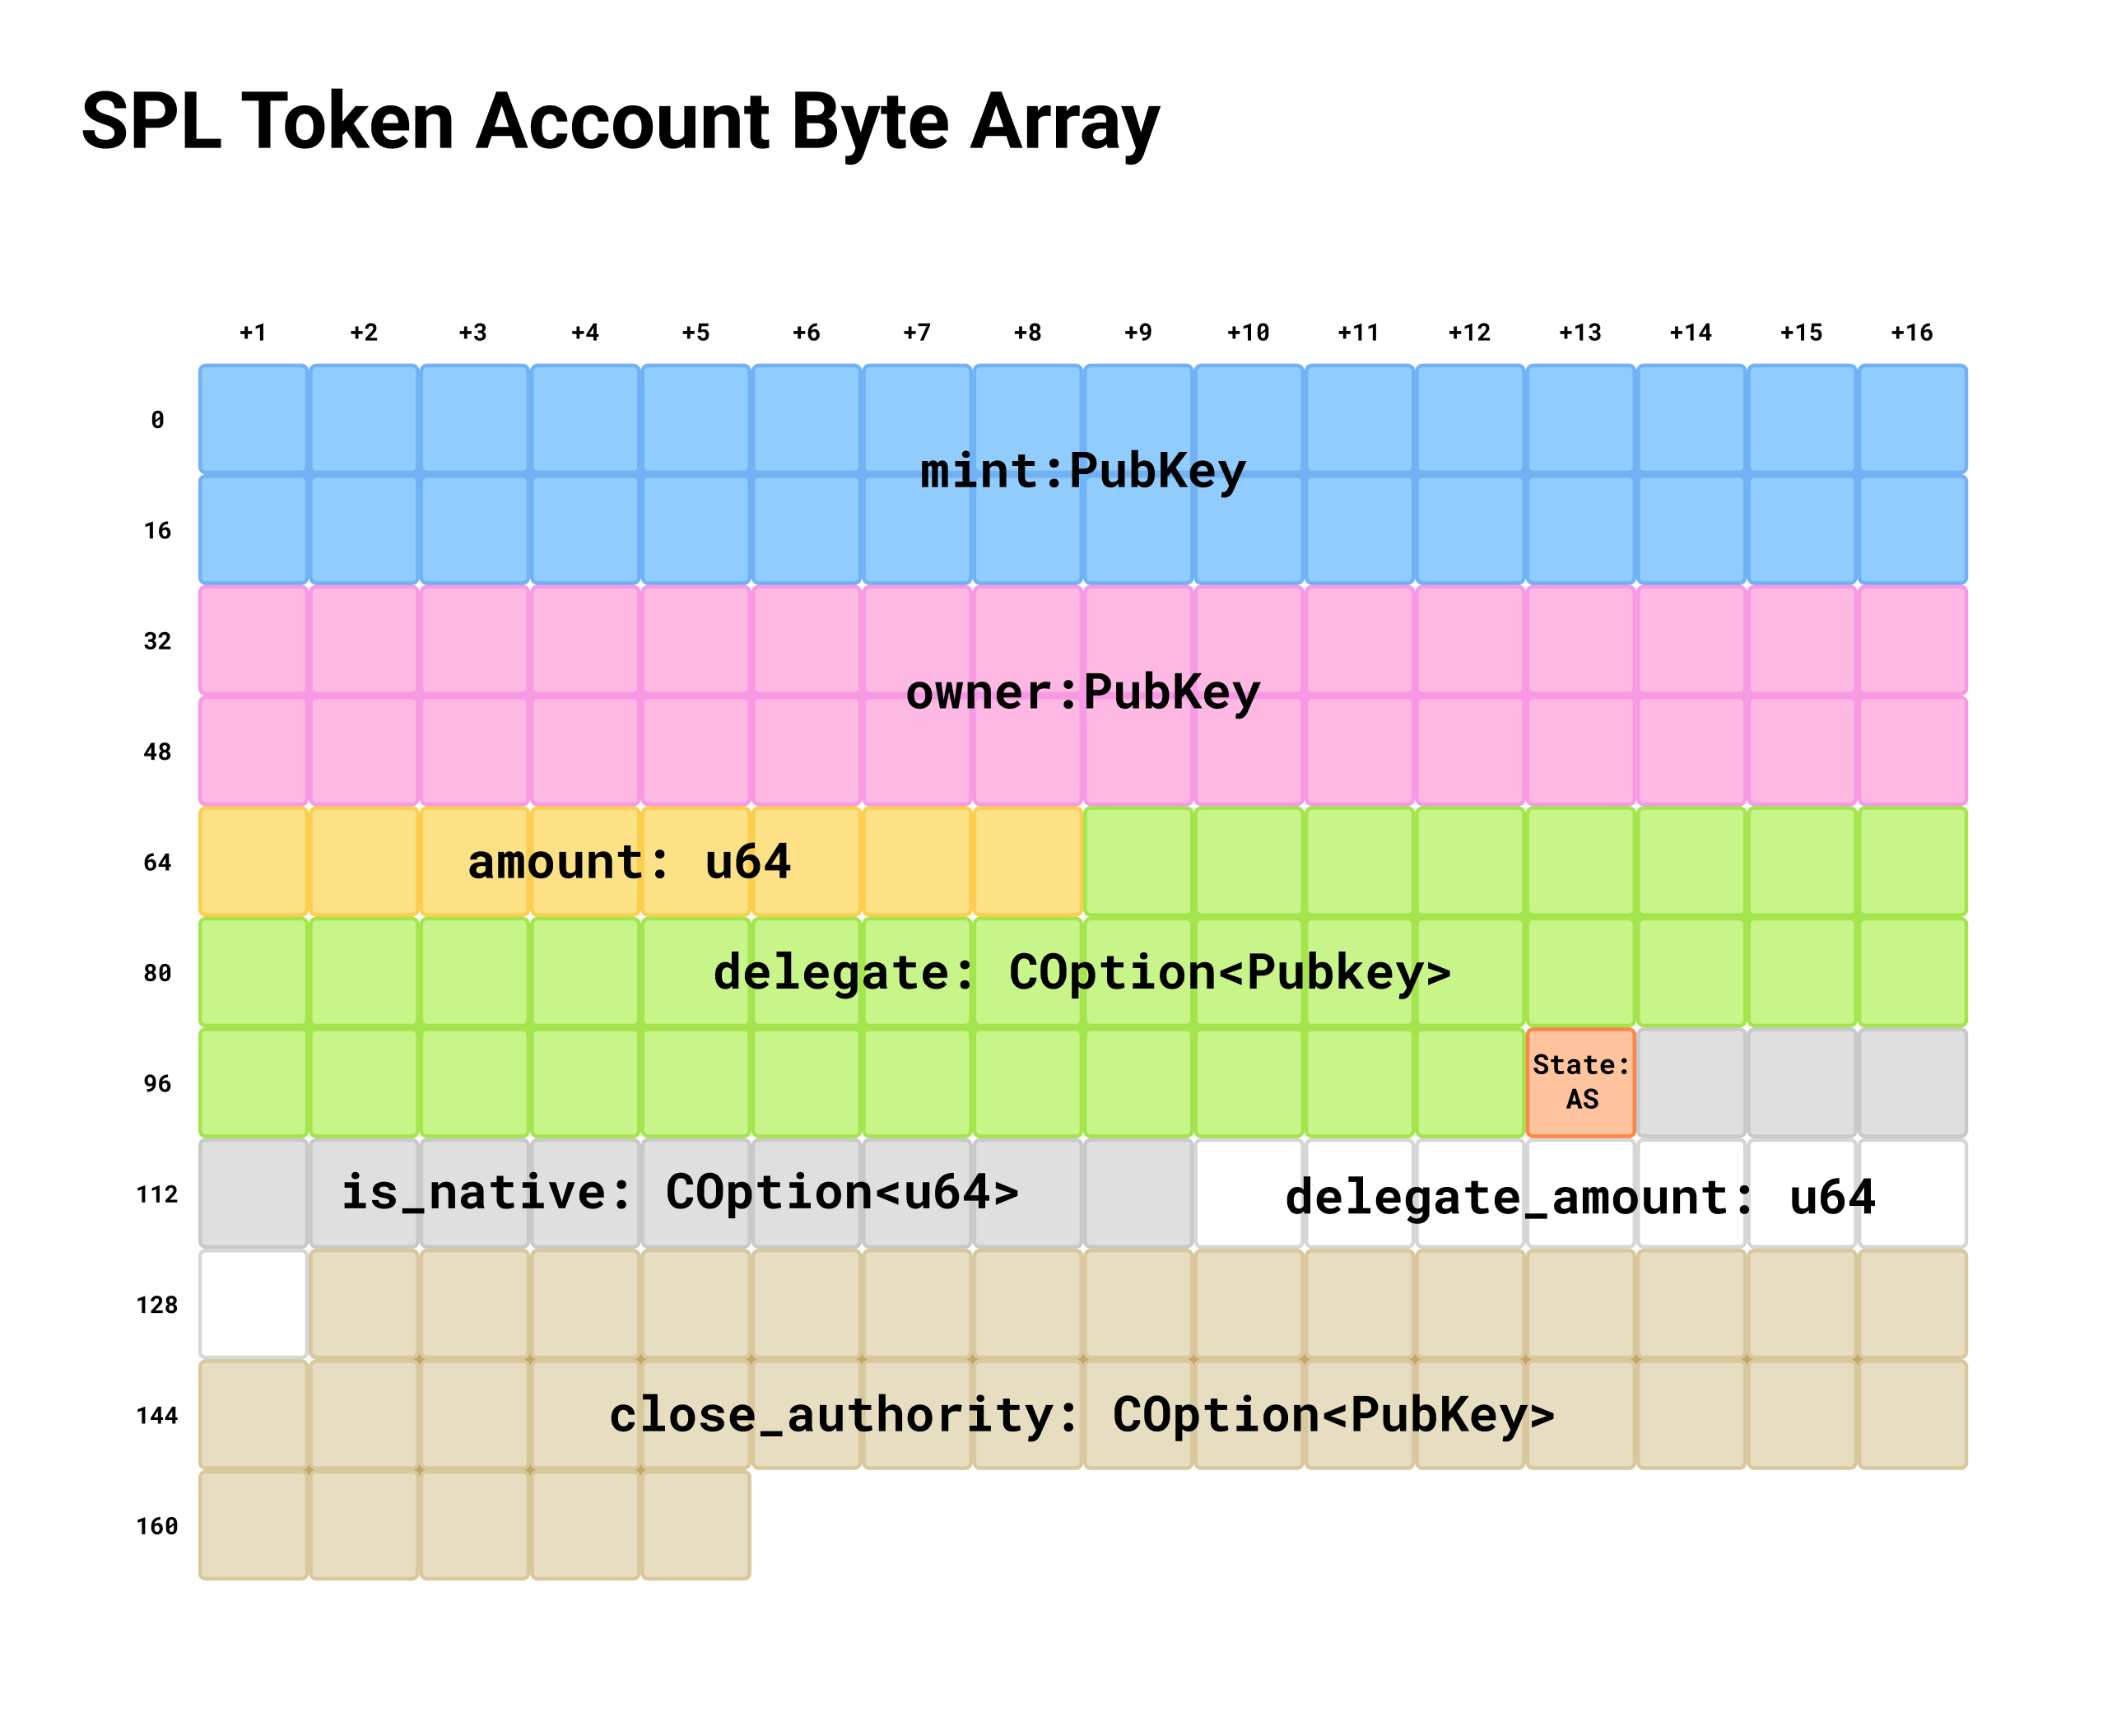
For applications to read and work with the data in the Token Account, they must deserialize it using the standard SPL Token format, which follows a fixed-length 165-byte array:
For example, we will use the @solana/web3.js library to deserialize the data in a USDC Token Account owned by the Binance Exchange.
First, we must know the wallet’s public key, as well as the key of the USDC Mint Account. We also need to know the keys for the Token Program and the Associated Token Program:
import { PublicKey } from '@solana/web3.js';

const WALLET_PUBLIC_KEY = new PublicKey("9WzDXwBbmkg8ZTbNMqUxvQRAyrZzDsGYdLVL9zYtAWWM");
const USDC_MINT = new PublicKey("EPjFWdd5AufqSSqeM2qN1xzybapC8G4wEGGkZwyTDt1v");
const TOKEN_PROGRAM_ID = new PublicKey("TokenkegQfeZyiNwAJbNbGKPFXCWuBvf9Ss623VQ5DA");
const ASSOCIATED_TOKEN_PROGRAM_ID = new PublicKey("ATokenGPvbdGVxr1b2hvZbsiqW5xWH25efTNsLJA8knL");
Using the findProgramAddressSync method, we can derive the USDC Token Account key, which belongs to the wallet. This function also returns a bump seed, which ensures the generated address is valid on Solana.
const [tokenAccountAddress, bumpSeed] = PublicKey.findProgramAddressSync(
    [WALLET_PUBLIC_KEY.toBuffer(), TOKEN_PROGRAM_ID.toBuffer(), USDC_MINT.toBuffer()],
    ASSOCIATED_TOKEN_PROGRAM_ID
);
console.log("Wallet's Token Account Address:", tokenAccountAddress.toBase58());
Wallet's Token Account Address: FGETo8T8wMcN2wCjav8VK6eh3dLk63evNDPxzLSJra8B
Now, we can read the data from the Token Account using the derived address. We’ll use a connection to the Solana mainnet via an RPC endpoint. If you don’t have an RPC endpoint already, you can make a free account on Syndica and use the default API key that comes ready to use with your account.
const SYNDICA_API_KEY = "YOUR-API-KEY";
const connection = new Connection("https://solana-mainnet.api.syndica.io/api-key/" + SYNDICA_API_KEY);

async function fetchTokenAccountData() {
  try {
    const accountInfo = await connection.getAccountInfo(tokenAccountAddress);
    if (!accountInfo || !accountInfo.data) {
      console.log("No data found for this token account.");
      return;
    }
    console.log("Raw data length:", accountInfo.data.length);
    console.log("Raw data (hex):", accountInfo.data.slice(0, 32).toString('hex'));
  } catch (error) {
    console.error("Error fetching token account data:", error);
  }
}

fetchTokenAccountData();
Raw data length: 165
Raw data (hex): c6fa7af3bedbad3a3d65f36aabc97431b1bbe4c2d2f6e0e47ca60203452f5d61
You can see that the raw data is only bytes, which we need to deserialize. We’ll use the @solana/buffer-layout and @solana/buffer-layout-utils libraries to define the layout and deserialize the data. We define RawAccount, which describes the shape of the decoded data for a token account, and AccountLayout, which specifies how to read the on-chain bytes into the fields defined in RawAccount:
export interface RawAccount {
    mint: PublicKey;
    owner: PublicKey;
    amount: bigint;
    delegateOption: 1 | 0;
    delegate: PublicKey;
    state: number;
    isNativeOption: 1 | 0;
    isNative: bigint;
    delegatedAmount: bigint;
    closeAuthorityOption: 1 | 0;
    closeAuthority: PublicKey;
  }

export const AccountLayout = struct<RawAccount>([
    publicKey("mint"),
    publicKey("owner"),
    u64("amount"),
    u32("delegateOption"),
    publicKey("delegate"),
    u8("state"),
    u32("isNativeOption"),
    u64("isNative"),
    u64("delegatedAmount"),
    u32("closeAuthorityOption"),
    publicKey("closeAuthority"),
]);
Now we can deserialize the data from the Token Account:
async function DeserializeTokenAccount() {
  try {
    const accountInfo = await connection.getAccountInfo(tokenAccountAddress);
    if (!accountInfo || !accountInfo.data) {
      console.log("No data found.");
      return;
    }

    const deserializedData = AccountLayout.decode(accountInfo.data);

    console.log("\nDeserialized Account Data:");
    console.log("Mint:", deserializedData.mint.toBase58());
    console.log("Owner:", deserializedData.owner.toBase58());
    console.log("Amount:", deserializedData.amount.toString());
    console.log("Delegate Option:", deserializedData.delegateOption);
    console.log("Delegate:", deserializedData.delegate.toBase58());
    console.log("State:", deserializedData.state);
    console.log("isNativeOption:", deserializedData.isNativeOption);
    console.log("isNative:", deserializedData.isNative.toString());
    console.log("Delegated Amount:", deserializedData.delegatedAmount.toString());
    console.log("closeAuthorityOption:", deserializedData.closeAuthorityOption);
    console.log("Close Authority:", deserializedData.closeAuthority.toBase58());
  } catch (error) {
    console.error("Error during deserialization:", error);
  }
}

DeserializeTokenAccount();
Deserialized Account Data:
Mint: EPjFWdd5AufqSSqeM2qN1xzybapC8G4wEGGkZwyTDt1v
Owner: 9WzDXwBbmkg8ZTbNMqUxvQRAyrZzDsGYdLVL9zYtAWWM
Amount: 570747950108573
Delegate Option: 0
Delegate: 11111111111111111111111111111111
State: 1
isNativeOption: 0
isNative: 0
Delegated Amount: 0
closeAuthorityOption: 0
Close Authority: 11111111111111111111111111111111
The above method works for deserializing any arbitrary data stored in an account. However, since SPL token accounts are standard in Solana, manually defining the above data format is not actually necessary. The @solana/spl-token library simplifies deserializing this common account structure with the getAccount function. We can also easily fetch this account's other general account fields using the getAccountInfo RPC method.
import { getAccount } from "@solana/spl-token";

async function DeserializeTokenAccount() {
  try {
    const tokenAccount = await getAccount(connection, tokenAccountAddress);

    console.log("\Deserialized Token Account Data (using SPL library):");
    console.log("Address:", tokenAccount.address.toBase58());
    console.log("Mint:", tokenAccount.mint.toBase58());
    console.log("Owner:", tokenAccount.owner.toBase58());
    console.log("Amount:", tokenAccount.amount.toString());
    console.log("Delegate:", tokenAccount.delegate ? tokenAccount.delegate.toBase58() : "None");
    console.log("Delegated Amount:", tokenAccount.delegatedAmount.toString());
    console.log("Close Authority:", tokenAccount.closeAuthority ? tokenAccount.closeAuthority.toBase58() : "None");
    console.log("Is Native:", tokenAccount.isNative);
    console.log("Is Frozen:", tokenAccount.isFrozen);

    const accountInfo = await connection.getAccountInfo(tokenAccountAddress);

    if (!accountInfo) {
      console.log("\nNo additional general account info found.");
      return;
    }

    console.log("\nAccount Info:");
    console.log("Lamports:", accountInfo.lamports);
    console.log("Executable:", accountInfo.executable);
    console.log("Owner Program:", accountInfo.owner.toBase58());
    console.log("Account Data Length:", accountInfo.data.length);
  } catch (error) {
    console.error("Error fetching account data:", error);
  }
}

DeserializeTokenAccount();
Deserialized Token Account Data (using SPL library):
Address: FGETo8T8wMcN2wCjav8VK6eh3dLk63evNDPxzLSJra8B
Mint: EPjFWdd5AufqSSqeM2qN1xzybapC8G4wEGGkZwyTDt1v
Owner: 9WzDXwBbmkg8ZTbNMqUxvQRAyrZzDsGYdLVL9zYtAWWM
Amount: 570747950108573
Delegate: None
Delegated Amount: 0
Close Authority: None
Is Native: false
Is Frozen: false
Raw data length: 165
Raw data (hex): c6fa7af3bedbad3a3d65f36aabc97431b1bbe4c2d2f6e0e47ca60203452f5d61

Account Info:
Lamports: 2039310
Executable: false
Owner Program: TokenkegQfeZyiNwAJbNbGKPFXCWuBvf9Ss623VQ5DA
Account Data Length: 165
As you can see, the token account is a data account (non-executable) and is owned by the Token Program. The owner of the tokens themselves (Binance) is found in the separate owner field within the account’s data field.
We’ve now thoroughly covered the essentials of accounts and the data they contain. We now turn to transactions and their role within the Solana Programming Model to understand how these accounts are created and updated on-chain. To dive deeper into reading on-chain data on Solana and how you can structure the data within your applications, we recommend the following resources:
Solana Client Libraries:
solana-web3.js v1: https://github.com/solana-labs/solana-web3.js
solana-web3.js v2: https://github.com/anza-xyz/solana-web3.js
Gill: https://github.com/solana-foundation/gill
Solana RPC Guide: https://blog.syndica.io/understanding-solana-rpc-a-comprehensive-guide-for-developers/
Streaming Data on Solana: https://blog.syndica.io/solana-data-streaming-how-to-power-your-dapp-with-real-time-data/
Program Derived Addresses: https://solana.com/docs/core/pda
Solana Program Examples: https://solana.com/docs/programs/examples
What is a Solana Transaction?
A Solana transaction is a single atomic unit of account state changes on the blockchain. It is structured as an array of signatures and a message, which cannot exceed 1232 bytes combined.
The signatures provide authorization for the state changes contained in the transaction. They are cryptographically generated using the private keys of individual Solana accounts. For example, to perform a simple transfer of SOL to a different wallet (account), the sending account must provide a signature because their lamports will be deducted/transferred.
The message contains the sequence of instructions. Each instruction is a unit of executable logic that will change the state of some account(s). The message also holds additional information about all of the accounts involved in the transaction. It specifies which accounts within the transaction will be read-only, which accounts will be modified, and which are signers. By requiring each transaction to specify which accounts are read-only vs. mutable, the Solana runtime can safely execute transactions that don’t modify the same account(s) in parallel. Here is a graphic of the Solana Transaction Structure:
An instruction is a fundamental unit of execution logic on the Solana blockchain. Each instruction specifies the program to be executed, the required accounts, and the data necessary for execution. Each instruction contains the following:
program_id: the program account address that contains the execution logic for the instruction.
accounts: all of the accounts the instruction will read from or write to, each of which is specified using the AccountMeta structure:
pubkey: the account addressis_writable: a boolean indicating if the account can be modified regarding its lamports or account data. This value is set within the context of a specific instruction. For example, if SOL is being transferred from one wallet to another, both accounts must be considered writable because both are being modified.is_signer: a boolean indicating if the account is expected to sign the transaction. This would be true if one or more of the transaction’s instructions attempted to deduct lamports or modify account data.
data: a byte array used to specify the instruction handlers (functions) to be executed by the program along with additional data (function arguments) required.
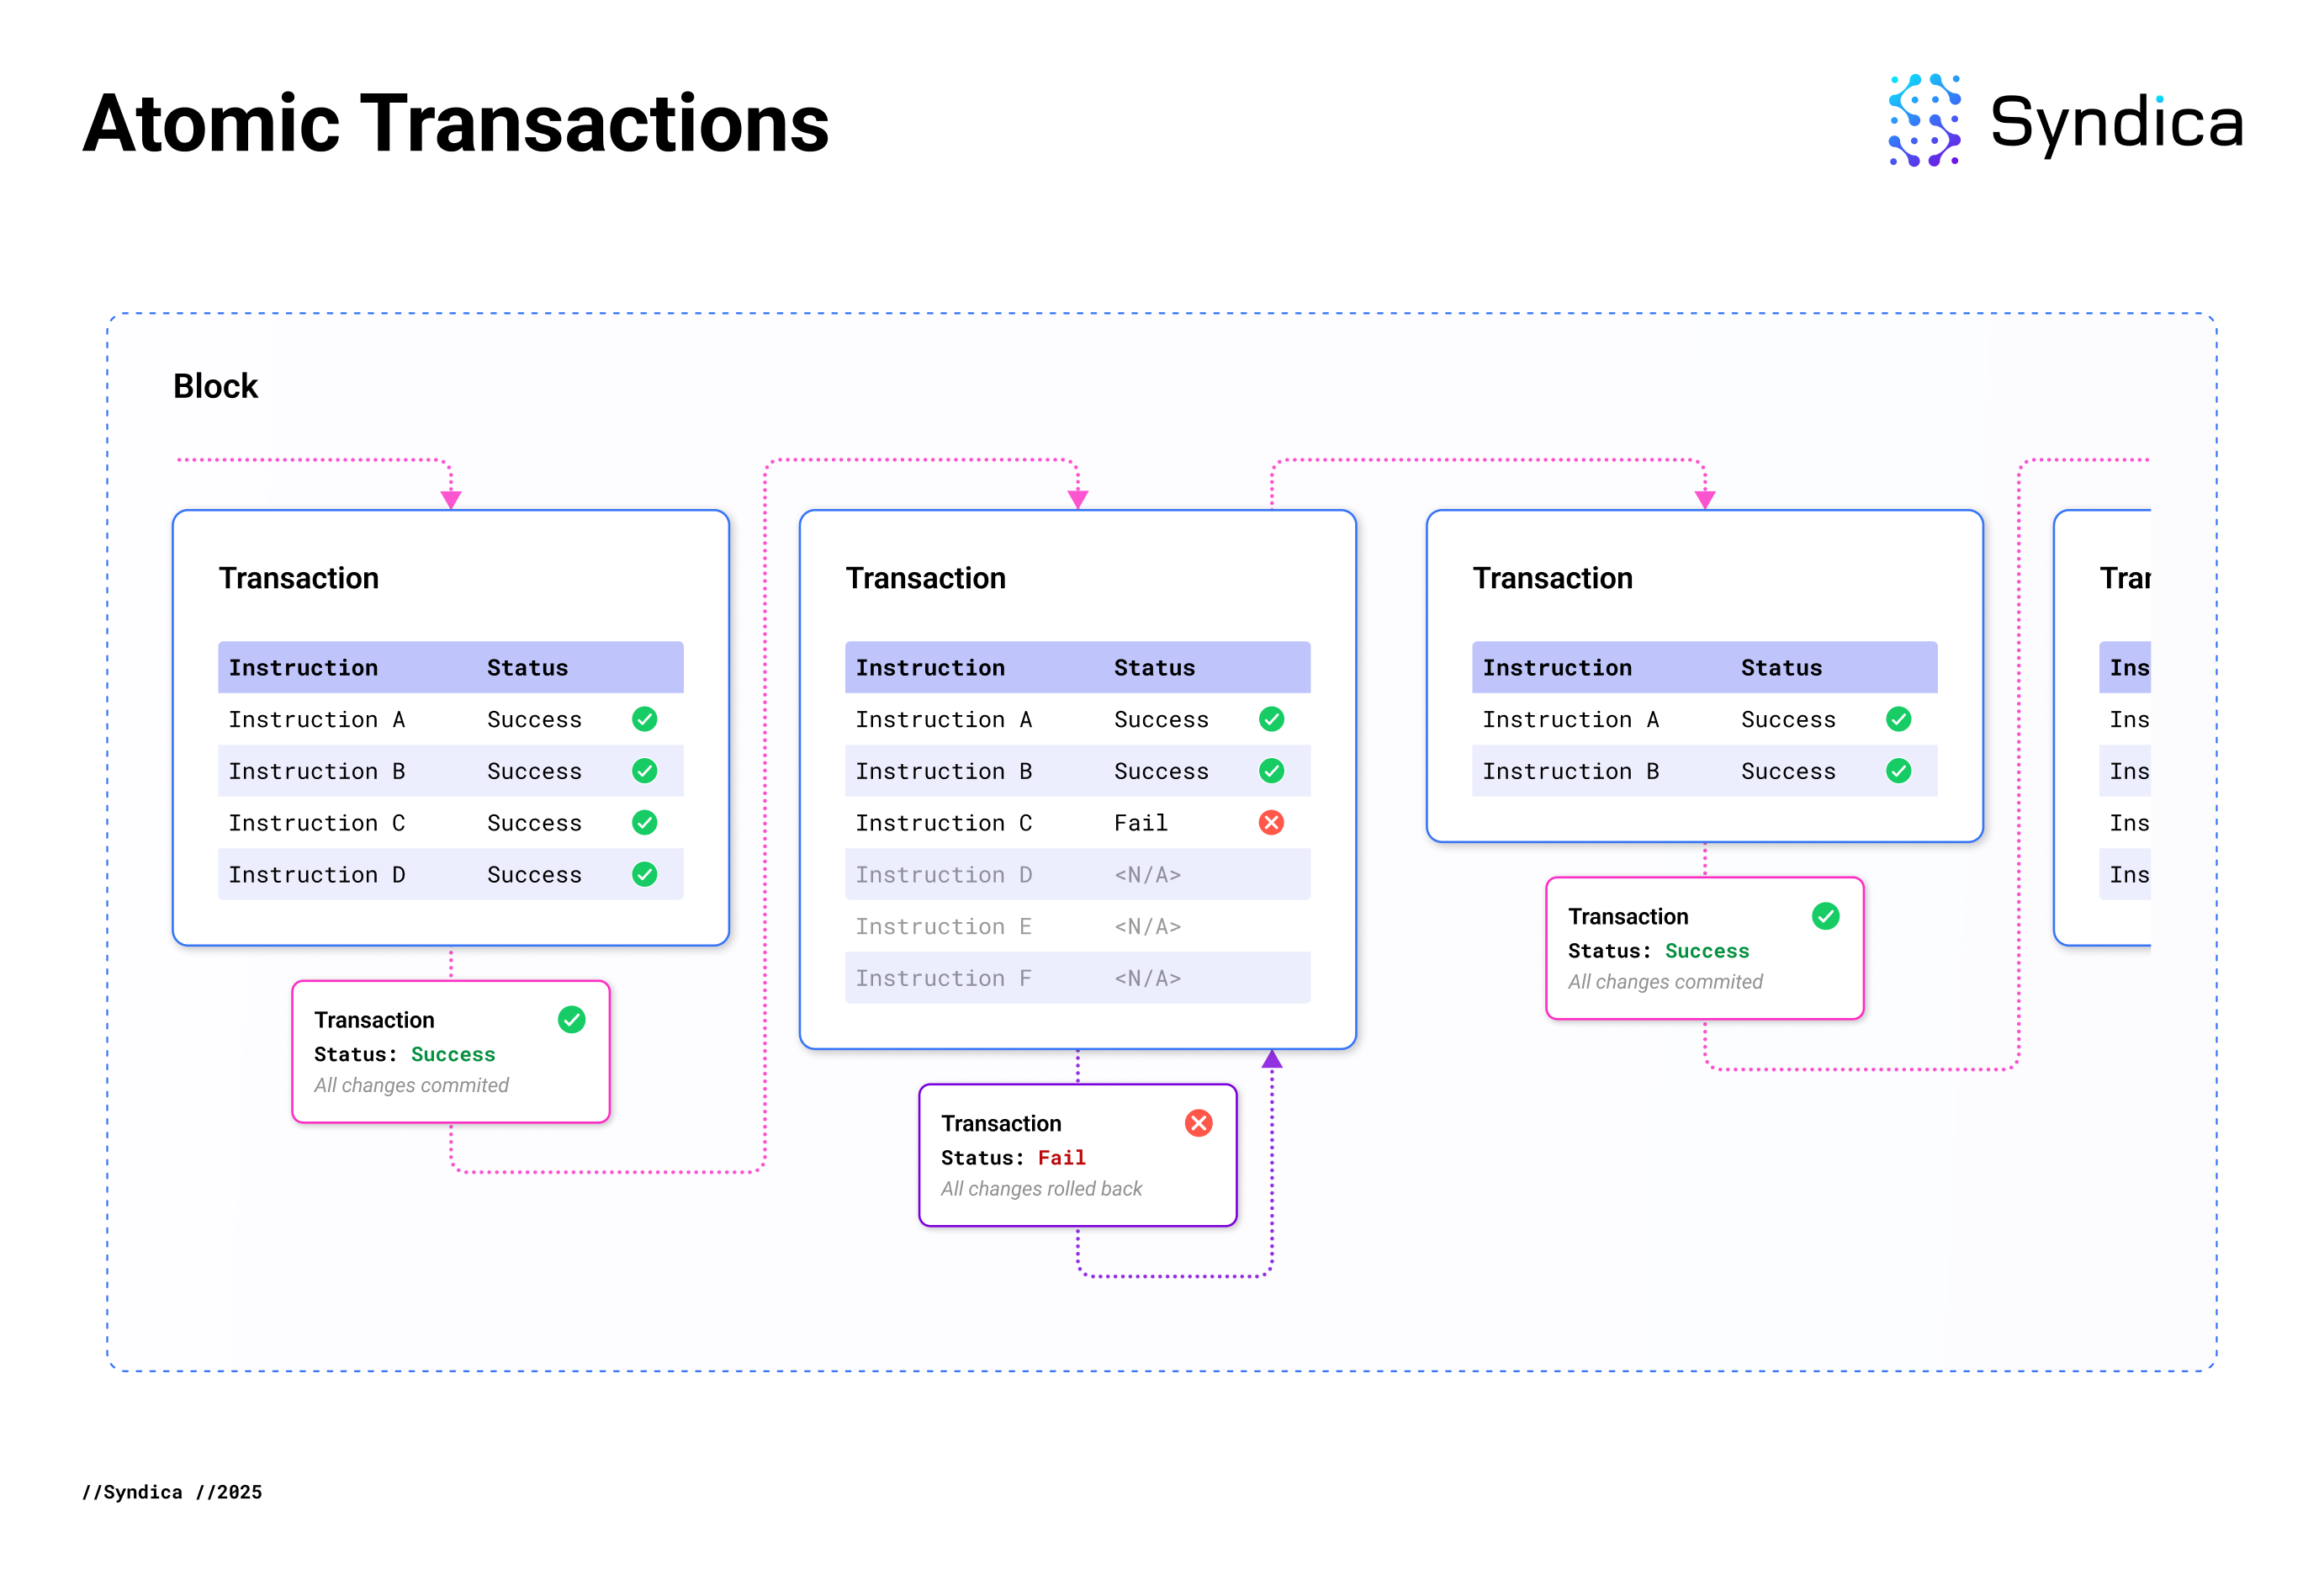
Each instruction within a transaction is executed in sequence, and the transaction’s construction determines the order. An essential characteristic of transactions on Solana is that they are atomic, meaning that all transactions either succeed entirely (all instructions successfully processed) or fail entirely if any one instruction fails. Atomicity prevents inconsistent states that can arise when some parts of a transaction succeed while others fail. For example, when transferring tokens, the deduction from the sender and the credit to the recipient both must happen as a single atomic operation.
Example: Deploying a Simple Anchor Program
It is helpful to deploy a simple program to demonstrate how accounts and transactions all come together within the Solana Programming Model. In addition to reading and writing some code, you can interact with the program and observe its state on-chain. In this example, we’ll deploy a simple program using Anchor.
What is Anchor?
Anchor is a robust framework for developing secure and efficient Solana programs using Rust. It simplifies the process of writing, testing, and deploying Solana programs by abstracting low-level account management and providing a clear structure through macros and traits. Anchor offers convenient tools like boilerplate code generation, a command-line interface, and a workspace for Solana DApp development.
To get started, you’ll need to install Rust, the Solana CLI, Anchor, Node, and set up a wallet on devnet. These steps are explained in the Anchor documentation here: https://www.anchor-lang.com/docs/installation
You’ll also need to install pnpm to install Node dependencies and run the tests for this example.
Once you’ve completed your setup, clone this repo, which contains examples of Solana programs: https://github.com/solana-developers/program-examples.git
Go to the anchor account-data example and verify everything is set up correctly:
>> cd program-examples/basics/account-data/anchor

>> pnpm install

>> anchor % rustc --version
rustc 1.79.0 (129f3b996 2024-06-10)

>> solana --version
solana-cli 2.1.14 (src:3ad46824; feat:3271415109, client:Agave)

>> avm --version
avm 0.30.1

>> anchor --version
anchor-cli 0.30.1

>> node --version
v23.6.1

>> pnpm --version
1.22.19

>> solana address
H5WuqB8TNXDLHaf9grdU3iBqmXJB5uGFLwNBn3WEog5y

>> solana balance
5 SOL
You should explore the project structure, which is typical for an Anchor project. The program’s instructions are defined in src/instructions.
├── Anchor.toml
├── Cargo.toml
├── package.json
├── pnpm-lock.yaml
├── programs
│   └── anchor-program-example
│       ├── Cargo.toml
│       ├── Xargo.toml
│       └── src
│           ├── constants.rs
│           ├── instructions
│           │   ├── create.rs
│           │   └── mod.rs
│           ├── lib.rs
│           └── state
│               ├── address_info.rs
│               └── mod.rs
├── tests
│   ├── bankrun.test.ts
│   └── test.ts
└── tsconfig.json
In this case, there is just one instruction in create.rs, which is the create_address_info instruction:
pub fn create_address_info(
    ctx: Context<CreateAddressInfo>,
    name: String,
    house_number: u8,
    street: String,
    city: String,
) -> Result<()> {
    *ctx.accounts.address_info = AddressInfo {
        name,
        house_number,
        street,
        city,
    };
    Ok(())
}
You should explore the code further to understand how exactly this instruction works. To do so, you can reference the Anchor documentation and the other resources at the end of this article. However, the main thing you should know is that this instruction simply creates a new data account containing some arbitrary data related to a mailing address (name, house number, etc.).
We will build and deploy this program on Solana’s devnet and then invoke the create_address_info instruction in a new transaction.
In anchor.toml, change the provider network from Localnet to Devnet:
[provider]
cluster = "Devnet"
wallet = "~/.config/solana/id.json"
Build the program and deploy it to devnet:
>> anchor build
Compiling proc-macro2 v1.0.89
Compiling unicode-ident v1.0.13
Compiling version_check v0.9.5
...
Compiling account-data-anchor-program-example v0.1.0 (/Users/me/program-examples-old/basics/account-data/anchor/programs/anchor-program-example)
    Finished `release` profile [optimized] target(s) in 52.27s
+ ./platform-tools/rust/bin/rustc --version
+ ./platform-tools/rust/bin/rustc --print sysroot
+ set +e

>> anchor deploy
Deploying cluster: https://api.devnet.solana.com
Upgrade authority: /Users/me/.config/solana/id.json
Deploying program "anchor_program_example"...
Program path: /Users/me/program-examples/basics/account-data/anchor/target/deploy/anchor_program_example.so...
Program Id: AufzsYrJxjTf9Y7hDRQHNznVekpXmSbM7gQWVrwya3ic

Signature: 2SfWoL17xMjfzG7Zw4UvdX9BLMpECm4QvAhc39wGNuDiVDQ1hoWQ6P3wU9vKeUA2BPrDh4LhwjzJE1b4m13kW64t

Deploy success
Once your program is deployed, you can inspect it by searching for its Program ID on the Solana Explorer. Be sure to use the Devnet network: https://explorer.solana.com/?cluster=devnet
Notice that the executable field is True because this account identifies executable data (it is a Program Account). The executable bytecode is in a separate data account, which you can see next to Executable Data. Since upgradeable is True, the Upgrade Authority can change the executable data. The authority key will be your wallet account.
In the Transaction History section on the Explorer page, click the first transaction; this transaction contains information regarding your contract’s deployment. The transaction logs show the following:
[
  "Program 11111111111111111111111111111111 invoke [1]",
  "Program 11111111111111111111111111111111 success",
  "Program BPFLoaderUpgradeab1e11111111111111111111111 invoke [1]",
  "Program 11111111111111111111111111111111 invoke [2]",
  "Program 11111111111111111111111111111111 success",
  "Deployed program AufzsYrJxjTf9Y7hDRQHNznVekpXmSbM7gQWVrwya3ic",
  "Program BPFLoaderUpgradeab1e11111111111111111111111 success"
]
Here, you should recognize some of the System Accounts that we learned about in the first section of this article. The “invoke [i]” notation refers to individual instructions by their index within the sequence. For example, the first was the createAccount instruction completed by the System Program. If you expand this specific instruction within the Explorer, you can see its arguments:
{
  "info": {
    "lamports": 1141440,
    "newAccount": "AufzsYrJxjTf9Y7hDRQHNznVekpXmSbM7gQWVrwya3ic",
    "owner": "BPFLoaderUpgradeab1e11111111111111111111111",
    "source": "H5WuqB8TNXDLHaf9grdU3iBqmXJB5uGFLwNBn3WEog5y",
    "space": 36
      },
  "type": "createAccount"
}
The System program created the new Program Account, setting the BPF Loader Program as its owner and your account as the source of the lamports required to initialize the account.
Next, we will execute your deployed program. This means we will call its instruction within a new transaction. This can be easily done using the code in tests/test.ts.
Currently, test.ts logs information about the data account it creates. Update the test also to log the transaction signature (ID) as well:
   const tx_result = await program.methods
      .createAddressInfo(addressInfo.name, addressInfo.houseNumber, addressInfo.street, addressInfo.city)
      .accounts({
        addressInfo: addressInfoAccount.publicKey,
        payer: payer.publicKey,
      })
      .signers([addressInfoAccount])
      .rpc();

    console.log(`Tx Signature:      : ${tx_result}`); // log the transaction signature
Update your anchor.toml file to target only this test file:
[scripts]
test = "pnpm ts-mocha -p ./tsconfig.json -t 1000000 tests/test.ts"
Run the test using anchor run test, and you should see the following output:
Account Data!
Payer Address      : H5WuqB8TNXDLHaf9grdU3iBqmXJB5uGFLwNBn3WEog5y
Address Info Acct  : E4jbD4vyt2tuJvzDPyWytPmQd4a8FwhFaeE7r3cJYuje
Tx Signature:      : 5EAXaXaG9HoohM7x6c5gqRJmfY9qoCgTrrBxL1QvsLb5qbpXJ2Ncj9jtyGoiK4GMoEda6iYvdtU9Lw5gN1BkBrKP
    ✔ Create the address info account (1019ms)
Name     : Joe C
House Num: 136
Street   : Mile High Dr.
City     : Solana Beach
    ✔ Read the new account's data (55ms)
The address information was written successfully for a new data account owned by your program account. Search for the transaction signature using the Devnet Explorer. You’ll be able to view a nice summary of what happened:

On this page you can also view the on-chain logs for the transaction:
[
  "Program AufzsYrJxjTf9Y7hDRQHNznVekpXmSbM7gQWVrwya3ic invoke [1]",
  "Program log: Instruction: CreateAddressInfo",
  "Program 11111111111111111111111111111111 invoke [2]",
  "Program 11111111111111111111111111111111 success",
  "Program AufzsYrJxjTf9Y7hDRQHNznVekpXmSbM7gQWVrwya3ic consumed 7016 of 200000 compute units",
  "Program AufzsYrJxjTf9Y7hDRQHNznVekpXmSbM7gQWVrwya3ic success"
]
Solana executed your program’s create_address_info instruction. This called the System Program to create the account, and then your program wrote the data to the new account.
This program is almost as simple as a Solana program can be. To familiarize yourself with how Anchor projects are typically structured, you should review the codebase and reference the official Anchor documentation. Below, we’ve included some helpful links that can help you continue learning more about developing on Solana:
Solana Development Frameworks:
Anchor: https://www.anchor-lang.com
Steel: https://github.com/regolith-labs/steel
Solana Courses and Tutorials:
Official Solana Courses: https://solana.com/developers/courses
Solana Playground: https://beta.solpg.io/
Ethereum and EVM Developer Transition Guide: https://solana.com/developers/evm-to-svm/complete-guide
The Solana Toolkit: https://solana.com/docs/toolkit
Running a Local Validator: https://solana.com/docs/toolkit/local-validator
Conclusion
In this article, we explored the fundamental elements of Solana’s programming model. We covered the flexible account structure that Solana uses to store data and code, akin to files on a typical operating system. We also explained how transactions execute on-chain programs to perform state changes. We demonstrated how to read and write data with two practical examples: reading on-chain data via web3.js and deploying a simple program with Anchor. Now that you are familiar with the basics of Solana’s programming model, you can dive deeper into the myriad features that Solana’s model enables and begin your journey of building robust, high-performance decentralized applications on Solana.
–
Syndica empowers principal enterprises and architects advancing the Solana ecosystem. In building the Cloud of Web3, we provide best-in-class RPC node infrastructure, Developer APIs, a robust end-to-end platform, and the next cutting-edge Solana client validator, Sig, written in Zig. Our team offers the dedicated support, reliability, and user-focused orientation for seamless integration with Solana, allowing you to focus solely on building your enterprise.
Get started quickly today for free at syndica.io, and check out our documentation here.