Sig Engineering - Part 4 - Solana’s Ledger and Blockstore
Sig Engineering - Part 4 - Solana’s Ledger and Blockstore
This post is Part 4 of a multi-part blog post series we will periodically release to outline Sig's engineering updates. You can find other Sig engineering articles here.
Blockchain technology has revolutionized the way we record information by introducing an approach that is inherently secure and trustworthy by design. At the core of any blockchain system is a ledger, which ensures data integrity, transparency, and security. Among all blockchains, Solana stands out for its unrivaled speed and scalability. Central to its performance, Solana's ledger is not only a record of transactions but also a decentralized database that is finely tuned to maximize performance.
In this blog post, we'll explore Solana's ledger. We'll uncover the motivations behind its design, dissect its components, such as blocks and shreds, and understand how it functions as the backbone of the Solana blockchain. In our next blog post, we’ll expand on this article to explain how we've implemented Solana’s ledger in Sig.
If you’re wondering what the Sig validator client from Syndica is, check out our introductory blog post.
Background: Solana
The core responsibilities of Solana are to store information, distribute information, and allow changes to that information. This means Solana is a database. What sets a blockchain apart from a traditional database is its unique method of storing data and how that approach unlocks decentralized trust.
Solana stores two types of information: accounts and transactions.
Accounts are like files on your computer. They answer the question, "What information exists right now?" An account may contain information like "I have $100" or "I am allowed to vote in governance." AccountsDB is the component of Sig responsible for storing accounts. Previously, we posted a deep dive blog post about AccountsDB.
Transactions answer the question, "How did the information change over time?" A transaction may contain information like "I paid someone $100" or "I submitted a vote for a proposal." Transactions are stored in a chain of blocks, which is where the word blockchain comes from.
Solana’s Ledger
In Solana, the ledger is a database containing a historical record of every transaction.
To facilitate consensus, large numbers of transactions are grouped together as blocks. This introduces a potential issue with network latency, so Solana divides them into smaller pieces called entries and shreds, which we'll explore in the Propagating Blocks: Entries and Shreds section below.
Nearly every component of a Solana validator uses the ledger. For example, the RPC service needs to read information from the ledger whenever a user searches for a transaction's status. Many other components, such as Consensus, Turbine, Gossip, and Proof of History, also use the ledger.
Transactions
A transaction represents any change to the information stored in a Solana account. Let’s define more precisely what a transaction is, where it comes from, and what it does.
Composition
A transaction is a message containing instructions that describe how state should be changed and signatures authorizing those changes.
pub const Transaction = struct {
    signatures: []const Signature,
    message: Message,
}

pub const Message = struct {
    header: MessageHeader,
    account_keys: []const Pubkey,
    recent_blockhash: Hash,
    instructions: []const CompiledInstruction,
}
Each instruction is a request for a specific Solana program to make modifications to information that's currently saved in an account. Bundling instructions together ensures that they will be executed atomically and in order. Atomic execution is all-or-nothing: it means that every instruction needs to complete successfully, otherwise the entire transaction fails and no changes take place.
Each signature is a cryptographic authorization generated by a private key, typically managed by a wallet. Signatures authorize the payment of a transaction fee, and they are used by Solana programs to decide whether the correct user has approved each instruction. This prevents a user from making changes to an account that they should not have access to.
Lifecycle
A Solana transaction begins when a user initiates an action intended to cause a change onchain, like swapping USDC for SOL on a decentralized exchange. The exchange generates an unsigned transaction, which is sent to the user's wallet for approval. After the user approves it, the wallet signs it with the user's private key and sends it to an RPC node using sendTransaction. The RPC node forwards the signed transaction to the leader for processing.
The leader is the Solana validator node responsible for generating the next block. It executes the transaction's instructions, resulting in state changes. It updates AccountsDB with these changes and stores the block containing this transaction in its ledger. It then broadcasts the block across the network using the Turbine protocol.
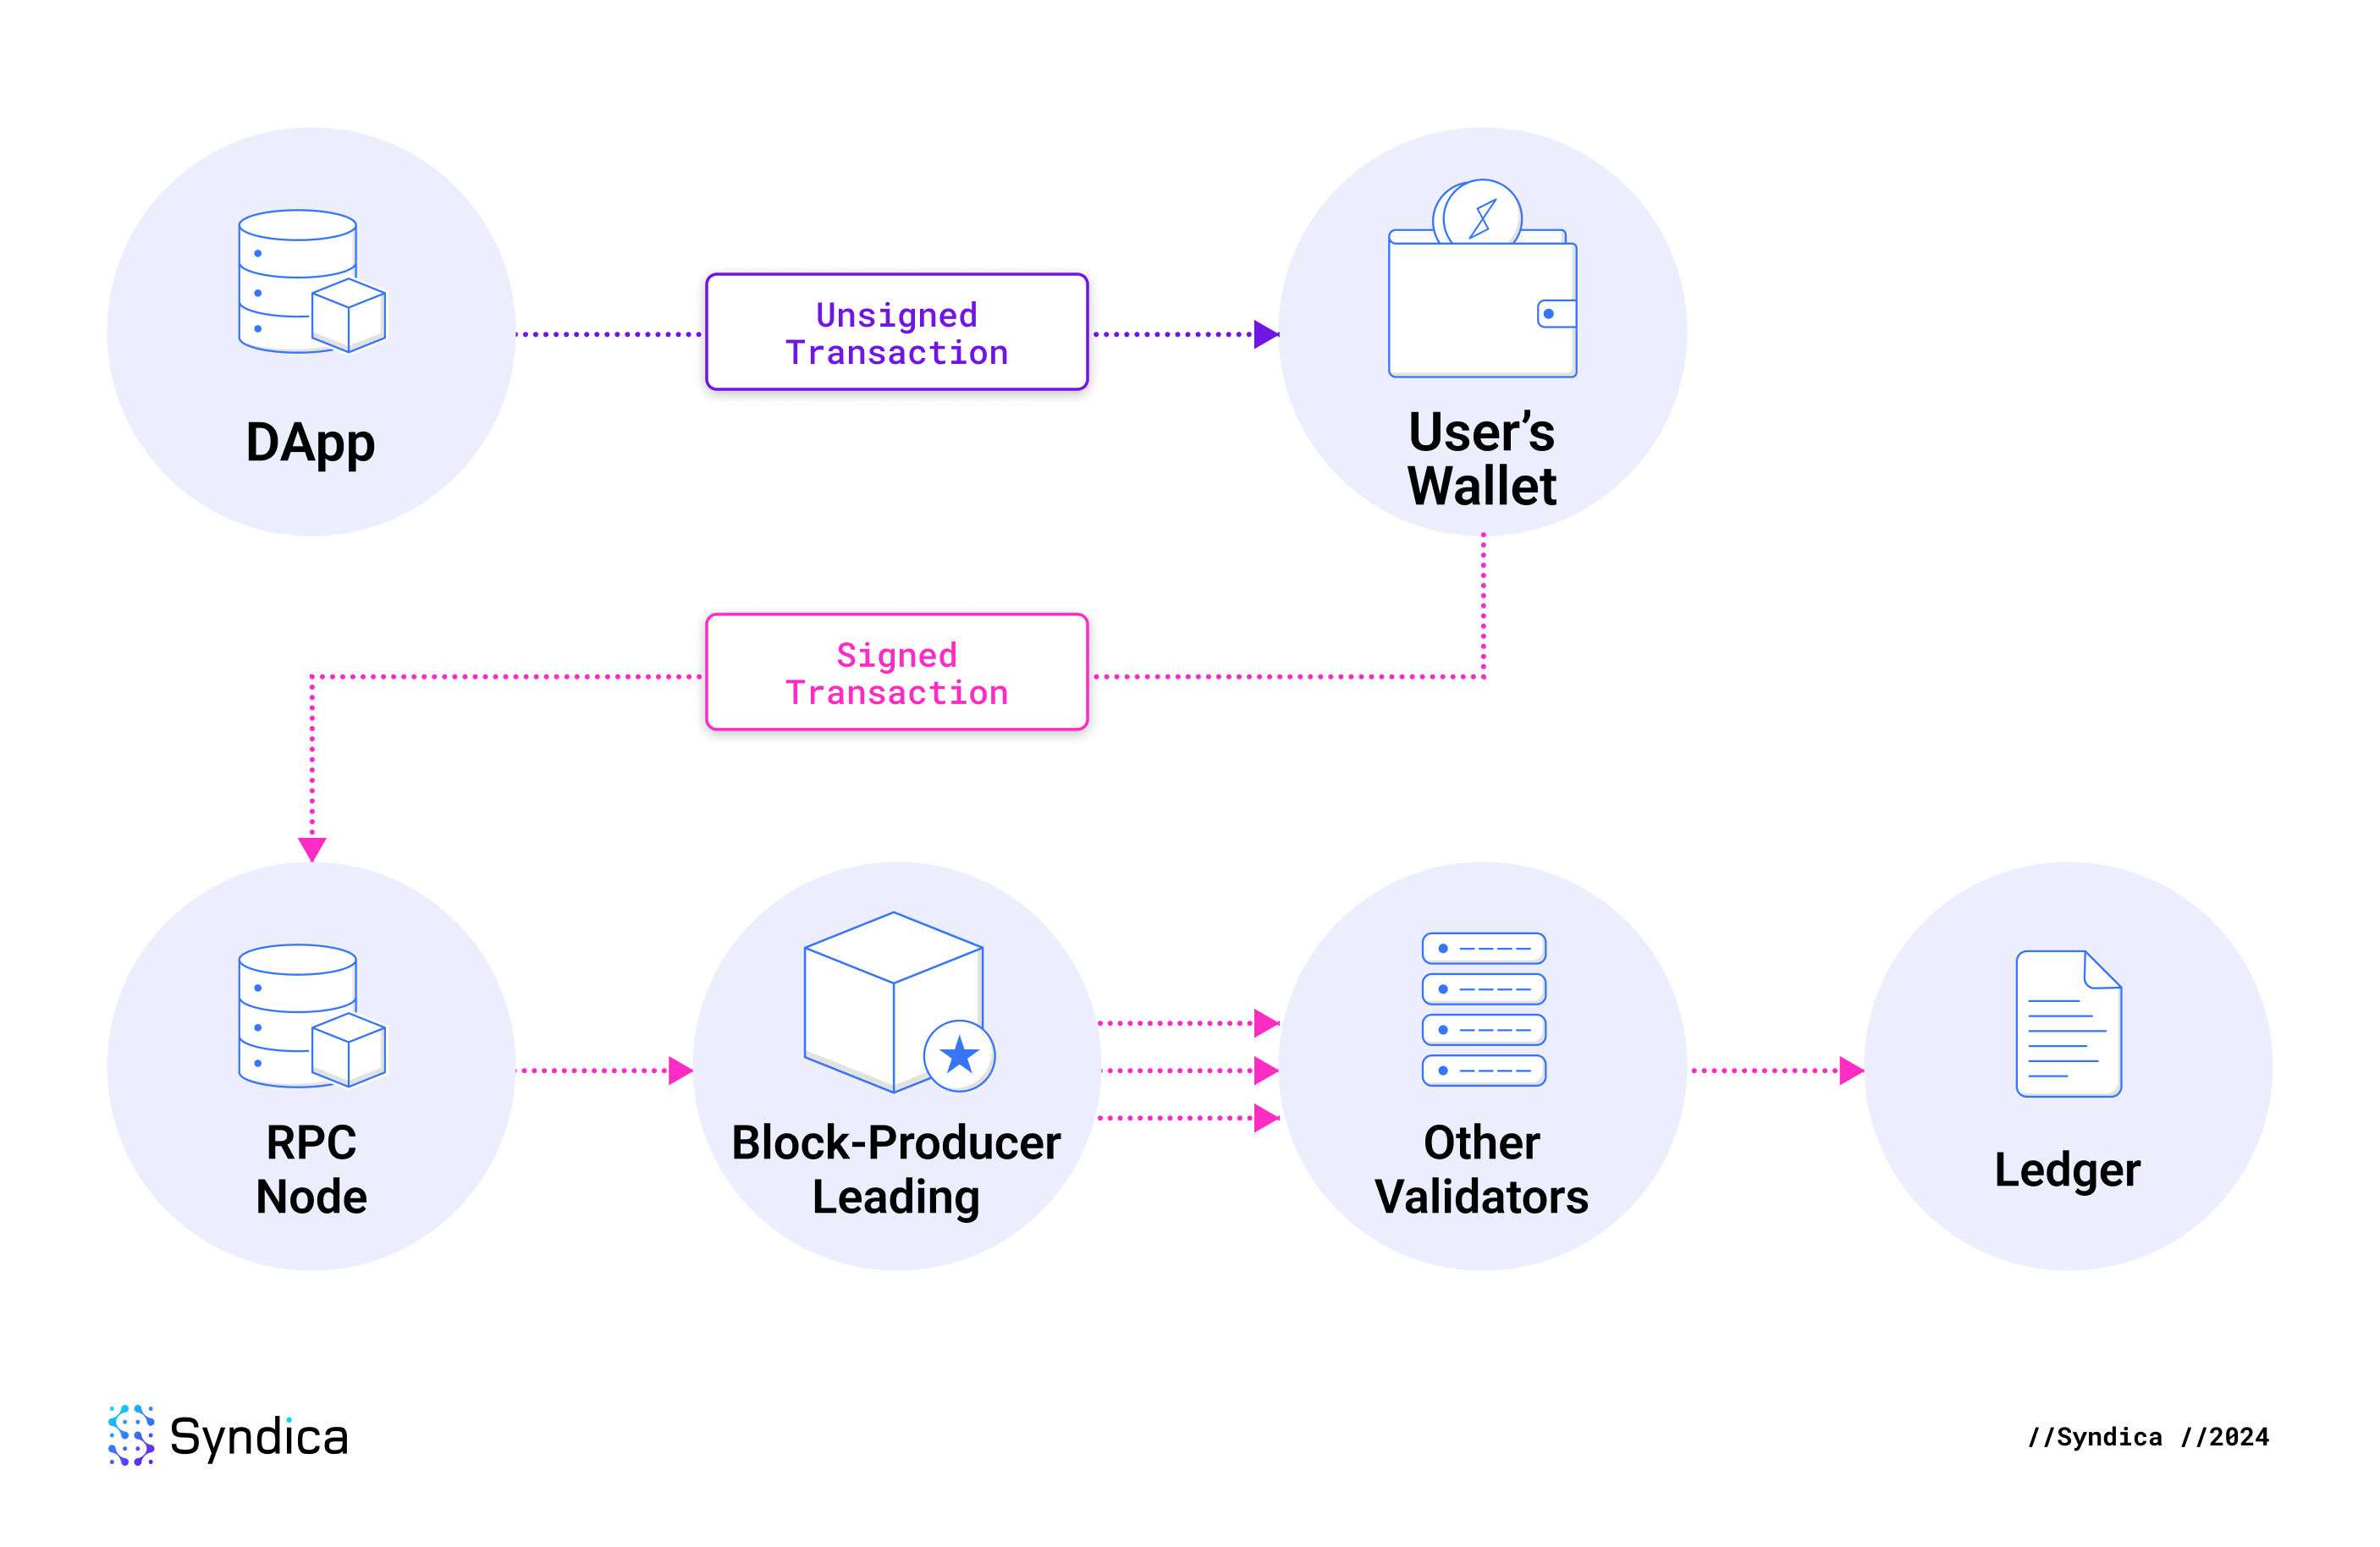
Other validators receive the block and store it in their ledgers. They execute the transactions in the block to verify their validity in a process known as replay. If two-thirds of validators agree on the outcome, the block is finalized, and the state changes become permanent. Otherwise, the block is discarded.
Users can track their transactions on platforms like Solscan using the transaction signature. The platform queries an RPC node using getTransaction, and the RPC node looks up the transaction in its ledger. Validators eventually delete old transactions to save space since the entire ledger is already hundreds of terabytes, as of the date of this writing. Once an epoch is completed, a separate application called Old Faithful archives it on Filecoin, where the entire ledger is publicly accessible and stored permanently.
Blocks
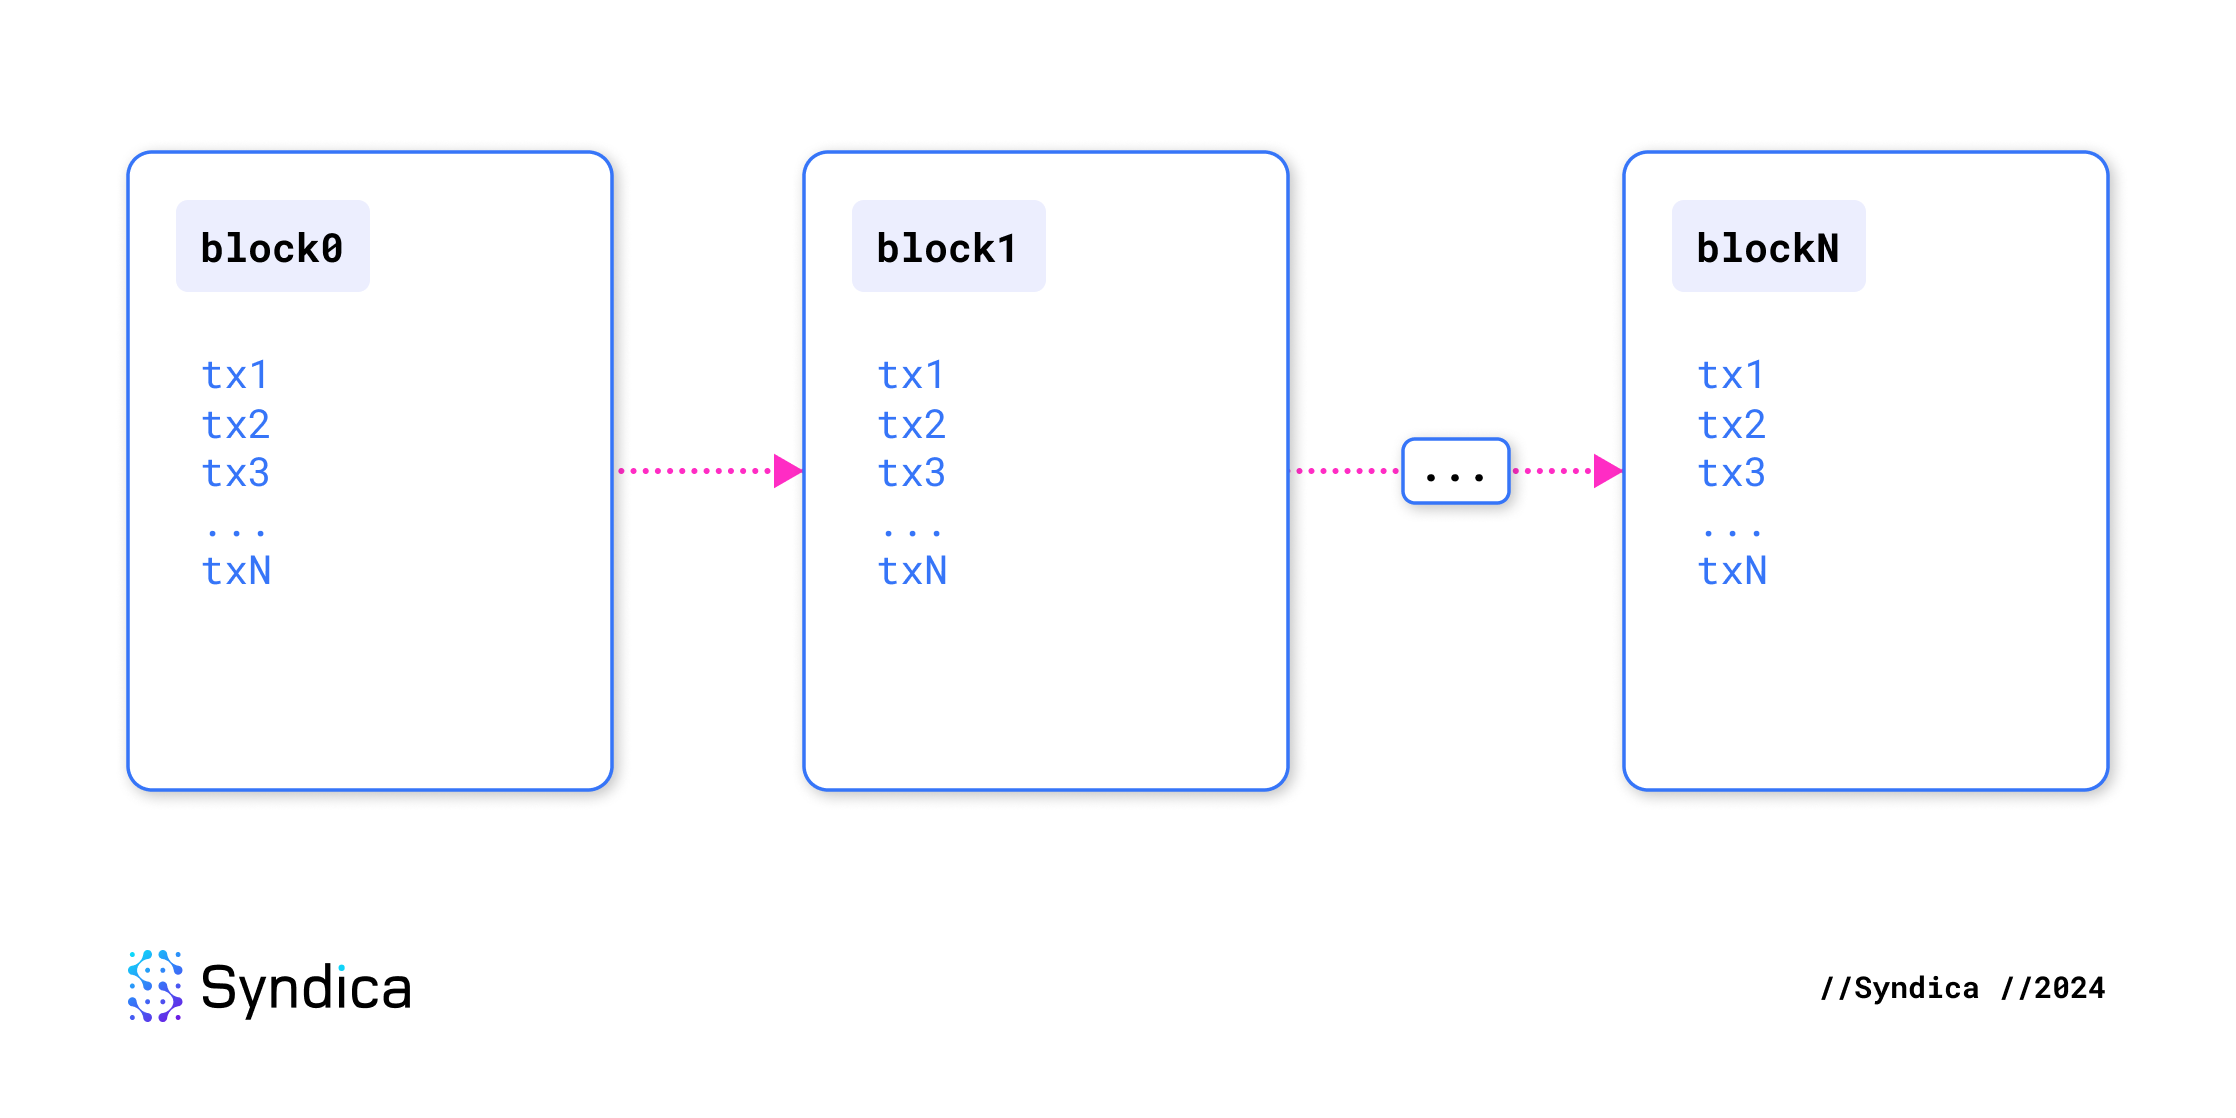
A blockchain ledger is a sequence of blocks, with each block containing a sequence of transactions. So a blockchain is essentially just a sequence of transactions. Initially, the blockchain is empty, storing no information. Transactions progressively add or remove data, and their order is crucial for determining the state at any given time. It is not just a collection of blocks but an ordered sequence of instructions.
Like transactions, blocks are atomic: they are either accepted or rejected as a whole. If a leader proposes a block with even one incorrect transaction, the entire block is rejected.
Why do blocks exist?
Blocks group transactions to streamline consensus. Without blocks, reaching consensus on every transaction individually would overwhelm network bandwidth with an enormous number of votes. The high frequency would also lead to forking and likely halt the network.
To efficiently reach consensus on many transactions at once, we bundle all transactions from a set interval (400 ms in Solana) into a block. This reduces network demands and minimizes forking conditions, ensuring reliable operation.
How are blocks created?
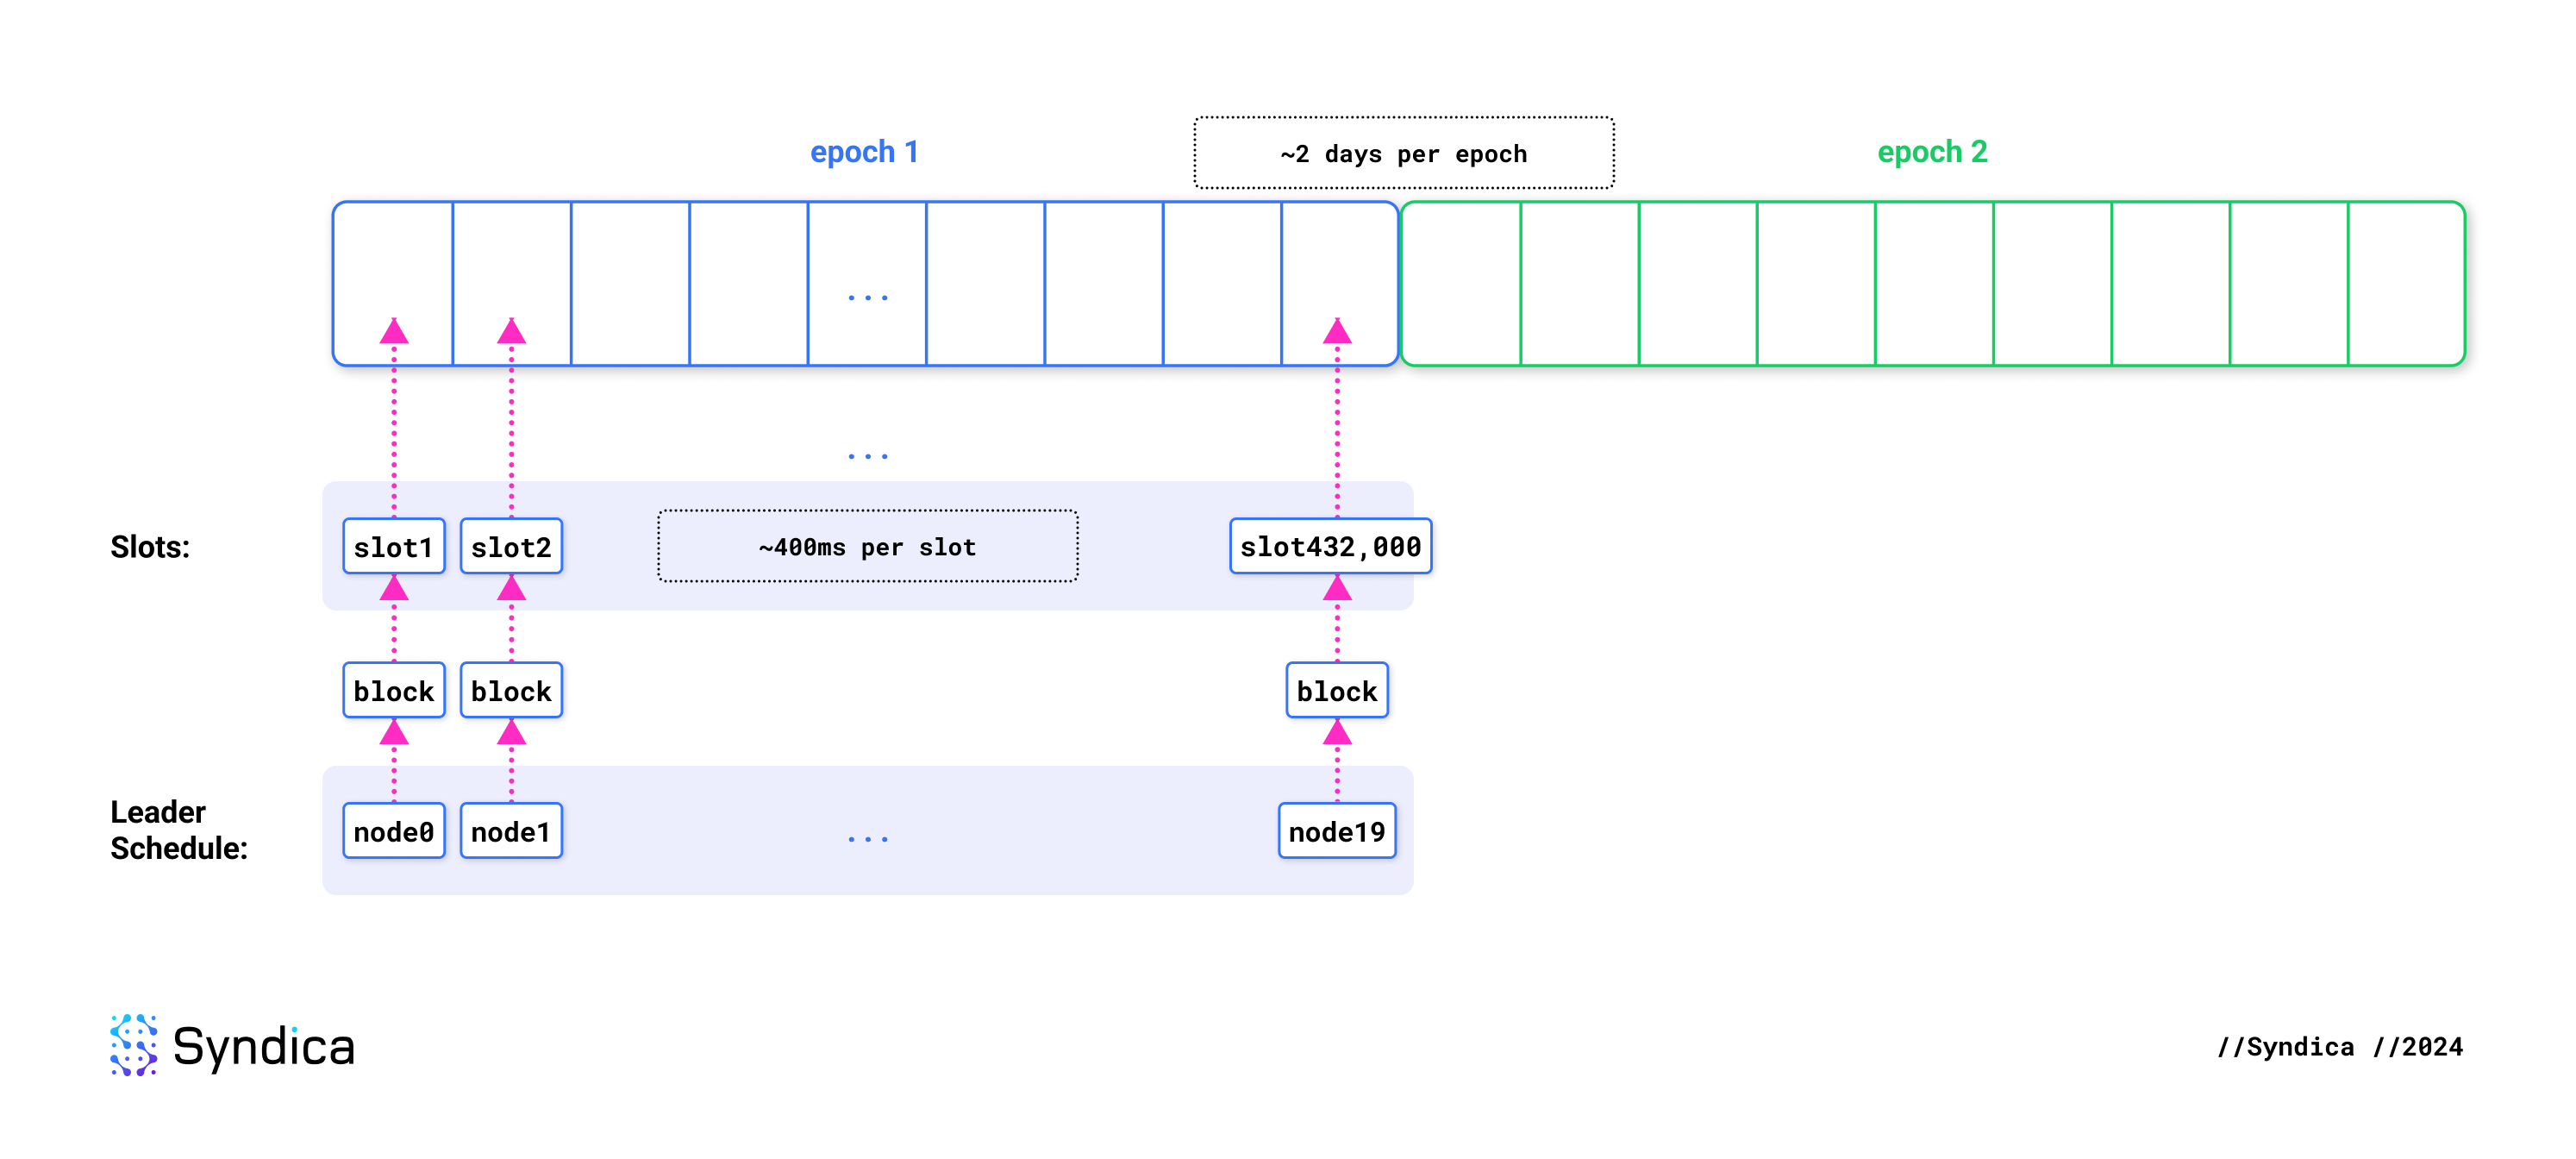
A slot is the unit of time during which exactly one block is expected to be produced. Each slot lasts about 400 ms. An epoch is a collection of 432,000 slots and lasts about two days.
At the start of each epoch, a leader schedule is generated, assigning slots to validators based on the size of their stake. When a validator is designated as the leader for a slot, it is responsible for producing that slot's block. When that slot arrives, all transactions are forwarded to that validator. It gathers and executes as many transactions as possible, arbitrarily deciding which ones to include and how to order them.
Propagating Blocks: Entries and Shreds
A unique aspect of Solana is how blocks have been optimized to reduce network latency during propagation. Blocks are divided into smaller pieces called entries, which are further broken down into shreds.
Traditional Block Production
Most blockchain systems produce blocks as single units. After a block is created, the next block producer must receive it, process it, and then build the next block on top of it. This leads to significant latency and performance bottlenecks because other nodes must wait to receive the entire block before processing any transactions.
Recall that blocks exist for consensus. They must occur far enough apart in time, or consensus fails. If blocks are produced too quickly, some nodes won’t have time to process them before the next block arrives. This would cause disagreement about which blocks exist, leading to forks. At best, forks are discarded, harming reliability and latency. At worst, consensus fails, halting the network.
Thus, a positive feedback mechanism emerges. Waiting for full blocks before producing the next one requires longer intervals, resulting in larger blocks and longer processing times, ultimately stabilizing at high block times.
Solana Block Production
Solana takes a different approach. In Solana, each node begins to process the transactions from a block before the block is fully produced. How is this possible?
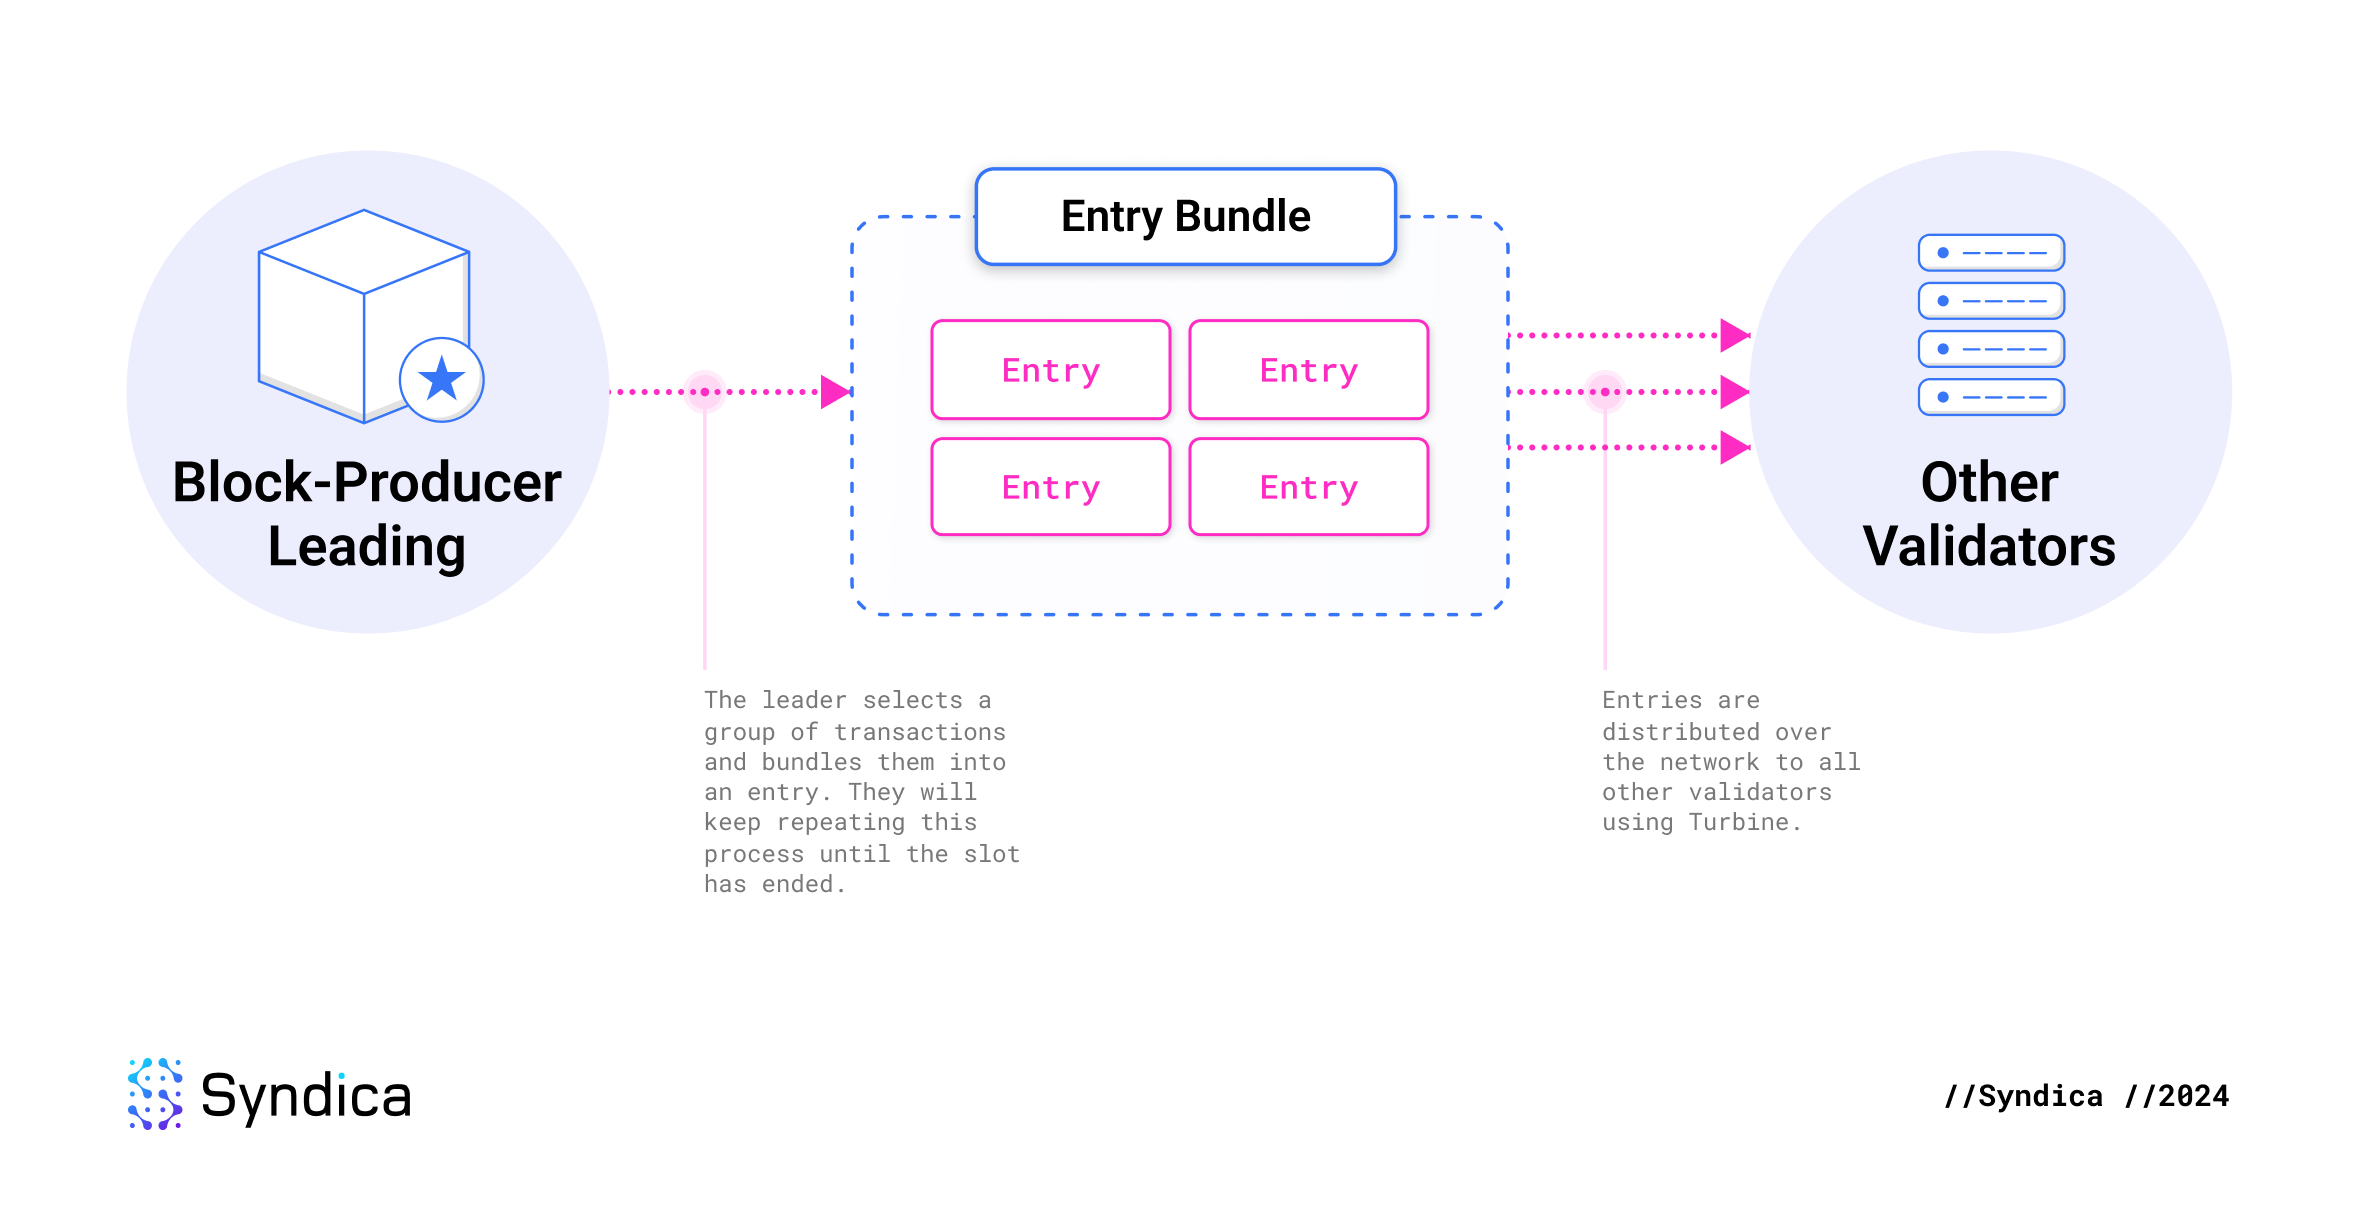
Solana's innovation is to continuously stream transactions from the leader as the block is being built. As the leader selects some transactions to include in its block, it immediately (before the block is complete) sends the transactions to the rest of the network. This bundle of transactions is called an entry. The "block" is then defined as the collection of all entries the leader produced during the slot.
This eliminates waiting periods during block production because other nodes have already processed the block by the time it is complete. The only delay is the network latency for the final packet, after which the next leader immediately starts streaming entries for the next block. This is an optimal solution and is only constrained by the physical limits of internet infrastructure.
Shred
To efficiently distribute entries over the network, they are broken into shreds. High performance is achieved by sizing the shreds similarly to network packets and using erasure coding to ensure reliable delivery.
After the leader generates a bundle of entries, it serializes them into a single large blob of data and then divides it into smaller fragments called shreds.
Each of these fragments becomes a data shred. In case any data shreds are lost, redundant fragments of data called code shreds are derived from them ahead of time using erasure coding. This is a form of error correction, enabling computational recovery of missing shreds.
An erasure set is the collection of all the data shreds and code shreds generated from a bundle of entries. Its maximum size is 32 data shreds and 32 code shreds.
This pseudocode illustrates the process of creating an erasure set from a group of entries.
entry_bundle = [entry1, entry2, entry3]

# convert entries into data fragments
entry_blob = bincode.serialize(entry_bundle)
data_fragments = entry_blob.split_into_chunks(chunk_size=1000)

# get erasure codes from data fragments
code_fragments = reed_solomon_encode(data_fragments)

# convert fragments into shreds
data_shreds = [DataShred(fragment) for fragment in data_fragments]
code_shreds = [CodeShred(fragment) for fragment in code_fragments]

erasure_set = data_shreds + code_shreds
Shred Propagation and Size
Every network has a maximum number of bytes that can be transmitted as a single cohesive unit. In most networks, that limit is at least 1232 bytes. If a message exceeds the limit, it must be divided into smaller packets and transmitted separately.
We do not want shreds to be divided into smaller pieces. If they are, it increases the probability of data loss. To avoid fragmentation, shreds are sized to fit within this 1232-byte limit. 4 bytes are reserved for a nonce, so shreds have a maximum size of 1228 bytes.
The fixed size of shreds also enables validator clients to make assumptions about memory usage, improving performance.
Erasure Coding
Erasure coding is a form of error correction used in Solana that enables recipients to recover every data shred, even if some were corrupted or lost during transmission. This is achieved by including redundant information in the shreds.
While transmitting redundant data requires extra time and bandwidth, redundancy is necessary to deal with packet loss. Erasure coding is the most efficient form of redundancy, making it a valuable performance optimization.
Imagine we had a perfect network that always transmitted every message. Each node could rely on a single assigned peer to send each data packet exactly once. This protocol avoids redundant transmission, maximizing bandwidth efficiency, but it would not work on real networks. Data loss is inevitable due to dropped packets or nodes going down. To ensure all nodes receive complete data, we need a mechanism to ensure every node receives every message.
There are three potential solutions to address this issue:
- Repair Requests: When a node is missing data, it requests the data from other nodes. This adds significant latency due to the extra communication. The node must detect the missing packet, send a request, and wait again. It is especially problematic if the packet was lost when first sent by the leader because it would flood the network with unserviceable requests.
- Redundant Messaging: Each node receives multiple copies of every packet from different peers. With 2x redundancy, each packet is expected to arrive from at least two peers. If you lose half of the packets, you'd hope to lose only one copy of each packet and receive the other. Unfortunately, in most cases, you’ll lose both copies of some packets, which means the full message cannot be recovered.
- Erasure Coding: Redundancy is evenly distributed throughout all packets using the Reed-Solomon algorithm explained below, eliminating the need for multiple transmissions of the same packet. With 2x redundancy, you can lose any half of the messages, and successful recovery is guaranteed. This vastly increases success rates compared to redundant messaging, meaning significantly fewer messages must be sent.
Erasure coding is the most effective solution. It maximizes reliability while minimizing latency and bandwidth usage compared to repair requests and redundant messaging.
Reed-Solomon
How does erasure coding work? The general idea is simple. Each message contains redundant information that tells you how to reconstruct the other messages. Doing this efficiently requires some clever math.
Consider a naive approach. Suppose we have ten messages of 10 KB each. We can divide each message into nine chunks and distribute these chunks into all the other messages as redundancy. Each message grows to 19 KB. This allows us to lose any message and reconstruct it from the others. But this erasure coding scheme has a big drawback: we've increased the data size by 90% but only protect against 10% data loss, which is extremely inefficient. Protecting against 10% data loss should only require 10% extra data.
Reed-Solomon erasure coding does this by leveraging the mathematical relationships between messages. To protect against a single message loss, we don't change the size of any messages. We only need to add a single extra message called a code message. The code message doesn't need to copy all the other data. It only describes the relationships between the other messages, allowing us to reconstruct any missing message from the others.
If this sounds too mysterious, we'll need to dive into the math to understand it.
Since every message is a binary number, you can reinterpret each message as a data point. You can fit a polynomial to these data points based on the Lagrange Interpolation Theorem, which states that a polynomial of degree k is uniquely determined by k+1 points, as depicted below.
Using the polynomial as a function, you can calculate n extra points on the curve for redundancy. This adds a safety net. If you lose any data points, as long as you don't lose more than n of them, you can use the remaining points to reconstruct the original polynomial. Once you have the polynomial, you can recalculate any missing data points by evaluating them at the appropriate positions.
For a more detailed and approachable explanation of these mathematical concepts, check out this video:
What are Reed-Solomon Codes?
Data Shreds and Code Shreds
Erasure Coding is applied when transmitting shreds. How does this work?
First, the leader takes a collection of recently produced entries and groups them into a batch that will be sent together. This is called an erasure set because Reed-Solomon erasure codes will be generated for the batch as a whole. These entries are only a portion of a block, and many erasure sets can be created during a single slot.
The entries are serialized and merged into a single continuous blob of data, then split into chunks of, at most, 1003 bytes. In the erasure coding scheme, these chunks are known as data fragments. They contain the actual data that we care about, and when combined with metadata, these fragments become data shreds.
For identification, each data shred in the erasure set is assigned a unique integer from 0 to the number of data shreds. This number is called the shred index.
The leader’s next step is to generate erasure codes, but how many are needed? This depends on the number of data shreds. For each number of data shreds from 0 to 32, the expected number of code shreds is specified in Agave’s code here.
Assuming each shred’s probability of success is independent of the others, the probability of recovering an entire erasure set follows a binomial distribution. Each erasure set–and its probability of success–can be found in this table. As long as the successful shred delivery rate is above 65%, every erasure set has at least a 99% chance of recovery. The smaller erasure sets have higher probabilities of recovery than the larger sets.
We use the Reed-Solomon algorithm to generate the erasure codes. To interpret a shred as a data point, its shred index determines the point’s x-value and its fragment becomes the point’s y-value.
Extra points on the curve are calculated and become code shreds, which are distributed to the other nodes alongside data shreds. Like data shreds, each code shred from the erasure set is numbered with a shred index, from 0 to the number of code shreds.

Later on, when a validator receives only a subset of the shreds, it runs the same process in reverse. First, identify which shreds are missing based on the shred indices. Then, use Lagrange interpolation to fit a polynomial, and calculate the points on the curve corresponding to the missing data shreds. By combining the data shreds and deserializing them, the validator can reconstruct the original entries created by the leader.
Data Integrity
Shreds also need to ensure the data integrity of the erasure set. We need the following guarantees:
- The shreds received by a validator are the same shreds the leader produced.
- Each shred correctly specifies the total number of shreds in its erasure set.
- Each shred that claims to be part of an erasure set actually belongs in that set.
If these are guaranteed, any validator receiving shreds can determine conclusively whether they've received a complete and correct erasure set. Without these guarantees, various issues can corrupt the cluster:
- A malicious actor could modify a shred to contain their desired transactions.
- The network might accidentally modify the data during transmission due to hardware failures.
- The leader might lie about the number of shreds they created, and distribute different shreds to each validator, causing confusion or disagreement about which shreds are supposed to constitute an erasure set.
To solve these problems, shreds contain Merkle proofs and cryptographic signatures.
Each shred includes a Merkle proof, a cryptographic method for verifying that a specific piece of data belongs to a larger data set.
This is accomplished using a Merkle tree, a structure in which every piece of data (or shred) is hashed individually. These hashes are then paired and hashed together recursively, forming a hierarchical tree of hashes. The top hash of this tree is called the Merkle root.
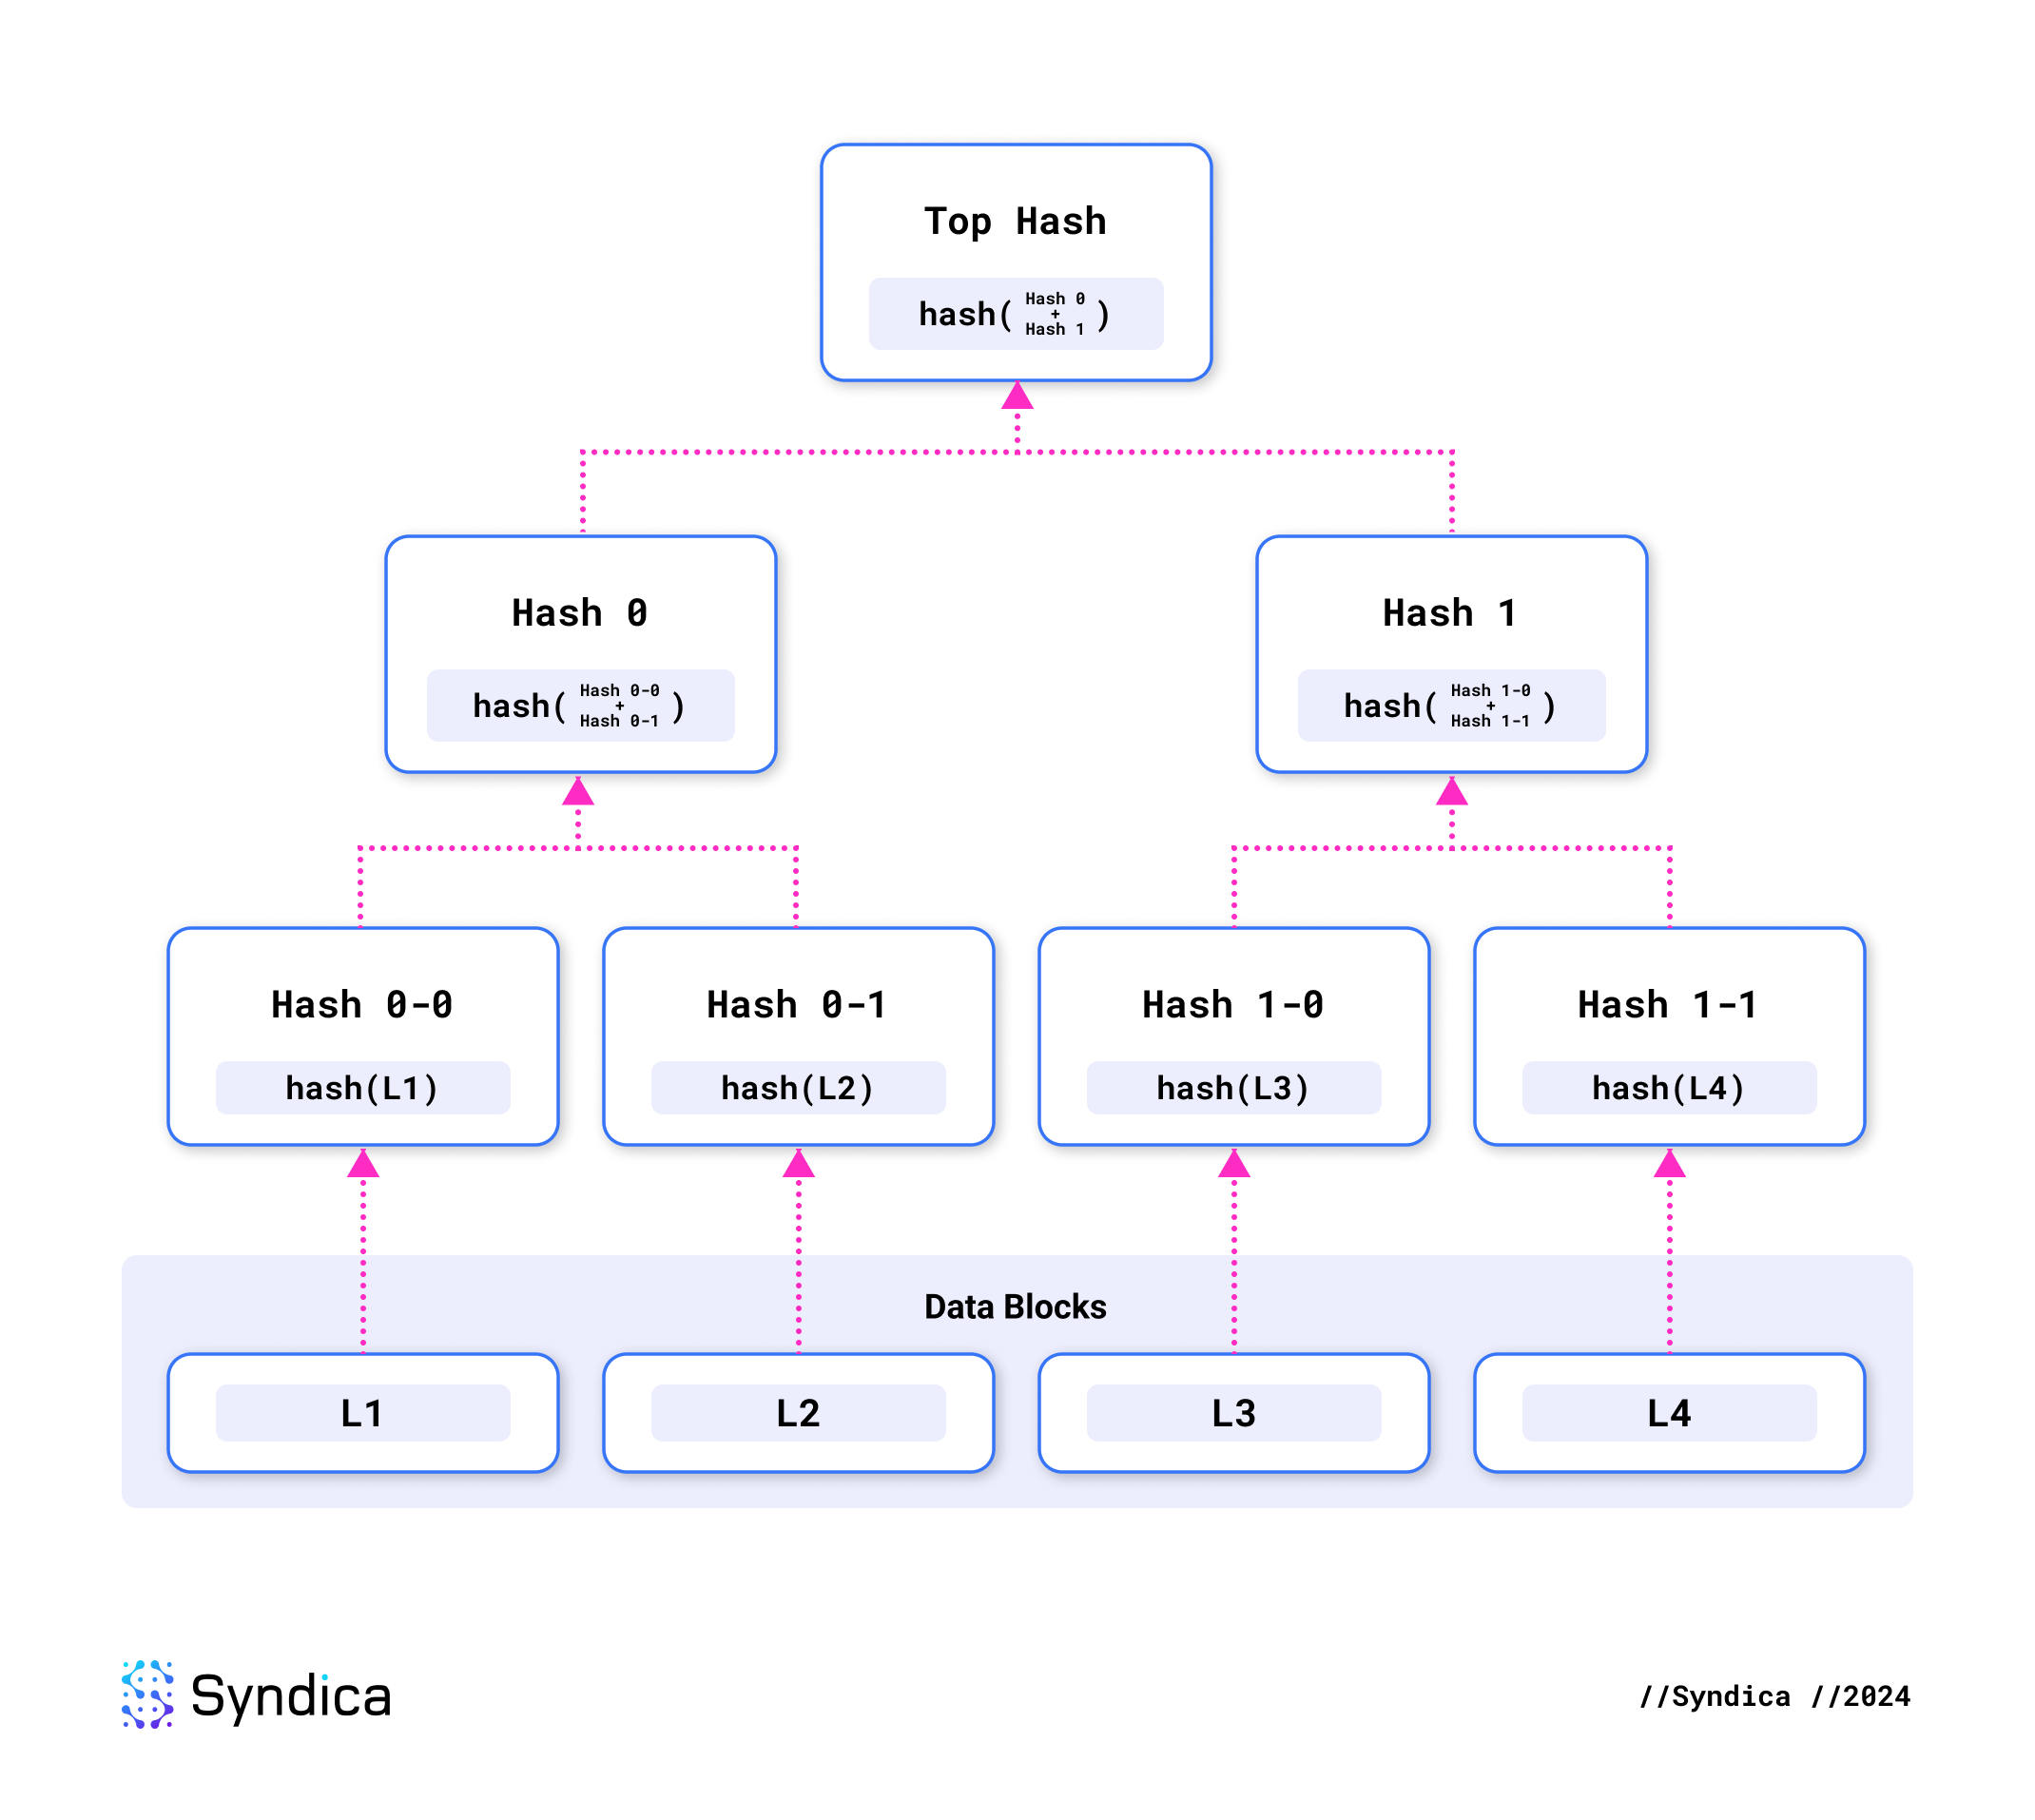
A Merkle proof contains only the necessary hashes along the path from the individual shred’s hash up to the Merkle root. For example, a Merkle proof for L4 need only contain the hashes 0 and 1-0. With L4 and those two hashes, you can reproduce the Merkle root by recursively hashing three times.
This allows verification of two things. First, we can verify that the data within the current shred is correct by reproducing its hash. Second, we can confirm that this shred is part of the overall erasure set by verifying the path to the Merkle root.
The leader signs each erasure set’s Merkle root, and the signature is included in every shred from that erasure set. Each validator knows the public key for each leader, so they validate the signature for every shred as soon as they receive it. This guarantees that the shred came from the leader.
Any shreds received with an invalid signature or Merkle proof are discarded.
Blockstore
Validators need a way to store, read, and write data to their ledger. To do this, they store it in a database called the Blockstore.
The three types of operation supported by the Blockstore are:
- Inserting shreds.
- Reading data.
- Inserting transaction results.
Inserting Shreds
As the validator runs, it constantly receives shreds from the cluster, which need to be inserted into the Blockstore.
After receiving a new shred, the first step is to validate its signature, the Merkle proof, and erasure set metadata. Some metadata is stored in the Blockstore to verify that future shreds are consistent with the shreds we’re storing now.
The next step is to execute shred recovery using Reed-Solomon erasure coding. After identifying the erasure set that the shred is a part of, if enough shreds are present, we read the other shreds of the same erasure set from the Blockstore. Then, we reconstruct the missing shreds using Reed-Solomon.
Last, all received and recovered shreds are stored in the Blockstore as a sequence ordered from the earliest to the latest.
After insertion, recovered shreds are forwarded to other nodes via Turbine.
Reading Data
The next operation is reading blocks or transactions from the Blockstore. This is used during replay, for example, when transactions need to be executed.
Some of the data types that can be read from the Blockstore include:
- Shred
- Entry
- Block
- Transaction
- Transaction Status
- Block Rewards
- Block Time
While all these data types can be read from the Blockstore, most data is stored in shreds. Transactions, entries, and blocks are not stored separately because they would be redundant with shreds.
A common operation is reading a transaction from the Blockstore. Instead of reading the transaction directly, the Blockstore figures out which collection of shreds is expected to contain that transaction, locates those shreds, converts them to entries, and then finds the transaction within them.
Inserting Transaction Results
After transactions are stored in the Blockstore as shreds, the validator must execute them. The leader executes the transactions and stores the results during the banking stage of block production. Other validators execute transactions during the replay stage of transaction validation. During replay, the validator first reads the full erasure set out of the Blockstore, and then executes every transaction in it.
Executing a transaction results in a transaction status, which includes information like whether the transaction succeeded and which accounts were modified. Once a whole block is completed, several more outputs are produced, such as the block rewards for the leader and the time the block was generated. After these outputs are produced in the replay and banking stages, the data is written to the Blockstore.
Complete Flow
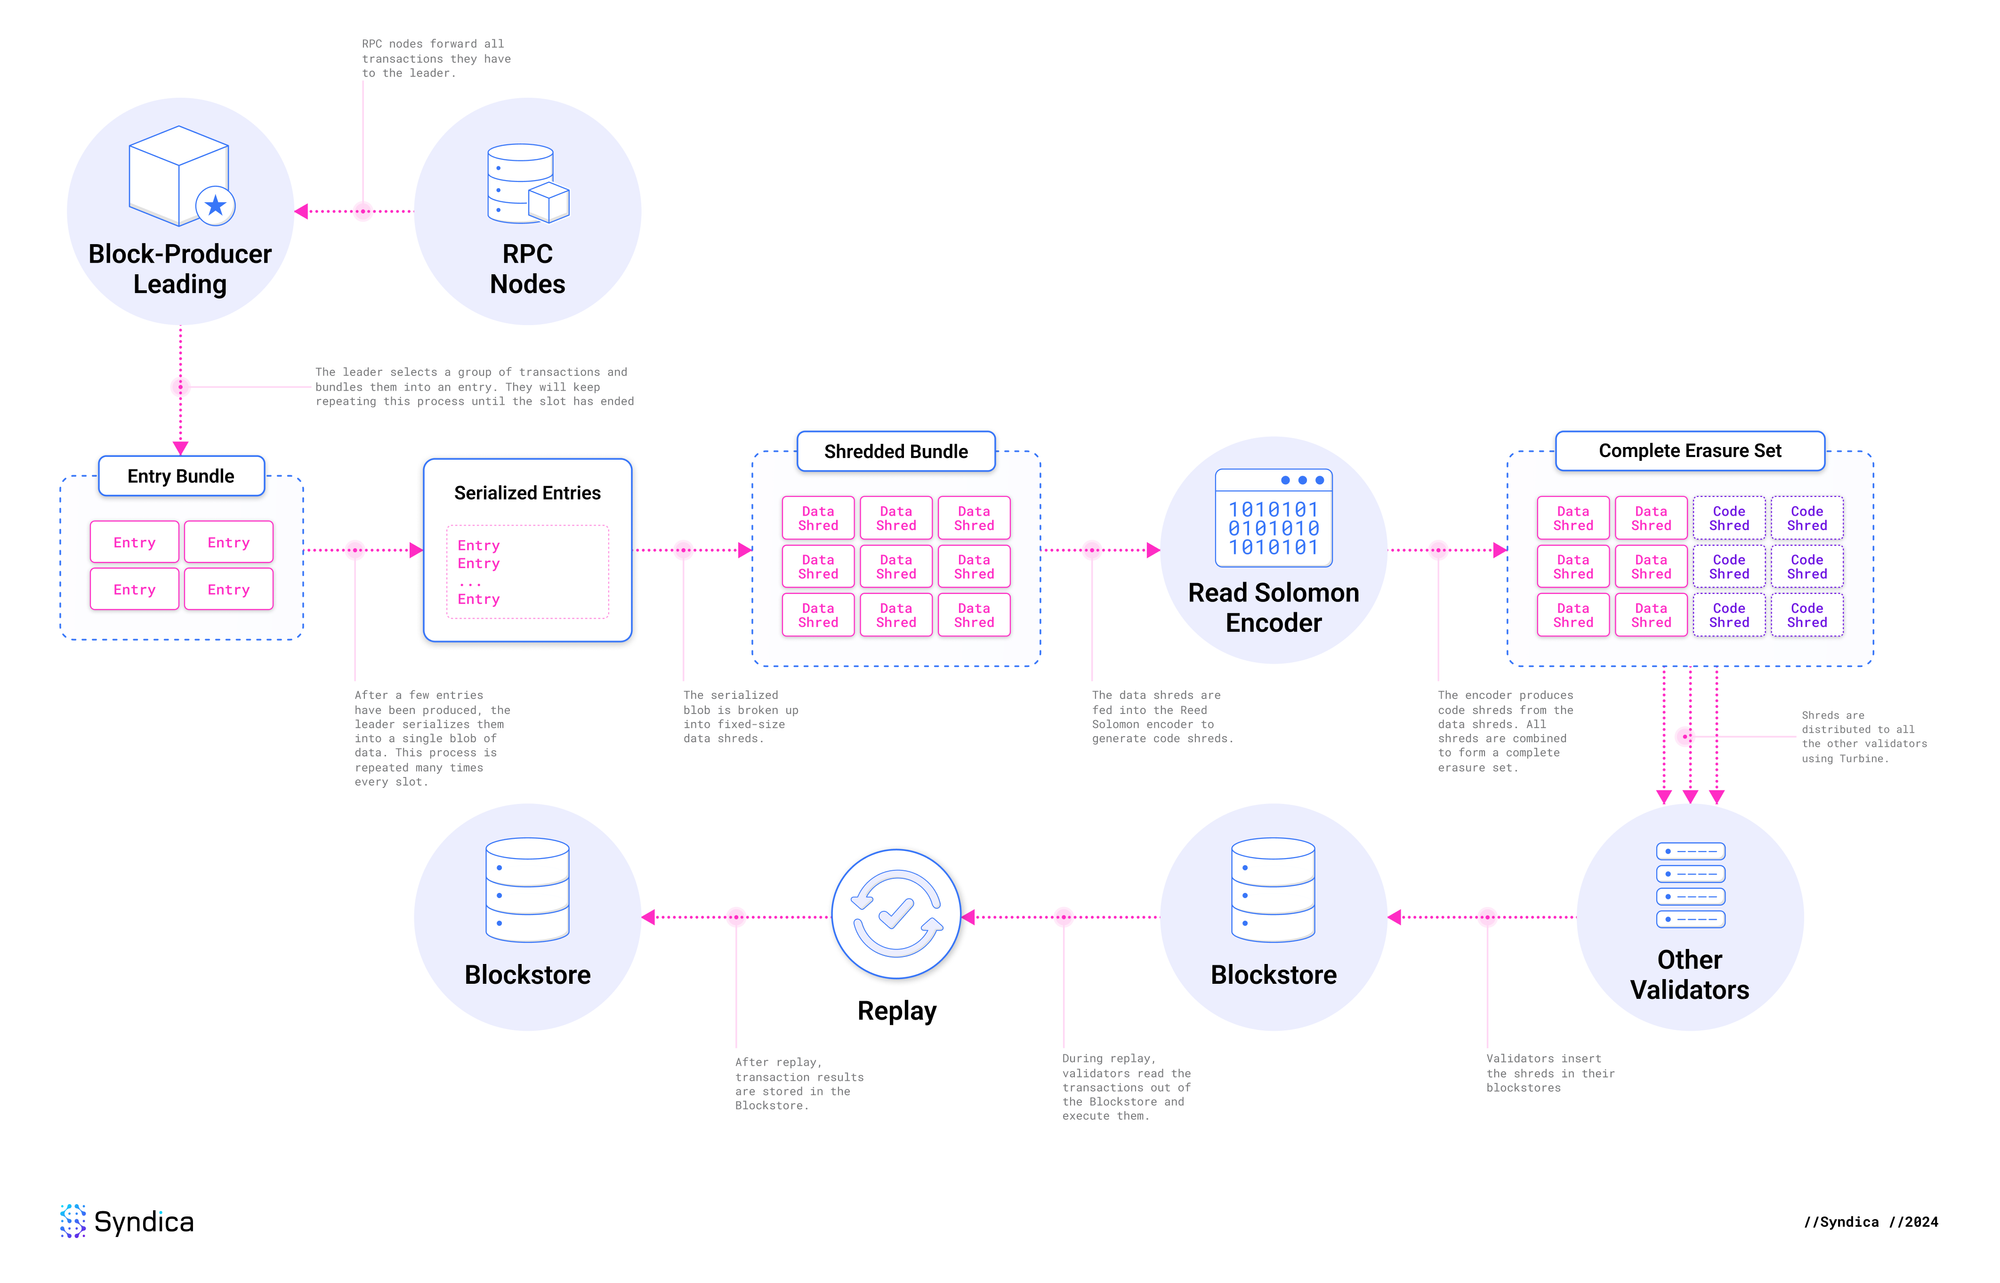
This diagram illustrates the complete flow we’ve described, from the time an RPC node first receives the transaction, until the transaction status is stored in the Blockstore.
Conclusion
The Solana ledger is a sophisticated system that combines erasure coding with cryptography to achieve speed, scalability, and resilience. It forms the backbone of Solana’s blockchain, enabling validators to process, store, and share transaction data efficiently.
In our next post, we’ll take these foundational concepts and show how they come together in the Sig validator. We’ll explore the specific design and implementation of Sig’s ledger, highlighting the engineering decisions that make it modular, flexible, and performant. Stay tuned for the next post. Follow us on Twitter to be the first to know when it goes live.

